ASRock 845GV-M driver and firmware
Related ASRock 845GV-M Manual Pages
Download the free PDF manual for ASRock 845GV-M and other ASRock manuals at ManualOwl.com
User Manual - Page 3

...1.3 Supported AGP VGA Cards List 7 1.4 Motherboard Layout 9 1.5 I/O Panal 10
2 Installation 11
Pre-installation Precautions 11 2.1 CPU Installation 12 2.2 Installation of CPU fan and Heatsink 12 2.3 Installation of Memory Modules (DIMM 13 2.4 Expansion Slots (PCI, AMR, and AGI 8X Slots 14 2.5 Easy Dual Monitor Feature 15 2.6 Jumpers Setup 15 2.7 Onboard Headers and Connectors 16
3 BIOS...
User Manual - Page 5
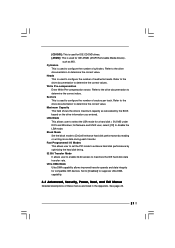
... / mouse RJ 45 4 default USB 2.0 ports 1 VGA port 1 serial port: COM1; 1 parallel port: ECP/EPP support Audio Jack: Line Out / Line In / Microphone AMI legal BIOS Supports "Plug and Play" ACPI 1.1 compliance wake up events Supports jumperfree SMBIOS 2.3.1 support CPU frequency stepless control (only for advanced users' reference, see CAUTION 7) Microsoft® Windows® 98SE / ME / 2000...
User Manual - Page 6
... VGA card, please refer to the installation guide on page 14.
6. Power Management for USB 2.0 works fine under Microsoft® Windows® XP SP1/2000 SP4. It may not work properly under Microsoft® Windows® 98/ME. Please refer to Microsoft® official document at http://www.microsoft.com/whdc/hwdev/bus/USB/USB2support.mspx
7. Although this motherboard offers stepless control...
User Manual - Page 11
... ATX form factor (9.6-in x 8.2-in, 24.4 cm x 20.8 cm) motherboard. Before you install the motherboard, study the configuration of your chassis to ensure that the motherboard fits into it.
Pre-installation Precautions
Take note of the following precautions before you install motherboard components or change any motherboard settings. 1. Unplug the power cord from the wall socket before touching any...
User Manual - Page 12
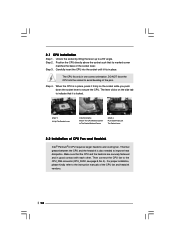
... is also needed to improve heat dissipation. Make sure that the CPU and the heatsink are securely fastened and in good contact with each other. Then connect the CPU fan to the CPU_FAN connector (CPU_FAN1, see page 9, No. 5). For proper installation, please kindly refer to the instruction manuals of the CPU fan and heatsink vendors.
12
User Manual - Page 13
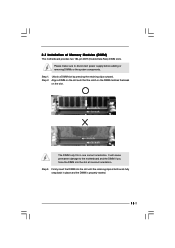
2.3 Installation of Memory Modules (DIMM)
This motherboard provides two 184-pin DDR (Double Data Rate) DIMM slots. Please make sure to disconnect power supply before adding or removing DIMMs or the system components....break
The DIMM only fits in one correct orientation. It will cause permanent damage to the motherboard and the DIMM if you force the DIMM into the slot at incorrect orientation. Step ...
User Manual - Page 14
... VGA card, the system will automatically set the onboard VGA as the primary graphics adapter. In that case, if you want to install the add-on AGP VGA card, you need to remove the onboard VGA driver first, and then install the add-on AGP VGA card and its driver. For the detailed instruction, please refer to the documents in the Support CD, "AGI Slot Installation Guide (for Windows...
User Manual - Page 15
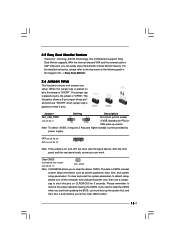
... AGI 8X Technology, this motherboard supports Easy Dual Monitor upgrade. With the internal onboard VGA and the external add-on AGP VGA card, you can easily enjoy the benefits of Dual Monitor feature. For the detailed instruction, please refer to the document at the following path in the Support CD: ..\ Easy Dual Monitor
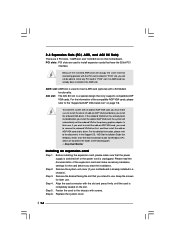
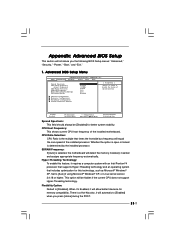
2.6 Jumpers Setup
The illustration shows how...
User Manual - Page 18
... with the following selections:
MAIN
Sets up the basic system configuration
ADVANCED
Sets up the advanced features
SECURITY
Sets up the security features
POWER
Configures Power Management features
BOOT
Configures the default system device that is used
to locate and load the Operating System
EXIT
Exits the current menu or the BIOS Setup
To access the menu bar items...
User Manual - Page 19
...a highlighted field Loads all the setup items to default value Saves changes and exits Setup
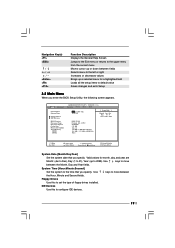
3.2 Main Menu
When you enter the BIOS Setup Utility, the following screen appears.
Main Advanced
System Date System Time
Floppy Drives IDE Devices
BIOS Version Processor Type Processor Speed Cache Size Microcode Update Total Memory
DDR1 DDR2
AMIBIOS SETUP UTILITY - VERSION 3.31a Security Power Boot Exit...
User Manual - Page 20
... already formatted on an older system, the BIOS Setup may detect incorrect parameters. In these cases, select [User] to manually enter the IDE hard disk drive parameters.
After entering the hard disk information into BIOS, use a disk utility, such as FDISK, to partition and format new IDE hard disk drives. This is necessary so that you can write or read...
User Manual - Page 21
... to determine the correct value. Maximum Capacity This field shows the drive's maximum capacity as calculated by the BIOS based on the drive information you entered. LBA Mode This allows user to select the LBA mode for a hard disk > 512 MB under DOS and Windows; for Netware and UNIX user, select [Off] to disable the...
User Manual - Page 22

... for more information.
4.2 Support CD Information
The Support CD that came with the motherboard contains necessary drivers and useful utilities that enhance the motherboard features.
4.2.1 Running The Support CD
To begin using the support CD, insert the CD into your CD-ROM drive. The CD automatically displays the Main Menu if "AUTORUN" is enabled in your computer. If the Main Menu...
User Manual - Page 23
... a computer system with an Intel Pentium®4 processor that supports Hyper-Threading technology and an operating system that includes optimization for this technology, such as Microsoft® Windows® XP. Set to [Auto] if using Microsoft® Windows® XP, or Linux kernel version 2.4.18 or higher. This option will be hidden if the current CPU does not support...
User Manual - Page 28
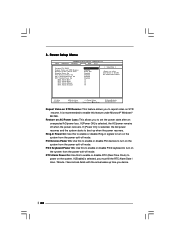
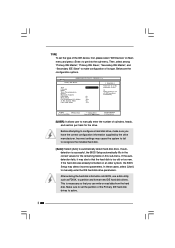
3. Power Setup Menu
Main Advanced
AMIBIOS SETUP UTILITY - VERSION 3.31a Security Power Boot Exit
Suspend To RAM Repost Video on STR Resume Restore on AC / Power Loss Ring-In Power On PCI Devices Power On PS / 2 keyboard Power On RTC Alarm Power On
RTC Alarm Date RTC Alarm Hour RTC Alarm Minute RTC Alarm Second
Disabled Disabled Power Off Disabled Disabled Disabled Disabled 15 12...