ASRock FM2A75M-DGS R2.0 driver and firmware
Drivers and firmware downloads for this ASRock item
Related ASRock FM2A75M-DGS R2.0 Manual Pages
Download the free PDF manual for ASRock FM2A75M-DGS R2.0 and other ASRock manuals at ManualOwl.com
Quick Installation Guide - Page 1
...business and the like), even if ASRock has been advised of the possibility of such damages arising from any defect or error in the guide or product.
This device complies with Part 15 of the ... see www.dtsc.ca.gov/hazardouswaste/perchlorate"
ASRock Website: http://www.asrock.com
Published December 2012 Copyright©2012 ASRock INC. All rights reserved.
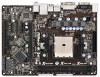
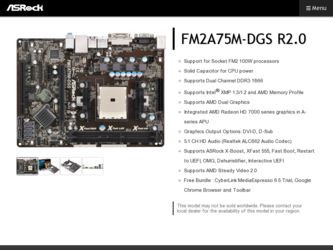
1 ASRock FM2A75M-DGS R2.0 Motherboard
English
Quick Installation Guide - Page 3

... "Speaker Configuration" to "Quadraphonic" or "Stereo". Click "Device advanced settings", choose "Make front and rear output devices playbacks two different audio streams simultaneously", and click "ok". Then reboot your system.
*** It is recommended to install the USB Keyboard/Mouse cable to USB 2.0 ports (USB01 or USB23) instead of USB 3.0 ports.
English
3 ASRock FM2A75M-DGS R2.0 Motherboard
Quick Installation Guide - Page 4
...) ASRock FM2A75M-DGS R2.0 Quick Installation Guide ASRock FM2A75M-DGS R2.0 Support CD 2 x Serial ATA (SATA) Data Cables (Optional) 1 x I/O Panel Shield
ASRock Reminds You... To get better performance in Windows® 8 / 8 64-bit / 7 / 7 64-bit / VistaTM / VistaTM 64 bit, it is recommended to set the BIOS option in Storage Configuration to AHCI mode.
4 ASRock FM2A75M-DGS R2.0 Motherboard
English
Quick Installation Guide - Page 6
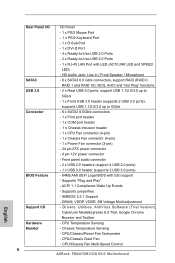
...VDDR, SB Voltage Multi-adjustment
English
Support CD
- Drivers, Utilities, AntiVirus Software (Trial Version),
CyberLink MediaEspresso 6.5 Trial, Google Chrome
Browser and Toolbar
Hardware
- CPU Temperature Sensing
Monitor
- Chassis Temperature Sensing
- CPU/Chassis/Power Fan Tachometer
- CPU/Chassis Quiet Fan
- CPU/Chassis Fan Multi-Speed Control
6 ASRock FM2A75M-DGS R2.0 Motherboard
Quick Installation Guide - Page 7
... 8 / 7 / VistaTM. For Windows® 64-bit OS with 64bit CPU, there is no such limitation. You can use ASRock XFast RAM to utilize the memory that Windows® cannot use.
3. For the discrete GPUs which support Dual Graphics technology, please refer to http://www.amd.com/us/products/technologies/ dual-graphics/Pages/dual-graphics.aspx#3 for details.
English
7 ASRock FM2A75M-DGS R2.0 Motherboard
Quick Installation Guide - Page 11
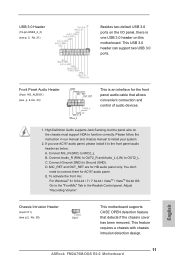
... two USB 3.0 ports.
Front Panel Audio Header
(9-pin HD_AUDIO1) (see p. 2, No. 23)
This is an interface for the front panel audio cable that allows convenient connection and control of audio devices.
1. High Definition Audio supports Jack Sensing, but the panel wire on the chassis must support HDA to function correctly. Please follow the instruction in our manual and chassis manual to install...
Quick Installation Guide - Page 14
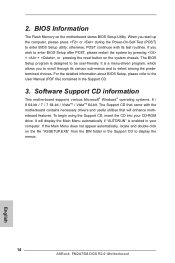
... using the Support CD, insert the CD into your CD-ROM drive. It will display the Main Menu automatically if "AUTORUN" is enabled in your computer. If the Main Menu does not appear automatically, locate and double-click on the file "ASSETUP.EXE" from the BIN folder in the Support CD to display the menus.
14 ASRock FM2A75M-DGS R2.0 Motherboard
English
Quick Installation Guide - Page 51

... Storage Configuration > SATA Mode. 3. Choose the item "UEFI:xxx" to boot in UEFI Setup Utility > Boot > Boot Option #1.
("xxx" is the device which contains your Windows® installation files. Normally it is an optical drive.) You can also press to launch boot menu at system POST and choose the item "UEFI:xxx" to boot. 4. Start Windows® installation.
51 ASRock FM2A75M-DGS R2.0 Motherboard...
Quick Installation Guide - Page 52
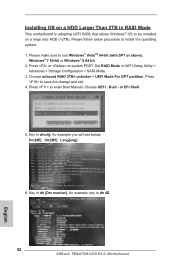
... BIOS that allows Windows® OS to be installed on a large size HDD (>2TB). Please follow below procedure to install the operating system. 1. Please make sure to use Windows® VistaTM 64-bit (with SP1 or above),
Windows® 7 64-bit or Windows® 8 64-bit. 2. Press or at system POST. Set RAID Mode in UEFI Setup Utility >
Advanced > Storage Configuration > SATA...
Quick Installation Guide - Page 53
... Storage Configuration > SATA Mode. 3. Choose the item "UEFI:xxx" to boot in UEFI Setup Utility > Boot > Boot Option #1.
("xxx" is the device which contains your Windows® installation files. Normally it is an optical drive.) You can also press to launch boot menu at system POST and choose the item "UEFI:xxx" to boot. 4. Start Windows® installation.
53 ASRock FM2A75M-DGS R2.0 Motherboard...
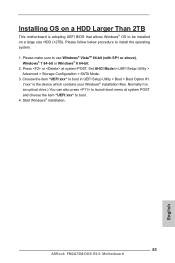
Quick Installation Guide - Page 54

... BIOS that allows Windows® OS to be installed on a large size HDD (>2TB). Please follow below procedure to install the operating system. 1. Please make sure to use Windows® VistaTM 64-bit (with SP1 or above),
Windows® 7 64-bit or Windows® 8 64-bit. 2. Press or at system POST. Set RAID Mode in UEFI Setup Utility >
Advanced > Storage Configuration > SATA...
Quick Installation Guide - Page 57
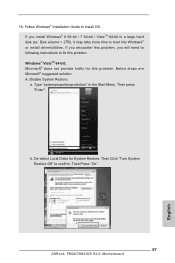
.... Windows® VistaTM 64-bit: Microsoft® does not provide hotfix for this problem. Below steps are Microsoft® suggested solution: A. Disable System Restore. a. Type "systempropertiesprotection" in the Start Menu. Then press "Enter".
b. De-select Local Disks for System Restore. Then Click "Turn System Restore Off" to confirm. Then Press "Ok".
57 ASRock FM2A75M-DGS R2.0 Motherboard...
Quick Installation Guide - Page 59

...://support.microsoft.com/kb/2505454/ B. After installing Windows® 8 64-bit / 7 64-bit, install the hotfix kb2505454.
(This may take long time; >30 mins.) C. Reboot your system. (It may take about 5 mins to boot.) D. The Windows® will install this hotfix then reboot by itself. E. Please start to install motherboard drivers and utilities. 17. Finish.
59 ASRock FM2A75M-DGS R2.0 Motherboard...
RAID Installation Guide - Page 1

AMD RAID Installation Guide
1. AMD BIOS RAID Installation Guide 3 1.1 Introduction to RAID 3 1.2 RAID Configurations Precautions 4 1.3 Installing Windows 8 / 8 64-bit / 7 / 7 64-bit / Vista / Vista 64-bit With RAID Functions ........ 5 1.4 Opening Option ROM 6 1.5 Using the Main Menu 7 1.6 Viewing Drive Assignments 8 1.7 Secure Erasing a Physical Drive 9 1.8 Creating a Logical Drive 11 1.9...
RAID Installation Guide - Page 2
2. AMD Windows RAID Installation Guide 19 2.1 Components of RAIDXpert Installation Software 19 2.2 Browser Support 19 2.3 Installing RAIDXpert 19 2.4 Logging into RAIDXpert 22 2.5 Regular Connection 22 2.6 Secure Connection 22 2.7 Creating a New Logical Drive 23 2.8 Connecting to RAIDXpert from the Internet 26 2.9 Running RAIDXpert without Network Connection 26
2
RAID Installation Guide - Page 3
... driver diskette, press or to enter BIOS setup to set the option to RAID mode by following the detailed instruction of the "User Manual" in our support CD or "Quick Installation Guide", then you can start to use the Option ROM to configure RAID.
1.1 Introduction to RAID
The term "RAID" stands for "Redundant Array of Independent Disks", which is a method combining two or more hard disk drives...
RAID Installation Guide - Page 5

... UEFI. A. Enter UEFI SETUP UTILITY → Advanced screen →Storage Configuration. B. Set the "SATA Mode" option to [RAID]. STEP 2: Set RAID configuration. Before you start to configure RAID function, you need to check this RAID installation guide for proper configuration. Please refer to the BIOS RAID installation guide part in this document for details. STEP 3: Install Windows 8 / 8 64-bit...
RAID Installation Guide - Page 19
... Guide
AMD Windows RAID Installation Guide is an instruction for you to configure RAID functions by using RAIDXpert RAID management software under Windows environment. The RAIDXpert software offers local and remote management and monitoring of all AMD SATA logical drives that exist anywhere on a network. Its browser-based GUI provides email notification of all major events/alarms, memory...
RAID Installation Guide - Page 20

... the "I accept the terms of the license agreement" option to proceed with installation. Then click the Next button to continue. Note: If you leave the "I do not accept..., the installation will quit when you click Next.
9. When the Choose Install Folder screen appears, make your selection of a folder for the RAIDXpert applications you are installing. For example, the Windows default folder...
RAID Installation Guide - Page 22
... Finish button.
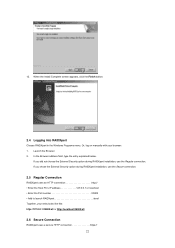
2.4 Logging into RAIDXpert
Choose RAIDXpert in the Windows Programs menu. Or, log on manually with your browser: 1. Launch the Browser. 2. In the Browser address field, type the entry explained below.
If you did not choose the External Security option during RAIDXpert installation, use the Regular connection. If you chose the External Security...