ASRock Fatal1ty Z68 Professional Gen3 driver and firmware
Drivers and firmware downloads for this ASRock item
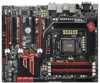

Related ASRock Fatal1ty Z68 Professional Gen3 Manual Pages
Download the free PDF manual for ASRock Fatal1ty Z68 Professional Gen3 and other ASRock manuals at ManualOwl.com
Intel Rapid Storage Guide - Page 12
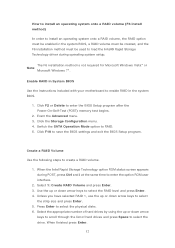
... to load the Intel® Rapid Storage Technology driver during operating system setup.
The F6 installation method is not required for Microsoft Windows Vista* or Note
Microsoft Windows 7*.
Enable RAID in System BIOS
Use the instructions included with your motherboard to enable RAID in the system BIOS.
1. Click F2 or Delete to enter the BIOS Setup program after the Power-On-Self-Test (POST) memory...
User Manual - Page 6
...75 3.4.4 Storage Configuration 76 3.4.5 Super IO Configuration 77 3.4.6 ACPI Configuration 78 3.4.7 USB Configuration 79 3.5 Hardware Health Event Monitoring Screen 80 3.6 Boot Screen 81 3.7 Security Screen 82 3.8 Exit Screen 83
4 Software Support 84
4.1 Install Operating System 84 4.2 Support CD Information 84
4.2.1 Running Support CD 84 4.2.2 Drivers Menu 84...
User Manual - Page 7
...cm)
ASRock Fatal1ty Z68 Professional Gen3 Series Quick Installation Guide ASRock Fatal1ty Z68 Professional Gen3 Series Support CD 1 x 80-conductor Ultra ATA 66/100/133 IDE Ribbon Cable 1 x Ribbon Cable for a 3.5-in Floppy Drive 6 x Serial ATA (SATA) Data Cables (Optional) 2 x Serial ATA (SATA) HDD Power Cables (Optional) 1 x 3.5mm Audio Cable (Optional) 1 x I/O Panel Shield 1 x Front USB 3.0 Panel...
User Manual - Page 13
... Flash ROM. This convenient BIOS update tool allows you to update system BIOS without entering operating systems first like MS-DOS or Windows®. With this utility, you can press key during the POST or press key to BIOS setup menu to access ASRock Instant Flash. Just launch this tool and save the new BIOS file to your USB flash drive...
User Manual - Page 25
... chassis with screws. Replace the system cover.
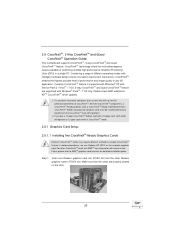
2.7 SLITM and Quad SLITM Operation Guide
This motherboard supports NVIDIA® SLITM and Quad SLITM (Scalable Link Interface) technology that allows you to install up to three identical PCI Express x16 graphics cards. Currently, NVIDIA® SLITM technology supports Windows® XP / XP 64-bit / VistaTM / VistaTM 64-bit / 7 / 7 64-bit...
User Manual - Page 29
...Windows® VistaTM / 7 OS only. Please check AMD website for ATITM CrossFireXTM driver updates.
1. If a customer incorrectly configures their system they will not see the performance benefits of CrossFireXTM. All three CrossFireXTM components, a CrossFireXTM Ready graphics card, a CrossFireXTM Ready motherboard and a CrossFireXTM Edition co-processor graphics card, must be installed...
User Manual - Page 33
....mspx B. You must have Microsoft .NET Framework installed prior to downloading and installing the CATALYST Control Center. Please check Microsoft website for details. For Windows® 7 / VistaTM OS: Install the CATALYST Control Center. Please check AMD website for details. Restart your computer. Install the VGA card drivers to your system, and restart your computer. Then you will find "ATI...
User Manual - Page 36
... the UEFI setup, the default value of "Onboard VGA Share Memory", [Auto], will disable VGA/D-Sub function when the add-on VGA card is inserted to this motherboard.
4. Install the onboard VGA driver and the add-on PCI Express VGA card driver to your system. If you have installed the drivers already, there is no need to install them again.
5. Set up a multi-monitor display.
For Windows® XP...
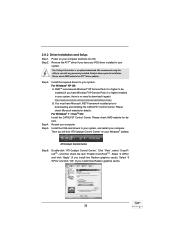
User Manual - Page 55
... the driver to install according to the mode you choose and the OS you install.
After the installation of Windows® XP / XP-64bit OS, if you want to manage RAID functions, you are allowed to use both "RAID Installation Guide" and "Intel Rapid Storage Information" for RAID configuration. Please refer to the document in the Support CD, "Guide to SATA Hard Disks Installation and RAID...
User Manual - Page 56
5. Finish the Windows® installation and install all necessary drivers. 6. Install the Intel(R) Rapid Storage software via the CD-ROM included with your
motherboard or after downloading it from the Internet. This will add the Intel(R) Rapid Storage Console which can be used to manage the RAID configuration. 7. After setting up a "RAID Ready" system as the above steps, you can follow the ...
User Manual - Page 64
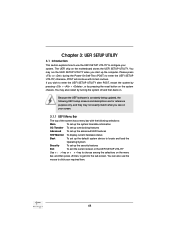
...Because the UEFI software is constantly being updated, the following UEFI setup screens and ...set up overclocking features
Advanced To set up the advanced UEFI features
H/W Monitor To display current hardware status
Boot
To set up the default system device to locate and load the
Operating System
Security
To set up the security features
Exit
To exit the current screen or the UEFI SETUP...
User Manual - Page 84
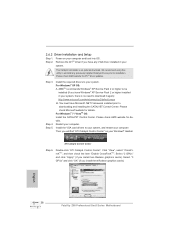
...-ROM drive. The CD automatically displays the Main Menu if "AUTORUN" is enabled in your computer. If the Main Menu did not appear automatically, locate and double click on the file "ASSETUP.EXE" from the BIN folder in the Support CD to display the menus.
4.2.2 Drivers Menu The Drivers Menu shows the available devices drivers if the system detects installed devices...
User Manual - Page 86

... plan to install the PCI Express graphics card for video output, please set the UEFI option "IGD Multi-Monitor" to [Disabled] to disable the onboard VGA in advance.
2. Intel® will update the new version Rapid Storage Technology driver in the near future. For the new version Rapid Storage Technology driver, please check our website for the latest information: http://www.asrock.com...
Quick Installation Guide - Page 7
... USB 3.0 Bracket 1 x ASRock SLI_Bridge_2S Card 1 x HDMI to DVI Adapter
ASRock Reminds You... To get better performance in Windows® 7 / 7 64-bit / VistaTM / VistaTM 64bit, it is recommended to set the BIOS option in Storage Configuration to AHCI mode. For the BIOS setup, please refer to the "User Manual" in our support CD for details.
7 Fatal1ty Z68 Professional Gen3 Series Motherboard...
Quick Installation Guide - Page 24
... card. For other CrossFireXTM cards that AMDTM has released or will release in the future, please refer to AMDTM graphics card manuals for detailed installation guide.
Step 1.
Insert one Radeon graphics card into PCIE2 slot and the other Radeon graphics card to PCIE4 slot. Make sure that the cards are properly seated on the slots.
English
24 Fatal1ty Z68 Professional Gen3 Series Motherboard
Quick Installation Guide - Page 28
...® taskbar.
ATI Catalyst Control Center
Step 6.
Double-click "ATI Catalyst Control Center". Click "View", select "CrossFireXTM", and then check the item "Enable CrossFireXTM". Select "2 GPUs" and click "Apply" (if you install two Radeon graphics cards). Select "3 GPUs" and click "OK" (if you install three Radeon graphics cards).
English
28 Fatal1ty Z68 Professional Gen3 Series Motherboard
Quick Installation Guide - Page 31
... the UEFI setup, the default value of "Onboard VGA Share Memory", [Auto], will disable VGA/D-Sub function when the add-on VGA card is inserted to this motherboard.
4. Install the onboard VGA driver and the add-on PCI Express VGA card driver to your system. If you have installed the drivers already, there is no need to install them again.
5. Set up a multi-monitor display.
For Windows® XP...
RAID Installation Guide - Page 7
...the driver to install according to the mode you choose and the OS you install.
After the installation of Windows® XP / XP-64bit OS, if you want to manage RAID functions, you are allowed to use both "RAID Installation Guide" and "Intel Rapid Storage Information" for RAID configuration. Please refer to the document in the Support CD, "Guide to SATA Hard Disks Installation and RAID Configuration...
RAID Installation Guide - Page 10

If you want to use "Intel Rapid Storage" in Windows® environment, please install "SATAII drivers" from the Support CD again so that "Intel Rapid Storage" will be installed to your system as well.
10
Lucid Virtu Installation Guide - Page 4
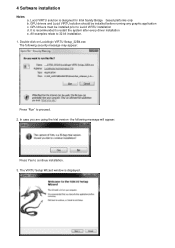
... recommended to restart the system after every driver installation e. All examples relate to 32 bit installation.
1. Double-click on Lucidlogix VIRTU Setup_32Bit.exe The following security message may appear:
Press "Run" to proceed. 2. In case you are using the trial version- the following message will appear:
Press Yes to continue installation. 3. The VIRTU Setup Wizard window is displayed.