ASRock Fatal1ty Z77 Performance driver and firmware
Drivers and firmware downloads for this ASRock item
Related ASRock Fatal1ty Z77 Performance Manual Pages
Download the free PDF manual for ASRock Fatal1ty Z77 Performance and other ASRock manuals at ManualOwl.com
User Manual - Page 5
... and CPU fan 21 2.5 Installation of Memory Modules (DIMM 22 2.6 Expansion Slots (PCI and PCI Express Slots 24 2.7 CrossFireXTM and Quad CrossFireXTM Operation Guide 25 2.8 Dual Monitor and Surround Display Features 29 2.9 Jumpers Setup 32 2.10 Onboard Headers and Connectors 33 2.11 Smart Switches 38 2.12 Dr. Debug 39 2.13 Serial ATA (SATA) / Serial ATA2 (SATA2) Hard Disks
Installation 43...
User Manual - Page 6
...62 3.4.6 Storage Configuration 63 3.4.7 Super IO Configuration 64 3.4.8 ACPI Configuration 65 3.4.9 USB Configuration 66 3.5 Hardware Health Event Monitoring Screen 67 3.6 Boot Screen 68 3.7 Security Screen 69 3.8 Exit Screen 70
4 Software Support 71
4.1 Install Operating System 71 4.2 Support CD Information 71
4.2.1 Running Support CD 71 4.2.2 Drivers Menu 71...
User Manual - Page 7
...)
ASRock Fatal1ty Z77 Performance Series Quick Installation Guide ASRock Fatal1ty Z77 Performance Series Support CD 2 x Serial ATA (SATA) Data Cables (Optional) 1 x I/O Panel Shield
ASRock Reminds You... To get better performance in Windows® 7 / 7 64-bit / VistaTM / VistaTM 64bit, it is recommended to set the BIOS option in Storage Configuration to AHCI mode. For the BIOS setup, please...
User Manual - Page 12
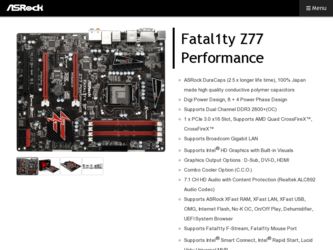
... the Fatal1ty Mouse port to add a professional level mouse configuration. In IES (Intelligent Energy Saver) mode, the voltage regulator can reduce the number of output phases to improve efficiency when the CPU cores are idle without sacrificing computing performance.
10. ASRock Instant Flash is a BIOS flash utility embedded in Flash ROM. This convenient BIOS update...
User Manual - Page 13
... extend their lifespan. 16. ASRock Crashless BIOS allows users to update their BIOS without fear of failing. If power loss occurs during the BIOS update process, ASRock Crashless BIOS will automatically finish the BIOS update procedure after regaining power. Please note that BIOS files need to be placed in the root directory of your USB disk. Only USB2.0 ports support this feature.
13
User Manual - Page 25
... supported with Windows® VistaTM / 7 OS only. Please check AMD's website for ATITM CrossFireXTM driver updates.
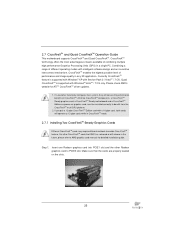
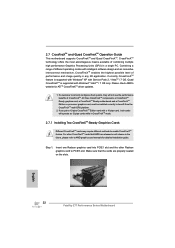
1. If a customer incorrectly configures their system, they will not see the performance benefits of CrossFireXTM. All three CrossFireXTM components, a CrossFireXTM Ready graphics card, a CrossFireXTM Ready motherboard and a CrossFireXTM Edition co-processor graphics card...
User Manual - Page 27
... B. You must have Microsoft .NET Framework installed prior to downloading and installing the CATALYST Control Center. Please check Microsoft's website for details. For Windows® 7 / VistaTM OS: Install the CATALYST Control Center. Please check AMD's website for details. Restart your computer. Install the VGA card drivers to your system, and restart your computer. Then you will find "ATI...
User Manual - Page 30
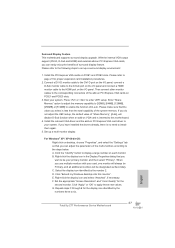
... adjust the UEFI setup, the default value of "Share Memory", [Auto], will disable D-Sub function when an add-on VGA card is inserted to this motherboard.
4. Install the onboard VGA driver and the add-on PCI Express VGA card driver to your system. If you have installed the drivers already, there is no need to install them again.
5. Set up a multi-monitor display.
For Windows® XP / XP...
User Manual - Page 47
... VistaTM 64-bit OS on your SATA / SATA2 / SATA3 HDDs with RAID functions, please follow the steps below.
RAID mode is not supported under Windows® XP / XP 64-bit.
STEP 1: Set up UEFI. A. Enter UEFI SETUP UTILITY Advanced screen Storage Configuration. B. Set the option "SATA Mode Selection" to [RAID]. STEP 2: Use "RAID Installation Guide" to set RAID configuration. Before you start...
User Manual - Page 49
... information
OC Tweaker To set up overclocking features
Advanced To set up the advanced UEFI features
H/W Monitor To display current hardware status
Boot
To set up the default system device to locate and load the
Operating System
Security
To set up the security features
Exit
To exit the current screen or the UEFI SETUP UTILITY
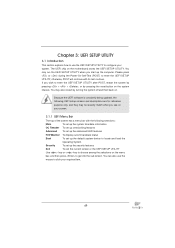
Use < > key or...
User Manual - Page 71
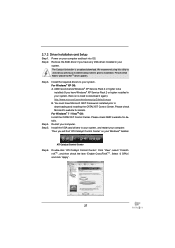
...-ROM drive. The CD automatically displays the Main Menu if "AUTORUN" is enabled in your computer. If the Main Menu does not appear automatically, locate and double click on the file "ASSETUP.EXE" from the BIN folder in the Support CD to display the menu.
4.2.2 Drivers Menu The Drivers Menu shows the available device's drivers if the system detects installed devices...
User Manual - Page 73
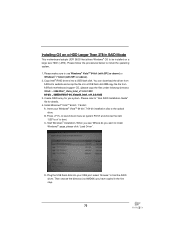
... You can download the driver from
ASRock's website and unzip the file into a USB flash disk OR copy the file from ASRock motherboard support CD. (please copy the files under following directory: 32 bit: ..\i386\Win7_Vista_Intel_v11.0.0.1032 64-bit: ..\AMD64\Win7-64_Vista64_Intel_v11.0.0.1032 3. Create RAID array for you system. Please refer to "Intel RAID Installation Guide...
Quick Installation Guide - Page 7
...)
ASRock Fatal1ty Z77 Performance Series Quick Installation Guide ASRock Fatal1ty Z77 Performance Series Support CD 2 x Serial ATA (SATA) Data Cables (Optional) 1 x I/O Panel Shield
ASRock Reminds You... To get better performance in Windows® 7 / 7 64-bit / VistaTM / VistaTM 64bit, it is recommended to set the BIOS option in Storage Configuration to AHCI mode. For the BIOS setup, please...
Quick Installation Guide - Page 13
...16. ASRock Crashless BIOS allows users to update their BIOS without fear of failing. If power loss occurs during the BIOS update process, ASRock Crashless BIOS will automatically finish the BIOS update procedure after regaining power. Please note that BIOS files need to be placed in the root directory of your USB disk. Only USB2.0 ports support this feature.
13 Fatal1ty Z77 Performance...
Quick Installation Guide - Page 22
... supported with Windows® VistaTM / 7 OS only. Please check AMD's website for ATITM CrossFireXTM driver updates.
1. If a customer incorrectly configures their system, they will not see the performance benefits of CrossFireXTM. All three CrossFireXTM components, a CrossFireXTM Ready graphics card, a CrossFireXTM Ready motherboard and a CrossFireXTM Edition co-processor graphics card...
Quick Installation Guide - Page 24

.... Install the VGA card drivers to your system, and restart your computer. Then you will find "ATI Catalyst Control Center" on your Windows® taskbar.
ATI Catalyst Control Center
Step 6.
Double-click "ATI Catalyst Control Center". Click "View", select "CrossFireXTM", and then check the item "Enable CrossFireXTM". Select "2 GPUs" and click "Apply".
English
24 Fatal1ty Z77 Performance...
Quick Installation Guide - Page 27
... adjust the UEFI setup, the default value of "Share Memory", [Auto], will disable D-Sub function when an add-on VGA card is inserted to this motherboard.
4. Install the onboard VGA driver and the add-on PCI Express VGA card driver to your system. If you have installed the drivers already, there is no need to install them again.
5. Set up a multi-monitor display.
For Windows® XP / XP...
Quick Installation Guide - Page 216
... and choose the item
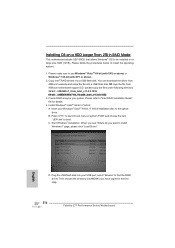
"UEFI:xxx" to boot. C. Start Windows® Installation. When you see "Where do you want to install
Windows?" page, please click "Load Driver".
D. Plug the USB flash disk into your USB port; select "Browse" to find the RAID driver. Then choose the directory (xx\AMD64\) you have copied in the first step.
216 Fatal1ty Z77 Performance Series Motherboard
English
Intel Rapid Storage Guide - Page 12
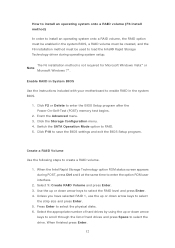
... to load the Intel® Rapid Storage Technology driver during operating system setup.
The F6 installation method is not required for Microsoft Windows Vista* or Note
Microsoft Windows 7*.
Enable RAID in System BIOS
Use the instructions included with your motherboard to enable RAID in the system BIOS.
1. Click F2 or Delete to enter the BIOS Setup program after the Power-On-Self-Test (POST) memory...
Lucid Virtu Installation Guide - Page 4
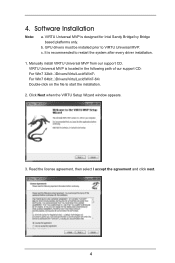
...the system after every driver installation.
1. Manually install VIRTU Universal MVP from our support CD. VIRTU Universal MVP is located in the following path of our support CD: For Win7 32bit:..\Drivers\Virtu\Lucid\Win7\ For Win7 64bit:..\Drivers\Virtu\Lucid\Win7-64\ Double-click on the file to start the installation.
2. Click Next when the VIRTU Setup Wizard window appears.
3. Read the license...