ASRock G41M-LE/H driver and firmware
Related ASRock G41M-LE/H Manual Pages
Download the free PDF manual for ASRock G41M-LE/H and other ASRock manuals at ManualOwl.com
User Manual - Page 3
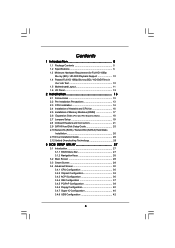
...-installation Precautions 13 2.3 CPU Installation 14 2.4 Installation of Heatsink and CPU fan 16 2.5 Installation of Memory Modules (DIMM 17 2.6 Expansion Slots (PCI and PCI Express Slots 18 2.7 Jumpers Setup 19 2.8 Onboard Headers and Connectors 21 2.9 SATAII Hard Disk Setup Guide 25 2.10 Serial ATA (SATA) / Serial ATAII (SATAII) Hard Disks
Installation 26 2.11 Driver Installation Guide...
User Manual - Page 4
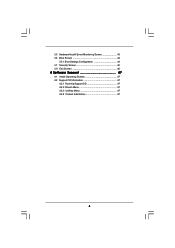
3.5 Hardware Health Event Monitoring Screen 43 3.6 Boot Screen 44
3.5.1 Boot Settings Configuration 44 3.7 Security Screen 45 3.8 Exit Screen 46
4 Software Support 47
4.1 Install Operating System 47 4.2 Support CD Information 47
4.2.1 Running Support CD 47 4.2.2 Drivers Menu 47 4.2.3 Utilities Menu 47 4.2.4 Contact Information 47
4
User Manual - Page 5
....asrock.com/support/index.asp
1.1 Package Contents
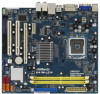
ASRock G41M-LE/H Motherboard (Micro ATX Form Factor: 9.6-in x 8.6-in, 24.4 cm x 21.8 cm)
ASRock G41M-LE/H Quick Installation Guide ASRock G41M-LE/H Support CD One 80-conductor Ultra ATA 66/100 IDE Ribbon Cable One Serial ATA (SATA) Data Cable (Optional) One Serial ATA (SATA) HDD Power Cable (Optional) One I/O Panel Shield One DVI-to-HDMI converter...
User Manual - Page 6
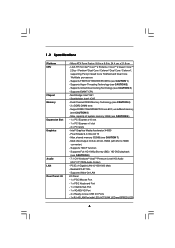
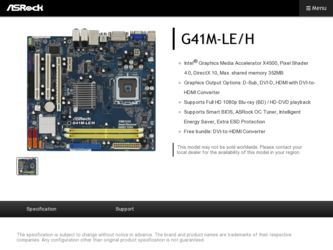
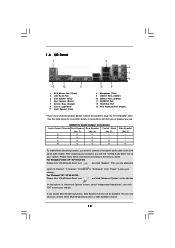
...shared memory 352MB (see CAUTION 7) - Multi VGA Output: D-Sub, DVI-D, HDMI (with DVI to HDMI converter) - Supports HDCP function - Supports Full HD 1080p Blu-ray (BD) / HD-DVD playback (see CAUTION 8) - 7.1 CH Windows® VistaTM Premium Level HD Audio (VIA® VT1708S Audio Codec) - PCIE x1 Gigabit LAN 10/100/1000 Mb/s - Realtek RTL8111DL - Supports Wake-On-LAN I/O Panel - 1 x PS/2 Mouse Port...
User Manual - Page 7
... panel audio connector
- 2 x USB 2.0 headers (support 4 USB 2.0 ports)
(see CAUTION 11)
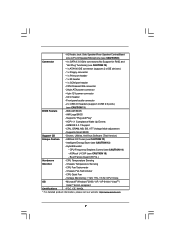
BIOS Feature
- 8Mb AMI BIOS
- AMI Legal BIOS
- Supports "Plug and Play"
- ACPI 1.1 Compliance Wake Up Events
- AMBIOS 2.3.1 Support
- CPU, DRAM, NB, SB, VTT Voltage Multi-adjustment
- Supports Smart BIOS
Support CD
- Drivers, Utilities, AntiVirus Software (Trial Version)
Unique Feature - ASRock OC...
User Manual - Page 8

... 26 for details.
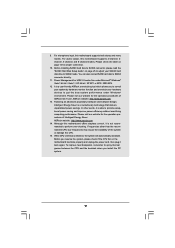
4. This motherboard supports Dual Channel Memory Technology. Before
you implement Dual Channel Memory Technology, make sure to read
the installation guide of memory modules on page 17 for proper
installation.
5. Please check the table below for the CPU FSB frequency and its
corresponding memory support frequency.
CPU FSB Frequency Memory Support Frequency
1333
DDR2 667...
User Manual - Page 9
... 12 for proper connection.
10. Before installing SATAII hard disk to SATAII connector, please read the "SATAII Hard Disk Setup Guide" on page 25 to adjust your SATAII hard disk drive to SATAII mode. You can also connect SATA hard disk to SATAII connector directly.
11. Power Management for USB 2.0 works fine under Microsoft® Windows® VistaTM 64-bit / VistaTM / XP...
User Manual - Page 10
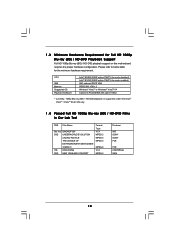
... / HD-DVD playback support on this motherboard requires the proper hardware configuration. Please refer to below table for the minimum hardware requirement.
CPU
VGA Memory Suggested OS Playback Software
Intel® E5200 (BIOS option PAVP Lite mode disabled) Intel® E1200 (BIOS option PAVP Lite mode enabled) G41 onboard DX10 VGA DDR2 800 1GB x 2 Windows® VistaTM or Windows® VistaTM...
User Manual - Page 12
... restarting your computer, you will find "VIA HD Audio Deck" tool on
your system. Please follow below instructions according to the OS you install.
For Windows® 2000 / XP / XP 64-bit OS:
Please click "VIA HD Audio Deck" icon
, and click "Speaker". Then you are allowed to
select "2 Channel", "4 Channel", "6 Channel" or "8 Channel". Click "Power" to...
User Manual - Page 13

... screws into the holes indicated by circles to secure the motherboard to the chassis.
Do not over-tighten the screws! Doing so may damage the motherboard.
2.2 Pre-installation Precautions
Take note of the following precautions before you install motherboard components or change any motherboard settings.
1. Unplug the power cord from the wall socket before touching any component. 2. To...
User Manual - Page 14
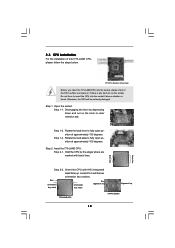
... on the hook to clear retention tab.
Step 1-2. Rotate the load lever to fully open position at approximately 135 degrees.
Step 1-3. Rotate the load plate to fully open position at approximately 100 degrees.
Step 2. Insert the 775-LAND CPU: Step 2-1. Hold the CPU by the edges where are marked with black lines.
Step 2-2. Orient...
User Manual - Page 25
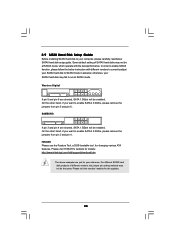
2.9 SATAII Hard Disk Setup Guide
Before installing SATAII hard disk to your computer, please carefully read below SATAII hard disk setup guide. Some default setting of SATAII hard disks may not be at SATAII mode, which operate with the best performance. In order to enable SATAII function, please follow the below instruction with different vendors to correctly adjust your SATAII hard disk to SATAII...
User Manual - Page 26
... bridge chipset that supports Serial ATA (SATA) / Serial ATAII (SATAII) hard disks. You may install SATA / SATAII hard disks on this motherboard for internal storage devices. This section will guide you to install the SATA / SATAII hard disks.
STEP 1: Install the SATA / SATAII hard disks into the drive bays of your chassis. STEP 2: Connect the SATA power cable to the SATA / SATAII hard disk. STEP...
User Manual - Page 27
...and then back on.
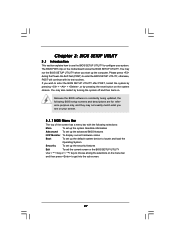
Because the BIOS software is constantly being updated, the following BIOS setup screens and descriptions are for reference...set up the advanced BIOS features
H/W Monitor To display current hardware status
Boot
To set up the default system device to locate and load the
Operating System
Security
To set up the security features
Exit
To exit the current screen or the BIOS SETUP...
User Manual - Page 31

... a computer system with an Intel Pentium® 4 processor that supports Hyper-Threading technology and an operating system that includes optimization for this technology, such as Microsoft® Windows® XP. Set to [Enabled] if using Microsoft® Windows® XP, or Linux kernel version 2.4.18 or higher. This option will be hidden if the installed CPU does not support Hyper...
User Manual - Page 32
...will be hidden if the current CPU does not support Intel (R) SpeedStep(tm) tech..
Please note that enabling this function may reduce CPU voltage and lead to system stability or compatibility issue with some power supplies. Please set this item to [Disable] if above issue occurs.
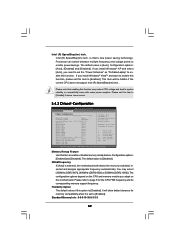
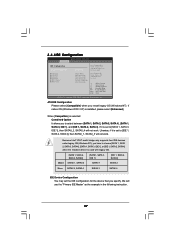
3.4.2 Chipset Configuration
BIOS SETUP UTILITY Advanced
Chipset Configuration
Memory Remap Feature
[Disabled]
DRAM...
User Manual - Page 34
... operation feature. The default value is [Enabled]. Configuration options: [Enabled] and [Disabled].
Primary Graphics Adapter This allows you to select [Onboard], [PCI] or [PCI Express] as the boot graphic adapter priority. The default value is [PCI].
Share Memory This allows you to set share memory feature. The default value is [Auto]. Configuration options: [Auto], [32MB], [64MB], [128MB] and...
User Manual - Page 37
... set to [IDE 1, SATA 2, SATA 4], then SATAII_1, SATAII_3 will not work.
Because Intel® ICH7 south bridge only supports four IDE devices under legacy OS (Windows NT), you have to choose [SATA 1, SATA 2, SATA 3, SATA 4], [SATA 1, SATA 3, IDE 1], or [IDE 1, SATA 2, SATA 4] when the installed device is used with legacy OS.
[SATA 1, SATA 2, SATA 3, SATA 4]
[SATA 1, SATA 3, IDE 1]
[IDE 1, SATA...
User Manual - Page 38
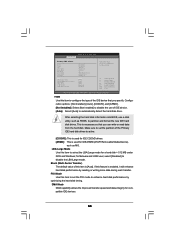
... item to configure the type of the IDE device that you specify. Configuration options: [Not Installed], [Auto], [CD/DVD], and [ARMD]. [Not Installed]: Select [Not Installed] to disable the use of IDE device. [Auto]: Select [Auto] to automatically detect the hard disk drive.
After selecting the hard disk information into BIOS, use a disk utility, such as FDISK, to partition and...
User Manual - Page 47
...-ROM drive. The CD automatically displays the Main Menu if "AUTORUN" is enabled in your computer. If the Main Menu did not appear automatically, locate and double click on the file "ASSETUP.EXE" from the BIN folder in the Support CD to display the menus. 4.2.2 Drivers Menu The Drivers Menu shows the available devices drivers if the system detects installed devices. Please install...