ASRock K10N780SLIX3-WiFi driver and firmware
Drivers and firmware downloads for this ASRock item
Related ASRock K10N780SLIX3-WiFi Manual Pages
Download the free PDF manual for ASRock K10N780SLIX3-WiFi and other ASRock manuals at ManualOwl.com
User Manual - Page 3

...2.11 SATAII Hard Disk Setup Guide 40 2.12 Serial ATA (SATA) / Serial ATAII (SATAII) Hard Disks
Installation 41 2.13 Hot Plug and Hot Swap Functions for SATA / SATAII HDDs and
eSATAIIDevices 42 2.14 SATA / SATAII HDD Hot Plug Feature and Operation Guide ....... 43 2.15 Driver Installation Guide 45 2.16 Installing Windows® XP / XP 64-bit / VistaTM / VistaTM 64-bit
Without RAID Functions 45...
User Manual - Page 4
... Installing Windows® XP / XP 64-bit With RAID Functions 47 2.17.2 Installing Windows® VistaTM / VistaTM 64-bit With RAID Functions 48
2.18 DTS Operation Guide 49 2.19 Untied Overclocking Technology 51
3 . BIOS SETUP UTILITY 5 2
3.1 Introduction 52 3.1.1 BIOS Menu Bar 52 3.1.2 Navigation Keys 53
3.2 Main Screen 53 3.3 Advanced Screen 54
3.3.1 CPU Configuration 54 3.3.2 Chipset...
User Manual - Page 5
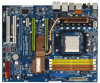
...-WiFi Quick Installation Guide ASRock K10N780SLIX3-WiFi Support CD ASRock WiFi-802.11g Module Operation Guide
Motherboard Accessories One ASRock SLI Bridge One ASRock 3-Way SLI Bridge One ASRock SLI/XFire Switch Card One 80-conductor Ultra ATA 66/100/133 IDE Ribbon Cable One Ribbon Cable for a 3.5-in Floppy Drive Four Serial ATA (SATA) Data Cables (Optional) One Serial ATA (SATA) HDD Power Cable...
User Manual - Page 9
... eSATAII and eSATAII installation procedures. 12. Power Management for USB 2.0 works fine under Microsoft® Windows® VistaTM 64-bit / VistaTM / XP 64-bit / XP SP1 or SP2. 13. WiFi/E header supports WiFi+AP function with ASRock WiFi-802.11g or WiFi-802.11n module, an easy-to-use wireless local area network (WLAN) adapter. It allows you to create a wireless environment and enjoy...
User Manual - Page 10
... between the CPU and the heatsink when you install the PC system.
18. This motherboard supports ASRock AM2 Boost overclocking technology for AM2 CPU. If you enable this function in the BIOS setup, the memory performance will improve up to 12.5%, but the effect still depends on the AM2 CPU you adopt. Enabling this function will overclock the chipset/CPU reference clock...
User Manual - Page 11
... website for details. ASRock website: http://www.asrock.com/support/index.htm
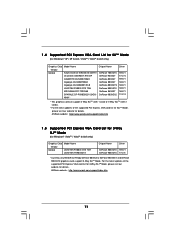
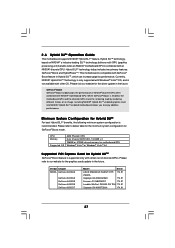
1 . 5 Supported PCI Express VGA Card List for 3-Way SLITM Mode
(for Windows® VistaTM / VistaTM 64-bit only)
Graphics Chip Model Name
Vendor
NVIDIA
LEADTEK PX8800 GTX TDH LEADTEK PX9800GTX
Chipset Name
Driver
GeForce 8800GTX 169.21 GeForce 9800GTX 174.74
* Currently, only NVIDIA SLI-Ready GeForce 8800Ultra...
User Manual - Page 21
... (PSU) can provide at least the minimum power required by your system. It is recommended to use NVIDIA® certified PSU. Please refer to NVIDIA® website for details.
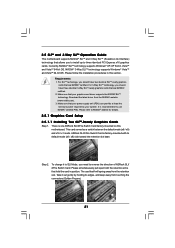
2.5.1 Graphics Card Setup
2.5.1.1 Installing Two SLITM-Ready Graphics Cards
Step 1. There is one ASRock SLI/XFire Switch Card factory-mounted on this motherboard. This card served as a switch between the default...
User Manual - Page 24
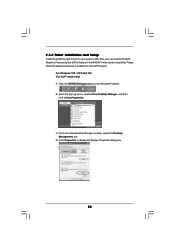
2.5.2 Driver Installation and Setup
Install the graphics card drivers to your system. After that, you can enable the MultiGraphics Processing Unit (GPU) feature in the NVIDIA® nView system tray utility. Please follow the below procedures to enable the multi-GPU feature.
For Windows® XP / XP 64-bit OS: (For SLITM mode only) A. Click the NVIDIA Settings icon...
User Manual - Page 27
....
CPU Memory
Suggested OS
AMD Phenom CPU Dual Channel DDR2 800, 1024MB x 2 256MB or 512MB shared memory for motherboard GPU Windows® VistaTM or Windows® VistaTM 64
Supported PCI Express Card for Hybrid SLITM
GeForce® Boost feature is supported only with certain set of discrete GPUs. Please refer to our website for the graphics cards update in the future.
Vendor Chipset NVIDIA...
User Manual - Page 28
... monitor cable to the correspondent connector on the PCI Express graphics card on PCIE1 slot. Boot your system. Press to enter BIOS setup. Enter "Advanced" screen, and enter "Chipset Settings". Then set the option "Hybrid SLI" to [Auto] or [Chipset Default]. Boot into OS. Install Hybrid SLITM driver from our support CD to your system. Hybrid SLITM driver is in the following path of ASRock support...
User Manual - Page 40

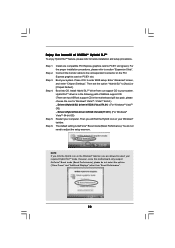
... Hard Disk Setup Guide
Before installing SATAII hard disk to your computer, please carefully read below SATAII hard disk setup guide. Some default setting of SATAII hard disks may not be at SATAII mode, which operate with the best performance. In order to enable SATAII function, please follow the below instruction with different vendors to correctly adjust your SATAII hard disk to SATAII...
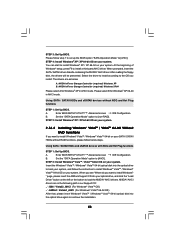
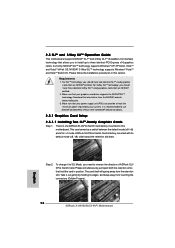
User Manual - Page 45
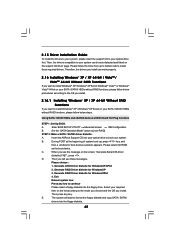
... functions
STEP 1: Set Up BIOS.
A.
Enter BIOS SETUP UTILITY Advanced screen
IDE Configuration.
B.
Set the "SATA Operation Mode" option to [non-RAID].
STEP 2: Make a SATA / SATAII driver diskette.
A.
Insert the ASRock Support CD into your optical drive to boot your system.
B.
During POST at the beginning of system boot-up, press key, and
then a window for boot devices selection appears...
User Manual - Page 46
... Storage Controller (required) Windows XP64
Please select A for Windows® XP in AHCI mode. Please select B for Windows® XP 64-bit in AHCI mode.
Using SATA / SATAII HDDs and eSATAII devices without NCQ and Hot Plug functions
STEP 1: Set Up BIOS.
A.
Enter BIOS SETUP UTILITY Advanced screen
IDE Configuration.
B.
Set the "SATA Operation Mode" option to [non-RAID].
STEP 2: Install...
User Manual - Page 47
... "SATA Operation Mode" to [RAID]. STEP 4: Use "RAID Installation Guide" to set RAID configuration. Before you start to configure RAID function, you need to check the RAID installation guide in the Support CD for proper configuration. Please refer to the BIOS RAID installation guide part of the document in the following path in the Support CD: .. \ RAID Installation Guide STEP 5: Install Windows...
User Manual - Page 48

... the BIOS RAID
installation guide part of the document in the following path in the Support CD:
.. \ RAID Installation Guide
STEP 3: Install Windows® VistaTM / VistaTM 64-bit OS on your system.
Insert the Windows® VistaTM / Windows® VistaTM 64-bit optical disk into the optical drive
to boot your system, and follow the instruction to install Windows® VistaTM / Windows®...
User Manual - Page 52
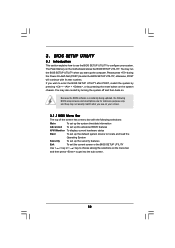
...BIOS SETUP UTILITY to configure your system. The Flash Memory on the motherboard stores the BIOS SETUP UTILITY. You may run the BIOS SETUP UTILITY when you start up the computer. Please press during the Power-On-Self-Test (POST) to enter the BIOS SETUP...and then back on.
Because the BIOS software is constantly being updated, the following BIOS setup screens and descriptions are for reference ...
User Manual - Page 72
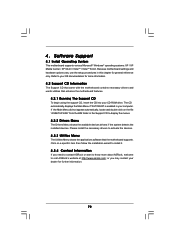
...-ROM drive. The CD automatically displays the Main Menu if "AUTORUN" is enabled in your computer. If the Main Menu did not appear automatically, locate and double click on the file "ASSETUP.EXE" from the BIN folder in the Support CD to display the menus.
4.2.2 Drivers Menu
The Drivers Menu shows the available devices drivers if the system detects the installed devices...
Quick Installation Guide - Page 9

... eSATAII and eSATAII installation procedures. 12. Power Management for USB 2.0 works fine under Microsoft® Windows® VistaTM 64-bit / VistaTM / XP 64-bit / XP SP1 or SP2. 13. WiFi/E header supports WiFi+AP function with ASRock WiFi-802.11g or WiFi-802.11n module, an easy-to-use wireless local area network (WLAN) adapter. It allows you to create a wireless environment and enjoy...
Quick Installation Guide - Page 18
... (PSU) can provide at least the minimum power required by your system. It is recommended to use NVIDIA® certified PSU. Please refer to NVIDIA® website for details.
2.5.1 Graphics Card Setup
2.5.1.1 Installing Two SLITM-Ready Graphics Cards
Step 1. There is one ASRock SLI/XFire Switch Card factory-mounted on this motherboard. This card served as a switch between the default...
Quick Installation Guide - Page 24
...; Hybrid SLITM Technology is only supported with Windows® VistaTM OS, and is not available with other OS. Please visit our website for the driver update in the future. For the compatible PCI Express graphics cards and the installation procedures, please refer to page 27 of "User Manual" in the support CD.
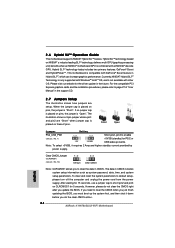
2.7 Jumpers Setup
The illustration shows how jumpers are...