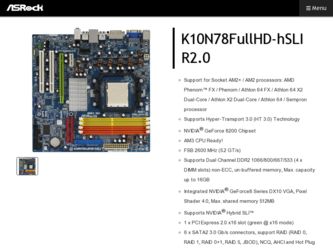
ASRock K10N78FullHD-hSLI R2.0 driver and firmware
Drivers and firmware downloads for this ASRock item
Related ASRock K10N78FullHD-hSLI R2.0 Manual Pages
Download the free PDF manual for ASRock K10N78FullHD-hSLI R2.0 and other ASRock manuals at ManualOwl.com
User Manual - Page 3
... Disk Setup Guide 36 2.12 Serial ATA (SATA) / Serial ATAII (SATAII) Hard Disks
Installation 37 2.13 Hot Plug and Hot Swap Functions for SATA / SATAII HDDs ....... 37 2.14 SATA / SATAII HDD Hot Plug Feature and Operation Guide ....... 38 2.15 Driver Installation Guide 40 2.16 Installing Windows® XP / XP 64-bit / VistaTM / VistaTM 64-bit
Without RAID Functions 40 2.16.1 Installing Windows...
User Manual - Page 4
... Floppy Configuration 58 3.3.7 Super IO Configuration 58 3.3.8 USB Configuration 59 3.4 Hardware Health Event Monitoring Screen 60 3.5 Boot Screen 61 3.5.1 Boot Settings Configuration 61 3.6 Security Screen 62 3.7 Exit Screen 63
4 . Software Support 64
4.1 Install Operating System 64 4.2 Support CD Information 64
4.2.1 Running Support CD 64 4.2.2 Drivers Menu 64 4.2.3 Utilities Menu...
User Manual - Page 5
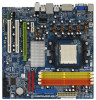
...x ASRock K10N78FullHD-hSLI Motherboard (Micro ATX Form Factor: 9.6-in x 9.6-in, 24.4 cm x 24.4 cm)
1 x ASRock K10N78FullHD-hSLI Quick Installation Guide 1 x ASRock K10N78FullHD-hSLI Support CD 1 x Ultra ATA 66/100/133 IDE Ribbon Cable (80-conductor) 1 x 3.5-in Floppy Drive Ribbon Cable 1 x Serial ATA (SATA) Data Cable (Optional) 1 x Serial ATA (SATA) HDD Power Cable (Optional) 1 x HDMI_SPDIF Cable...
User Manual - Page 8
... sure to read the installation guide of memory modules on page 18 for proper installation.
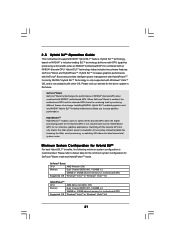
4. Whether 1066MHz memory speed is supported depends on the AM2+ CPU you adopt. If you want to adopt DDR2 1066 memory module on this motherboard, please refer to the memory support list on our website for the compatible memory modules. ASRock website http://www.asrock.com
5. Due to the...
User Manual - Page 9
... disk drive to SATAII mode. You can also connect SATA hard disk to SATAII connector directly.
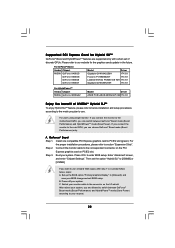
11. Power Management for USB 2.0 works fine under Microsoft® Windows® VistaTM 64-bit / VistaTM / XP 64-bit / XP SP1 or SP2.
12. WiFi/E header supports WiFi+AP function with ASRock WiFi-802.11g or WiFi-802.11n module, an easy-to-use wireless local area network (WLAN) adapter...
User Manual - Page 11
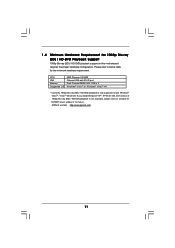
...-ray (BD) / HD-DVD Playback Support
1080p Blu-ray (BD) / HD-DVD playback support on this motherboard requires the proper hardware configuration. Please refer to below table for the minimum hardware requirement.
CPU VGA Memory Suggested OS
AMD Phenom X3 8400 Onboard VGA with DVI-D port Dual Channel DDR2 533, 1GB x 2 Windows® VistaTM or Windows® VistaTM 64
* Currently, 1080p...
User Manual - Page 21
... power management with HybridPowerTM. Currently, NVIDIA® Hybrid SLITM Technology is only supported with Windows® VistaTM OS, and is not available with other OS. Please visit our website for the driver update in the future.
GeForce® Boost GeForce® Boost turbocharges the performance of NVIDIA® discrete GPU when combined with NVIDIA® motherboard...
User Manual - Page 22
... cable to the correspondent connector on the PCI
Express graphics card on PCIE2 slot. Step 3. Boot your system. Press to enter BIOS setup. Enter "Advanced" screen,
and enter "Chipset Settings". Then set the option "Hybrid SLI" to [256MB] or [512MB].
If you want to use onboard VGA output, after step 1 to 3, please follow below steps: A. Set up the BIOS option "Primary Graphics Display...
User Manual - Page 23
..." screen,
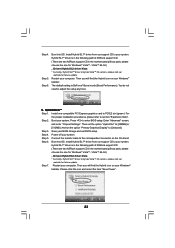
and enter "Chipset Settings". Then set the option "Hybrid SLI" to [256MB] or [512MB]. And set the option "Primary Graphics Display" to [Onboard]. Step 3. Save your BIOS change and exit BIOS setup. Step 4. Power off your system. Step 5. Connect the monitor cable to the correspondent connector on the I/O shield. Step 6. Boot into OS. Install Hybrid SLITM driver from our support CD to your...
User Manual - Page 24
...enter BIOS setup. Enter "Advanced" screen,
and enter "Chipset Settings". Then set the option "Share Memory" to [32MB], [64MB], [128MB], [256MB] or [512MB]. Step 3. Connect one monitor cable to the correspondent connector on the I/O shield. Connect the other monitor cable to the correspondent connector on the PCI Express graphics card on PCIE2 slot. Step 4. Boot into OS. Install Hybrid SLITM driver...
User Manual - Page 25
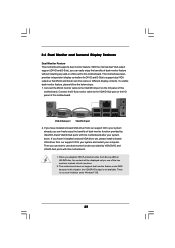
...dual monitor feature without installing any add-on VGA card to this motherboard. This motherboard also provides independent display controllers for DVI-D and D-Sub to support dual VGA output so that DVI-D and D-sub can drive same or different display contents. To enable dual monitor feature, please follow the below steps: 1. Connect the DVI-D monitor cable to the VGA/DVI-D port on the I/O panel of...
User Manual - Page 26
...® PCI Express VGA card to PCI Express slot. Please refer to
page 20 for proper expansion card installation procedures for details. 2. Connect the DVI-D monitor cable to the VGA/DVI-D port on the I/O panel of this
motherboard. Connect the D-Sub monitor cable to the VGA/D-Sub port on the I/O panel of this motherboard. 3. Boot your system. Press to enter BIOS setup. Enter "Share Memory" option...
User Manual - Page 45
...
This section explains how to use the BIOS SETUP UTILITY to configure your system. The SPI Memory on the motherboard stores the BIOS SETUP UTILITY. You may run the BIOS SETUP UTILITY when you start up the computer. Please press during the Power-On-Self-Test (POST) to enter the BIOS SETUP UTILITY, otherwise, POST will continue with its test routines. If...
User Manual - Page 64
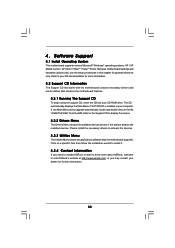
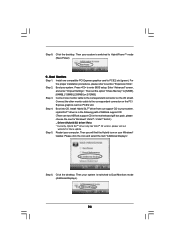
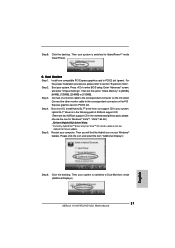
...-ROM drive. The CD automatically displays the Main Menu if "AUTORUN" is enabled in your computer. If the Main Menu did not appear automatically, locate and double click on the file "ASSETUP.EXE" from the BIN folder in the Support CD to display the menus.
4.2.2 Drivers Menu
The Drivers Menu shows the available devices drivers if the system detects the installed devices...
Quick Installation Guide - Page 8
... sure to read the installation guide of memory modules on page 15 for proper installation.
4. Whether 1066MHz memory speed is supported depends on the AM2+ CPU you adopt. If you want to adopt DDR2 1066 memory module on this motherboard, please refer to the memory support list on our website for the compatible memory modules. ASRock website http://www.asrock.com
5. Due to the...
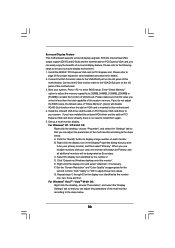
Quick Installation Guide - Page 11
... (BD) / HD-DVD playback is only supported under Windows® VistaTM / VistaTM 64-bit OS. If you install Windows® XP / XP 64-bit OS, the function of 1080p Blu-ray (BD) / HD-DVD playback is not available, please visit our website for NVIDIA® driver update in the future. ASRock website http://www.asrock.com
English
11 ASRock K10N78FullHD-hSLI Motherboard
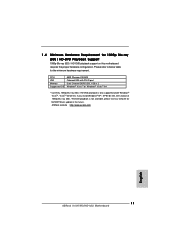
Quick Installation Guide - Page 18
... CPU
Memory
Dual Channel DDR2 800, 1024MB x 2
256MB or 512MB shared memory for motherboard GPU
Suggested OS Windows® VistaTM or Windows® VistaTM 64
HybridPowerTM CPU Memory
Suggested OS
AMD Athlon X2 3800+ CPU Dual Channel DDR2 667, 1024MB x 2 256MB or 512MB shared memory for motherboard GPU Windows® VistaTM or Windows® VistaTM 64
18 ASRock K10N78FullHD-hSLI Motherboard
Quick Installation Guide - Page 20
..." screen,
and enter "Chipset Settings". Then set the option "Hybrid SLI" to [256MB] or [512MB]. And set the option "Primary Graphics Display" to [Onboard]. Step 3. Save your BIOS change and exit BIOS setup. Step 4. Power off your system. Step 5. Connect the monitor cable to the correspondent connector on the I/O shield. Step 6. Boot into OS. Install Hybrid SLITM driver from our support CD to your...
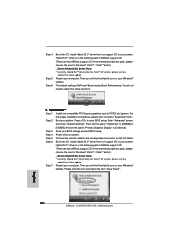
Quick Installation Guide - Page 21
... SLITM driver only has VistaTM 32 version, please visit our
website for future update. Step 5. Restart your computer. Then you will find the Hybrid icon on your Windows®
taskbar. Please click the icon and select the item "Additional Displays".
Step 6. Click the desktop. Then your system is switched to Dual Monitors mode (Additional Displays).
21 ASRock K10N78FullHD-hSLI Motherboard
English
Quick Installation Guide - Page 23
...® PCI Express VGA card to PCI Express slot. Please refer to
page 17 for proper expansion card installation procedures for details. 2. Connect the DVI-D monitor cable to the VGA/DVI-D port on the I/O panel of this
motherboard. Connect the D-Sub monitor cable to the VGA/D-Sub port on the I/O panel of this motherboard. 3. Boot your system. Press to enter BIOS setup. Enter "Share Memory" option...