ASRock P4VM800 driver and firmware
Related ASRock P4VM800 Manual Pages
Download the free PDF manual for ASRock P4VM800 and other ASRock manuals at ManualOwl.com
User Manual - Page 3
...10 2.1 CPU Installation 11 2.2 Installation of CPU Fan and Heatsink 11 2.3 Installation of Memory Modules (DIMM 12 2.4 Expansion Slots (PCI, AMR, and AGP Slots 13 2.5 Jumpers Setup 14 2.6 Onboard Headers and Connectors 15 2.7 Serial ATA (SATA) Hard Disks Installation 18 2.8 Hot Plug and Hot Swap Functions for SATA HDDs ....... 18 2.9 Installing Windows 2000 / Windows XP With RAID
Functions...
User Manual - Page 4
4. Software Support 35
4.1 Install Operating System 35 4.2 Support CD Information 35
4.2.1 Running Support CD 35 4.2.2 Drivers Menu 35 4.2.3 Utilities Menu 35 4.2.4 Contact Information 35
4
User Manual - Page 5
...asrock.com
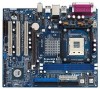
1.1 Package Contents
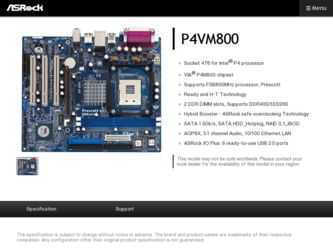
ASRock P4VM800 Motherboard (Micro ATX Form Factor: 9.6-in x 8.0-in, 24.4 cm x 20.3 cm)
ASRock P4VM800 Quick Installation Guide ASRock P4VM800 Support CD One 80-conductor Ultra ATA 66/100/133 IDE Ribbon Cable One Ribbon Cable for a 3.5-in Floppy Drive One Serial ATA (SATA) Cable One Serial ATA (SATA) HDD Power Cable(Optional) One ASRock I/O PlusTM Shield One COM Port...
User Manual - Page 7
...-to-use USB 2.0 ports,
1 RJ 45 port,
Audio Jack: Line In / Line Out / Microphone
BIOS:
AMI BIOS
Supports "Plug and Play"
ACPI 1.1 compliance wake up events
Supports jumperfree
SMBIOS 2.3.1 support
CPU frequency stepless control
(only for advanced users' reference, see CAUTION 5)
OS:
Microsoft® Windows® 98SE / ME / 2000 / XP compliant
CAUTION!
1. About the setting of "Hyper...
User Manual - Page 10
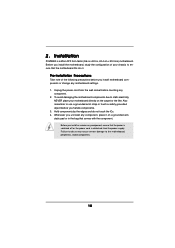
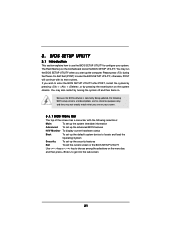
2. Installation
P4VM800 is a Micro ATX form factor (9.6-in x 8.0-in, 24.4 cm x 20.3 cm) motherboard. Before you install the motherboard, study the configuration of your chassis to ensure that the motherboard fits into it.
Pre-installation Precautions
Take note of the following precautions before you install motherboard components or change any motherboard settings. 1. Unplug the power cord from ...
User Manual - Page 11

... Lever Up to 90°
STEP 2/STEP 3: Match The CPU Marked Corner to The Socket Marked Corner
STEP 4: Push Down And Lock The Socket Lever
2.2 Installation of CPU Fan and Heatsink
This motherboard adopts 478-pin CPU socket to support Intel® Pentium® 4 / Celeron® CPU. It requires larger heatsink and cooling fan to dissipate heat...
User Manual - Page 12
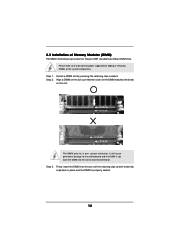
2.3 Installation of Memory Modules (DIMM)
P4VM800 motherboard provides two 184-pin DDR (Double Data Rate) DIMM slots. Please make sure to disconnect power supply before adding or removing DIMMs or the system components...
The DIMM only fits in one correct orientation. It will cause permanent damage to the motherboard and the DIMM if you force the DIMM into the slot at incorrect orientation. Step ...
User Manual - Page 13
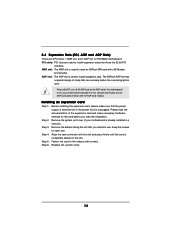
..., 1 AMR slot, and 1 AGP slot on P4VM800 motherboard. PCI slots: PCI slots are used to install expansion cards that have the 32-bit PCI
interface. AMR slot: The AMR slot is used to insert an ASRock MR card with v.92 Modem
functionality. AGP slot: The AGP slot is used to install a graphics card. The ASRock AGP slot has
a special design of clasp that...
User Manual - Page 14
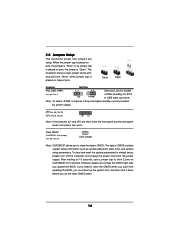
...
Open
Jumper
Setting
PS2_USB_PWR1
1_2
2_3
Short pin2, pin3 to enable
(see p.8, No. 1)
+5V
+5VSB
+5VSB (standby) for PS/2 or USB wake up events...setup, please turn off the computer and unplug the power cord from the power supply. After waiting for 15 seconds, use a jumper cap to short 2 pins on CLRCMOS1 for 5 seconds. However, please do not clear the CMOS right after you update the BIOS...
User Manual - Page 17
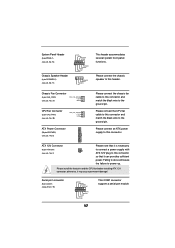
...+12V GND
CPU Fan Connector
(3-pin CPU_FAN1) (see p.8, No. 30)
CPU_FAN_SPEED +12V GND
ATX Power Connector
(20-pin ATXPWR1) (see p.8, No. 8)
Please connect the chassis fan cable to this...sufficient power. Failing to do so will cause the failure to power up.
Please install the heatsink and the CPU fan before installing ATX 12V connector; otherwise, it may cause permanent damage!
Serial port ...
User Manual - Page 18
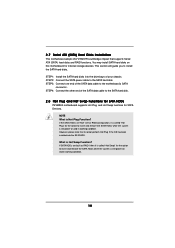
...SATA) Hard Disks Installation
This motherboard adopts VIA VT8237R southbridge chipset that supports Serial ATA (SATA) hard disks and RAID functions. You may install SATA hard disks on this motherboard for internal storage devices. This section will guide you to install the SATA hard disks. STEP 1: Install the SATA hard disks into the drive bays of your chassis. STEP 2: Connect the SATA power cable...
User Manual - Page 19
... drive, and press . E. The system will start to format the floppy diskette and copy SATA
drivers into the floppy diskette. STEP 2: Use "SATA RAID BIOS" to set RAID configuration.
Before you start to configure the RAID function, you need to check the installation guide in the Support CD for proper configuration. Please refer to the document in the Support CD, "Guide to SATA Hard Disks Installation...
User Manual - Page 20
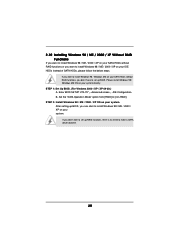
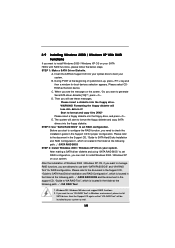
... install Windows 98 / Windows ME on your SATA HDDs without RAID functions, you don't have to set up BIOS. Please install Windows 98 / Windows ME OS on your system directly. STEP 1: Set Up BIOS. (For Wndows 2000 / XP / XP 64-bit.) A. Enter BIOS SETUP UTILITY ¡÷Advanced screen ¡÷IDE Configuration. B. Set the "SATA Operation Mode" option from [RAID] to [non-RAID]. STEP 2: Install...
User Manual - Page 21
...BIOS SETUP UTILITY to configure your system. The Flash Memory on the motherboard stores the BIOS SETUP UTILITY. You may run the BIOS SETUP UTILITY when you start up the computer. Please press during the Power-On-Self-Test (POST) to enter the BIOS SETUP...and then back on.
Because the BIOS software is constantly being updated, the following BIOS setup screens and descriptions are for reference ...
User Manual - Page 22
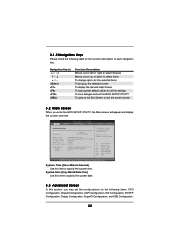
... screen will appear and display the system overview
BIOS SETUP UTILITY
Main Advanced
H/W Monitor
Boot
Security
Exit
System Overview
System Time System Date
[17:00:09] [Fri 02/25/2005]
BIOS Version
: P4VM800 BIOS P1.00
Processor Type : Intel (R) Pentium (R) 4 CPU 2.40 GHz
Processor Speed : 2400 MHz
Cache Size
: 512KB
Microcode Update : 0F24/1E
Total Memory DIMM 1 DIMM 2
: 256MB...
User Manual - Page 24

... cannot support CPUs with extended CPUID functions.
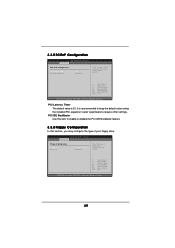
3.3.2 Chipset Configuration
BIOS SETUP UTILITY Advanced
Chipset Configuration
DRAM Frequency Flexibility Option DRAM CAS# Latency DRAM Command Rate
DRAM Voltage AGP Voltage
Primary Graphics Adapter AGP Aperture Size AGP Mode AGP Fast Write Onboard AGP Share Memory
PCI Delay Transaction OnBoard LAN OnBoard AC'97 Audio Onboard MC'97 Modem
[Auto...
User Manual - Page 25
... [64MB]; otherwise, please set the share memory size to [32MB].
PCI Delay Transaction Enable PCI Delay Transaction feature will free the PCI Bus when the CPU is accessing 8-bit ISA cards. Disable this feature when using ISA cards that are not PCI 2.1 compliant.
OnBoard LAN This allows you to enable or disable the onboard LAN feature.
OnBoard AC'97 Audio Select [Auto], [Enabled...
User Manual - Page 28
... item to configure the type of the IDE device that you specify. Configuration options: [Not Installed], [Auto], [CD/DVD], and [ARMD]. [Not Installed]: Select [Not Installed] to disable the use of IDE device. [Auto]: Select [Auto] to automatically detect the hard disk drive.
After selecting the hard disk information into BIOS, use a disk utility, such as FDISK, to partition and...
User Manual - Page 29
.... It is recommended to keep the default value unless the installed PCI expansion cards' specifications require other settings.
PCI IDE BusMaster Use this item to enable or disable the PCI IDE BusMaster feature.
3.3.6 Floppy Configuration
In this section, you may configure the type of your floppy drive.
BIOS SETUP UTILITY Advanced
Floppy Configuration
Floppy A Floppy B
[1.44 MB 312"] [Disabled...
User Manual - Page 35
... for more information.
4.2 Support CD Information
The Support CD that came with the motherboard contains necessary drivers and useful utilities that enhance the motherboard features.
4.2.1 Running The Support CD
To begin using the support CD, insert the CD into your CD-ROM drive. The CD automatically displays the Main Menu if "AUTORUN" is enabled in your computer. If the Main Menu...