ASRock X79 Extreme6/GB driver and firmware
Drivers and firmware downloads for this ASRock item
Related ASRock X79 Extreme6/GB Manual Pages
Download the free PDF manual for ASRock X79 Extreme6/GB and other ASRock manuals at ManualOwl.com
User Manual - Page 3
...Installation Guide
(X79 Extreme6/GB 25 2.8 SLITM, 3-Way SLITM and Quad SLITM Operation Guide ... 37 2.9 CrossFireXTM, 3-Way CrossFireXTM and Quad
CrossFireXTM Operation Guide 43 2.10 Surround Display Features 47 2.11 ASRock Smart Remote Installation Guide 48 2.12 Jumpers Setup 49 2.13 Onboard Headers and Connectors 50 2.14 Smart Switches 57 2.15 Dr. Debug 58 2.16 Serial ATA (SATA) / Serial...
User Manual - Page 4
... 67
2.23.2 Installing Windows® 7 / 7 64-bit / VistaTM / VistaTM 64-bit Without RAID Functions 68
2.24 Teaming Function Operation Guide (X79 Extreme6/GB 69
2.25 Untied Overclocking Technology 72
3 UEFI SETUP UTILITY 73
3.1 Introduction 73 3.1.1 UEFI Menu Bar 73 3.1.2 Navigation Keys 74
3.2 Main Screen 74 3.3 OC Tweaker Screen 76 3.4 Advanced Screen 81
3.4.1 CPU Configuration...
User Manual - Page 5
... x Rear USB 3.0 Bracket 1 x ASRock SLI_Bridge_2S Card 1 x ASRock 3-Way SLI-2S1S Bridge Card 1 x ASRock Game Blaster (X79 Extreme6/GB)
ASRock Reminds You... To get better performance in Windows® 7 / 7 64-bit / VistaTM / VistaTM 64bit, it is recommended to set the BIOS option in Storage Configuration to AHCI mode. For the BIOS setup, please refer to the "User Manual" in our support CD for...
User Manual - Page 9
...is no such limitation. You can use ASRock XFast RAM to utilize the memory that Windows® cannot use.
5. Currently Intel® Socket 2011 Sandy Bridge-E Processor doesn't support PCIE 3.0, but this motherboard is already PCIE 3.0 hardware ready. It depends on Intel's CPU to enable PCIE 3.0. Please check Intel's website for information on future CPU updates and releases.
6. For microphone input...
User Manual - Page 10
... the key during the POST or the key to enter into the BIOS setup menu to access ASRock Instant Flash. Just launch this tool and save the new BIOS file to your USB flash drive, floppy disk or hard drive, then you can update your BIOS only in a few clicks without preparing an additional floppy diskette or...
User Manual - Page 11
...update process, ASRock Crashless BIOS will automatically finish the BIOS update procedure after regaining power. Please note that BIOS files need to be placed in the root directory of your USB disk. Only USB2.0 ports support this feature.
16. Although this motherboard offers stepless control, it is not recommended to perform over-clocking. Frequencies other than the recommended CPU bus...
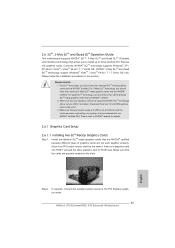
User Manual - Page 37
... are NVIDIA® certified. 2. Make sure that your graphics card driver supports NVIDIA® SLITM technology (driver version 280.41 and later). Download the driver from NVIDIA website (www.nvidia.com). 3. Make sure that your power supply unit (PSU) can provide at least the minimum power required by your system. It is recommended to use NVIDIA®...
User Manual - Page 43
...Windows® VistaTM / 7 OS only. Please check AMD website for ATITM CrossFireXTM driver updates.
1. If a customer incorrectly configures their system they will not see the performance benefits of CrossFireXTM. All three CrossFireXTM components, a CrossFireXTM Ready graphics card, a CrossFireXTM Ready motherboard and a CrossFireXTM Edition co-processor graphics card, must be installed...
User Manual - Page 46
....mspx B. You must have Microsoft .NET Framework installed prior to downloading and installing the CATALYST Control Center. Please check Microsoft website for details. For Windows® 7 / VistaTM OS: Install the CATALYST Control Center. Please check AMD website for details. Restart your computer. Install the VGA card drivers to your system, and restart your computer. Then you will find "ATI...
User Manual - Page 73

... information
OC Tweaker To set up overclocking features
Advanced To set up the advanced UEFI features
H/W Monitor To display current hardware status
Boot
To set up the default system device to locate and load the
Operating System
Security
To set up the security features
Exit
To exit the current screen or the UEFI SETUP UTILITY
Use < > key or...
User Manual - Page 96
...-ROM drive. The CD automatically displays the Main Menu if "AUTORUN" is enabled in your computer. If the Main Menu did not appear automatically, locate and double click on the file "ASSETUP.EXE" from the BIN folder in the Support CD to display the menus.
4.2.2 Drivers Menu The Drivers Menu shows the available devices drivers if the system detects installed devices...
User Manual - Page 98

... download the driver from
ASRock's website and unzip the file into a USB flash disk OR copy the file from ASRock motherboard support CD. (please copy the files under following directory: 32 bit: ..\i386\Win7_Vista_Intel_v3.0.0.1112 64-bit: ..\AMD64\Win7-64_Vista64_Intel_v3.0.0.1112 3. Create RAID array for you system. Please refer to "Intel RAID Installation Guide" fi...
Quick Installation Guide - Page 8
... x Rear USB 3.0 Bracket 1 x ASRock SLI_Bridge_2S Card 1 x ASRock 3-Way SLI-2S1S Bridge Card 1 x ASRock Game Blaster (X79 Extreme6/GB)
ASRock Reminds You... To get better performance in Windows® 7 / 7 64-bit / VistaTM / VistaTM 64bit, it is recommended to set the BIOS option in Storage Configuration to AHCI mode. For the BIOS setup, please refer to the "User Manual" in our support CD for...
Quick Installation Guide - Page 13
.... To use ASRock SmartView feature, please make sure your OS version is Windows® 7 / 7 64 bit / VistaTM / VistaTM 64 bit, and your browser version is IE8. ASRock website: http://www.asrock.com/Feature/SmartView/index.asp
11. ASRock XFast USB can boost USB storage device performance. The performance may depend on the properties of the device.
13 ASRock X79 Extreme6/GB / X79 Extreme6 Motherboard...
Quick Installation Guide - Page 14
...update process, ASRock Crashless BIOS will automatically finish the BIOS update procedure after regaining power. Please note that BIOS files need to be placed in the root directory of your USB disk. Only USB2.0 ports support this feature.
16. Although this motherboard offers stepless control, it is not recommended to perform over-clocking. Frequencies other than the recommended CPU bus...
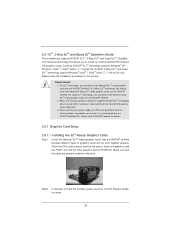
Quick Installation Guide - Page 33
... graphics cards will not work together properly. (Even the GPU chips version shall be the same.) Insert one graphics card into PCIE1 slot and the other graphics card to PCIE3 slot. Make sure that the cards are properly seated on the slots.
Step2. If required, connect the auxiliary power source to the PCI Express graphics cards.
33 ASRock X79 Extreme6/GB / X79 Extreme6 Motherboard
English
Quick Installation Guide - Page 39
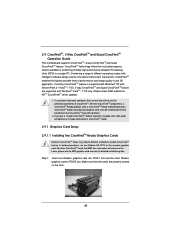
... graphics card. For other CrossFireXTM cards that AMD has released or will release in the future, please refer to AMD graphics card manuals for detailed installation guide.
Step 1. Insert one Radeon graphics card into PCIE1 slot and the other Radeon graphics card to PCIE3 slot. Make sure that the cards are properly seated on the slots.
39 ASRock X79 Extreme6/GB / X79 Extreme6 Motherboard
English
Quick Installation Guide - Page 42
...® taskbar.
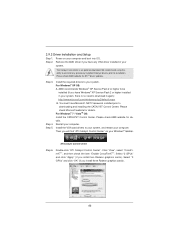
ATI Catalyst Control Center
Step 6.
Double-click "ATI Catalyst Control Center". Click "View", select "CrossFireXTM", and then check the item "Enable CrossFireXTM". Select "2 GPUs" and click "Apply" (if you install two Radeon graphics cards). Select "3 GPUs" and click "OK" (if you install three Radeon graphics cards).
English
42 ASRock X79 Extreme6/GB / X79 Extreme6 Motherboard
Quick Installation Guide - Page 246
... the item
"UEFI:xxx" to boot. C. Start Windows® Installation. When you see "Where do you want to install
Windows?" page, please click "Load Driver".
D. Plug the USB flash disk into your USB port; select "Browse" to find the RAID driver. Then choose the directory (xx\AMD64\) you have copied in the first step.
246 ASRock X79 Extreme6/GB / X79 Extreme6 Motherboard
English
Intel Rapid Storage Guide - Page 12
... to load the Intel® Rapid Storage Technology driver during operating system setup.
The F6 installation method is not required for Microsoft Windows Vista* or Note
Microsoft Windows 7*.
Enable RAID in System BIOS
Use the instructions included with your motherboard to enable RAID in the system BIOS.
1. Click F2 or Delete to enter the BIOS Setup program after the Power-On-Self-Test (POST) memory...