Acer Aspire G7700 driver and firmware
Drivers and firmware downloads for this Acer Computers item

Related Acer Aspire G7700 Manual Pages
Download the free PDF manual for Acer Aspire G7700 and other Acer manuals at ManualOwl.com
Aspire G7700 Series User's Guide - Page 10
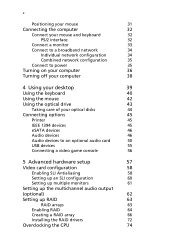
... network configuration
35
Connect to power
35
Turning on your computer
36
Turning off your computer
38
4 Using your desktop
39
Using the keyboard
40
Using the mouse
42
Using the optical drive
43
Taking care of your optical disks
44
Connecting options
45
Printer
45
IEEE 1394 devices
45
eSATA devices
46
Audio devices
46
Audio devices to an optional audio card
50
USB...
Aspire G7700 Series User's Guide - Page 11

...84
Post-installation instructions
85
Opening your Aspire G7700
86
Removing and installing the bezel door
86
Removing and installing the side panel
88
Removing and installing a hard drive
90
Removing and installing an optical drive
93
Upgrading the system memory
95
System memory interface
95
System memory configuration guidelines 96
Installing an expansion card
99
PCI bus slots...
Aspire G7700 Series User's Guide - Page 17
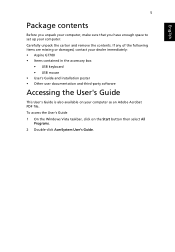
... set up your computer. Carefully unpack the carton and remove the contents. If any of the following items are missing or damaged, contact your dealer immediately: • Aspire G7700 • Items contained in the accessory box
• USB keyboard • USB mouse • User's Guide and installation poster • Other user documentation and third-party software
Accessing the User's Guide...
Aspire G7700 Series User's Guide - Page 50

38
3 Setting up your computer
English
Turning off your computer
The software procedure below applies to system running a Windows OS. For other OS shutdown procedures, refer to the related user documentation.
1 On the Windows Vista taskbar, click on the Start button, and click
,
then click Shut Down.
2 Turn off all peripherals connected to your computer.
If you cannot...
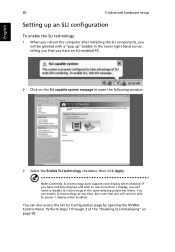
Aspire G7700 Series User's Guide - Page 72
...
5 Advanced hardware setup
Setting up an SLI configuration
To enable the SLI technology:
1 When you reboot the computer after installing the SLI components, you will be greeted with a "pop up" bubble in the lower right hand corner, telling you that you have an SLI-enabled PC.
2 Click on the SLI capable system message to open the following window.
1
1
2 Select the...
Aspire G7700 Series User's Guide - Page 78
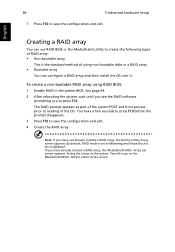
... the standard method of using non bootable disks in a RAID array. • Bootable array
You can configure a RAID array and then install the OS over it.
To create a non-bootable RAID array using RAID BIOS:
1 Enable RAID in the system BIOS. See page 64. 2 After rebooting the system, wait until you see the RAID software
prompting you to press F10. The...
Aspire G7700 Series User's Guide - Page 82
70
5 Advanced hardware setup
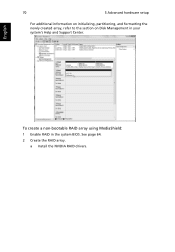
For additional information on initializing, partitioning, and formatting the newly created array, refer to the section on Disk Management in your system's Help and Support Center.
English
To create a non-bootable RAID array using MediaShield:
1 Enable RAID in the system BIOS. See page 64. 2 Create the RAID array.
a Install the NVIDIA RAID drivers.
Aspire G7700 Series User's Guide - Page 83

...Windows nForce Drivers page.
(2) Select the modules you want to install, then follow the onscreen instructions to finish installation.
b Open the NVIDIA Control Panel by right-clicking on the desktop and selecting NVIDIA Control Panel.
c From the Select a Task pane under the Storage category, select Create array to start the Create Array Wizard and follow the onscreen instructions to complete disk...
Aspire G7700 Series User's Guide - Page 84

...Select NVIDIA nForce RAID Controller, then click Next. 7 Click Load Driver. 8 At the Load Driver dialog box, click Browse then navigate to the folder
containing the installation files. 9 Select NVIDIA nForce Serial ATA Controller, then click Next.
Note: You do not need to install the nForce RAID Device. Windows handles it automatically as part of the RAID and SATA controller installation process.
Aspire G7700 Series User's Guide - Page 85

English
73
10 Select the disk where you want to install Windows and follow all onscreen instructions to complete installation.
Important: After Windows Vista is completely installed, it is recommended to install the nForceWare software in order to access the MediaShield Storage interface.
For more information on how to use NVIDIA MediaShield, refer to its online help.
Aspire G7700 Series User's Guide - Page 89
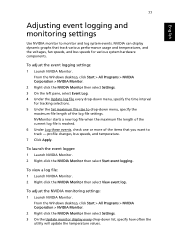
... NVIDIA Monitor. 2 Right-click the NVIDIA Monitor then select View event log.
To adjust the NVIDIA monitoring settings:
1 Launch NVIDIA Monitor. From the Windows desktop, click Start > All Programs > NVIDIA Corporation > NVIDIA Monitor.
2 Right-click the NVIDIA Monitor then select Settings. 3 On the Update monitor display every drop-down list, specify how often the
utility will...
Aspire G7700 Series User's Guide - Page 96
English
84
6 Upgrading your computer
Installation precautions
Before you install any computer component, we recommend that you read the following sections. These sections contain important ESD precautions along with preinstallation and post-installation instructions.
ESD precautions
Electrostatic discharge (ESD) can damage your processor, disk drives, expansion boards, and other components. ...
Aspire G7700 Series User's Guide - Page 98

English
86
6 Upgrading your computer
Opening your Aspire G7700
Caution: Before you proceed, make sure that you have turned off your computer and all peripherals connected to it. Read the "Preinstallation instructions" on page 84.
You need to open your computer before you can install upgrade components. The side panel is removable to allow access to the computer's internal components. Refer...
Aspire G7700 Series User's Guide - Page 100
English
88
6 Upgrading your computer
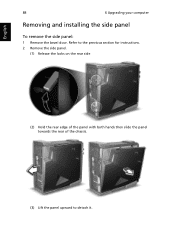
Removing and installing the side panel
To remove the side panel:
1 Remove the bezel door. Refer to the previous section for instructions. 2 Remove the side panel.
(1) Release the locks on the rear side
(2) Hold the rear edge of the panel with both hands then slide the panel towards the rear of the chassis.
(3) Lift the panel upward to detach it.
Aspire G7700 Series User's Guide - Page 102
English
90
6 Upgrading your computer
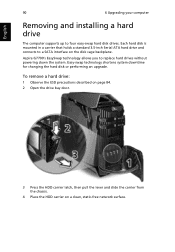
Removing and installing a hard drive
The computer supports up to four easy-swap hard disk drives. Each hard disk is mounted in a carrier that holds a standard 3.5-inch Serial ATA hard drive and connects to a SATA interface on the disk cage backplane.
Aspire G7700's EasySwap technology allows you to replace hard drives without powering down the system. Easy-...
Aspire G7700 Series User's Guide - Page 106

94
6 Upgrading your computer
4 Move the release slider into the lock position.
English
5 Connect the power and data cables to the rear of the new drive. 6 Observe the post-installation instructions described on page 85.
Aspire G7700 Series User's Guide - Page 107
English
95
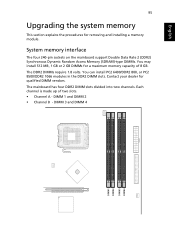
Upgrading the system memory
This section explains the procedures for removing and installing a memory module.
System memory interface
The four 240-pin sockets on the mainboard support Double Data Rate 2 (DDR2) Synchronous Dynamic Random Access Memory (SDRAM)-type DIMMs. You may install 512 MB, 1 GB or 2 GB DIMMs for a maximum memory capacity of 8 GB. The DDR2 DIMMs require...
Aspire G7700 Series User's Guide - Page 108
96
6 Upgrading your computer
English
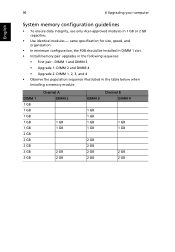
System memory configuration guidelines
• To ensure data integrity, use only Acer-approved modules in 1 GB or 2 GB capacities.
• Use identical modules - same specification for size, speed, and organization.
• In minimum configuration, the FDB should be installed in DIMM 1 slot. • Install memory pair upgrades in the following sequence:
...
Aspire G7700 Series User's Guide - Page 136
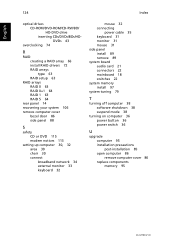
... 115 modem notices 113
setting up computer 30, 32 area 30 chair 30 connect broadband network 34 external monitor 33 keyboard 32
mouse 32 connecting
power cable 35 keyboard 31 monitor 31 mouse 31 side panel install 89 remove 89 system board audio card 21 connectors 22 mainboard 18 switches 22 system memory install 97 system tuning 79
T
turning off computer 38 software shutdown...
Aspire G7700 Service Guide - Page 87
... directly from Acer CSD Taiwan.
Acer's Website offers you convenient and valuable support resources whenever you need them.
In the Support & Downloads tab you can download information materials for all of Acer notebook, desktop and server models including:
Service guides for all models
User's manuals
Training materials
BIOS updates
Software utilities...