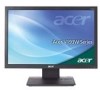
Acer V193W - bm - 19" LCD Monitor driver and firmware
Drivers and firmware downloads for this Acer Computers item

Related Acer V193W Manual Pages
Download the free PDF manual for Acer V193W and other Acer manuals at ManualOwl.com
Quick Start Guide - Page 1
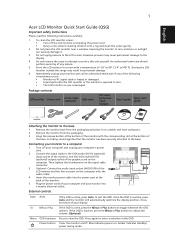
...to the VGA and/or DVI-D (optional) input socket of the monitor, and the VGA and/or DVI-D (optional) output socket of the graphics card on the computer. Then tighten the thumbscrews on the signal cable connector.
3 Optional: Connect the audio input socket (AUDIO IN) of the LCD monitor and the line-out port on the computer with the audio cable.
4 Insert the monitor power cable into the power port at...
Quick Start Guide - Page 2
... experienced radio/television technician for help.
CE declaration of conformity Hereby, Acer Inc., declares that this LCD monitor is in compliance with the essential requirements and other relevant provisions of EMC Directive 2004/108/EC, Low Voltage Directive 2006/95/EC, and RoHS Directive 2002/95/EC.
Notice: Shielded cables All connections to other computing devices must...
Quick Start Guide - Page 3
English
3
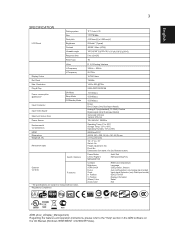
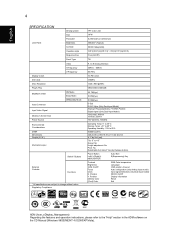
SPECIFICATION
LCD Panel
Display Colors Dot Clock Max. Resolution Plug & Play Power consumption @200cd/m2 Input Connector Input Video Signal Maximum Screen Size Power Source Environmental Considerations MTBF Dimensions Weight (N. W.) Mechanism spec
External Controls:
Driving system Size Pixel pitch Brightness Contrast Viewable angle Response time Panel Type Video H-Frequency V-...
User Manual - Page 4
...power from the equipment, be sure to unplug the power cord from the electrical outlet.
Safe listening
To protect your hearing, follow these instructions.
• Gradually increase the volume until you can hear it clearly and comfortably
and without distortion.
• After setting...in installation unless ...devices.
Using electrical power
• This product should be operated from the type of power...
User Manual - Page 9
...reflections by: • placing your display in such a way that the side faces the window or
any light source
• ...display's top front edge
• Avoid adjusting your display to an awkward viewing angle. • Avoid looking at bright light sources, such as open windows, for extended
periods of time.
Developing good work habits
Develop the following work habits to make your computer...
User Manual - Page 13
... Communications Commission Declaration of Conformity Unpacking Attaching/removing the base Screen position adjustment Connecting the power cord Power saving Display Data Channel (DDC) Connector pin assignment Standard timing table Installation User controls How to adjust a setting Acer eColor Management User Troubleshooting VGA mode DVI mode
1
iii iii iii iii iii iv iv iv iv v vi vi vii vii viii...
User Manual - Page 17

... light Blue
Amber
The power saving mode will be kept until a control signal has been detected or the keyboard or mouse is activated. The recovery time from "power saving" mode back to "on" is around 3 seconds.
Display Data Channel (DDC)
To make installation easier, so long as your system supports the DDC protocol, the monitor is able to...
User Manual - Page 20
6
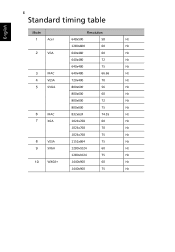
Standard timing table
English
Mode
Resolution
1
Acer
648x500
58
Hz
1280x800
60
Hz
2
VGA
640x480
60
Hz
640x480
72
Hz
640x480
75
Hz
3
MAC
640x480
66.66
Hz
4
VESA
720x400
70
Hz
5
SVGA
800x600
56
Hz
800x600
60
Hz
800x600
72
Hz
800x600
75
Hz
6
MAC
832x624
74.55
Hz
7
XGA
1024x768
60
Hz
1024x768
70...
User Manual - Page 21
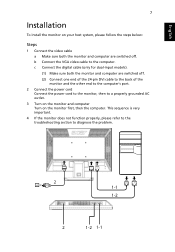
... monitor and computer are switched off. b Connect the VGA video cable to the computer. c Connect the digital cable (only for dual-input models). (1) Make sure both the monitor and computer are switched off. (2) Connect one end of the 24-pin DVI cable to the back of the monitor and the other end to the computer's port.
2 Connect the power cord Connect the power cord to the monitor...
User Manual - Page 23
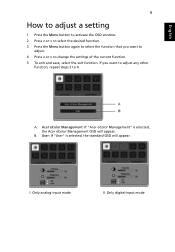
...OSD window. 2 Press < or > to select the desired function. 3 Press the Menu button again to select the function that you want to
adjust. 4 Press < or > to change the settings of... the current function. 5 To exit and save, select the exit function. If you want to adjust any other
function, repeat steps 2 to 4.
A. Acer eColor Management: If "Acer eColor Management" is selected, the Acer ...
Quick Start Guide - Page 1

...to the VGA and/or DVI-D (optional) input socket of the monitor, and the VGA and/or DVI-D (optional) output socket of the graphics card on the computer. Then tighten the thumbscrews on the signal cable connector.
3 Optional: Connect the audio input socket (AUDIO IN) of the LCD monitor and the line-out port on the computer with the audio cable.
4 Insert the monitor power cable into the power port at...
Quick Start Guide - Page 2
... experienced radio/television technician for help.
CE declaration of conformity Hereby, Acer Inc., declares that this LCD monitor is in compliance with the essential requirements and other relevant provisions of EMC Directive 2004/108/EC, Low Voltage Directive 2006/95/EC, and RoHS Directive 2002/95/EC.
Notice: Shielded cables All connections to other computing devices must...
Quick Start Guide - Page 4
English
4
SPECIFICATION
LCD Panel
Display Colors Dot Clock Max. Resolution Plug & Play ENERGY STAR
Input Connector Input Video Signal Maximum Screen Size Power Source Environmental Considerations MTBF Dimensions Weight (N. W.) Mechanism spec
External Controls:
Driving system Size Pixel pitch Brightness Contrast Viewable angle Response time Panel Type Video H-Frequency V-Frequency
ON Mode Sleep ...
Service Guide - Page 3
... in a retrieval system, or translated into any language or computer language, in any form or by any means, electronic, mechanical, magnetic, optical, chemical, manual or otherwise, without the prior written permission of Acer Incorporated.
Disclaimer The information in this guide is subject to change without notice. Acer Incorporated makes no representations or warranties, either expressed or...
Service Guide - Page 4
... FRU list of this printed Service Guide. You MUST use the list provided by your regional Acer office to order FRU parts for repair and service of customer machines.
Warning: (For FCC Certified Models)
Note: This equipment has been tested and found to comply with the limits for a Class B digital device, pursuant to Part 15 of...
Service Guide - Page 5
... wall socket shall be installed near the equipment and shall be easily accessible.
Special Notes On LCD Monitors
The following symptoms are normal with LCD monitor and do not indicate a problem.
Notes
Due to the nature of the fluorescent light, the screen may flicker during initial use. Turn off the Power Switch and then turn it...
Service Guide - Page 6
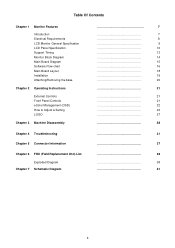
... Features
Introduction Electrical Requirements LCD Monitor General Specification LCD Panel Specification Support Timing Monitor Block Diagram Main Board Diagram Software Flow chart Main Board Layout Installation Attaching/Removing the base
Chapter 2 Operating Instructions
External Controls Front Panel Controls eColor Management (OSD) How to Adjust a Setting LOGO
Chapter 3 Machine Disassembly...
Service Guide - Page 17
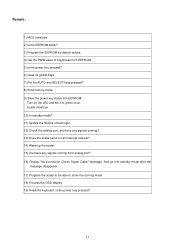
... up the scalar. 15) Are there any signals coming from analog port? 16) Display "No connection Check Signal Cable" message. And go into standby mode after the
message disappears. 17) Program the scalar to be able to show the coming mode. 18) Process the OSD display. 19) Read the keyboard. Is the power key pressed?
17
Service Guide - Page 19

...;Connect the VGA video cable to the computer. 2 Connect the power cord Connect the power cord to the monitor, then to a properly grounded AC outlet. 3 Turn on the monitor and computer Turn on the monitor first, then the computer. This sequence is very important. 4 If the monitor does not function properly, please refer to the troubleshooting section to diagnose the problem.
19