Acer Veriton X4610G driver and firmware
Drivers and firmware downloads for this Acer Computers item


Related Acer Veriton X4610G Manual Pages
Download the free PDF manual for Acer Veriton X4610G and other Acer manuals at ManualOwl.com
Veriton X461x Desktop Series Service Guide - Page 2

Revision History
Please refer to the table below for the updates made on this service guide.
Date
Chapter
Updates
ii
Veriton X461x Desktop Series Service Guide - Page 4
... merchantability or fitness for any particular purpose. Any Acer Incorporated software described in this manual is sold or licensed "as is". Should the programs prove defective following their purchase, the buyer (and not Acer Incorporated, its distributor, or its dealer) assumes the entire cost of all necessary servicing, repair, and any incidental or consequential damages...
Veriton X461x Desktop Series Service Guide - Page 5
... this manual:
SCREEN MESSAGES
Denotes actual messages that appear on screen.
NOTE
Gives additional information related to the current topic.
WARNING CAUTION IMPORTANT
Alerts you to any physical risk or system damage that might result from doing or not doing specific actions.
Gives precautionary measures to avoid possible hardware or software problems...
Veriton X461x Desktop Series Service Guide - Page 7
... ODD Bracket
62
Romoving the Outside Connector Slice
63
Install the I/O Shielding
63
Install the Main Board
64
Install the Internal Speaker
65
Connect the Cable
66
Install the Optical Drive Bracket
68
Install the Hard Disk Drive
69
Install the Optical Drive
71
Install the VGA Card
73
Install the Wireless LAN Card
74
Install the Printer Port Cable and COM2 Port Cable
75
vii
Veriton X461x Desktop Series Service Guide - Page 8
...79
System Check Procedures
80
Power System Check
80
System External Inspection
80
System Internal Inspection
80
Beep Codes
81
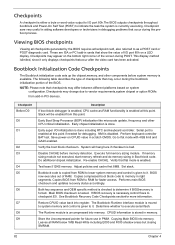
Checkpoints
82
BIOS Recovery
85
Jumper and Connector Information
86
M/B Placement
86
Jumper Setting
88
Setting Jumper
88
FRU (Field Replaceable Unit) List
96
Veriton X4610/X4610G/X4618G Exploded Diagram
97
Veriton X4610/X4610G/X4618G FRU List
98...
Veriton X461x Desktop Series Service Guide - Page 9

...nm, 2nd Generation Hi-K+metal gate process processor core. • 32nm, Hi-K+metal gate process, Intel® HD Graphics & Integrated Memory Controller.
Chipset
• PCH: Intel Q65 • Design Criteria:
• Should meet Intel Cougar Point platform design guide. • Super I/O:
• Should support Intel PECI 3.0. • Should support SST signal output. • Please follow Intel...
Veriton X461x Desktop Series Service Guide - Page 11
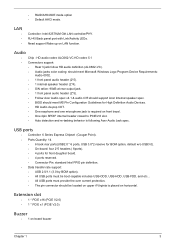
... re-tasking behavior is following Acer Audio Jack spec.
USB ports
• Controller: 6 Series Express Chipset (Cougar Point). • Ports Quantity: 14
• 6 back rear ports(USB2.0 * 6 ports, USB 3.0*2 reserve for BOM option, default w/o USB3.0). • On-board: four 2*5 headers ( 8ports). • 4 ports for front daughter board. • 4 ports reserved. • Connector Pin: standard...
Veriton X461x Desktop Series Service Guide - Page 18
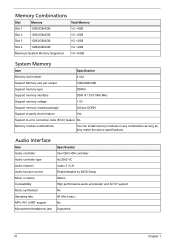
... can install memory modules in any combination as long as they match the above specifications.
Audio Interface
Item Audio controller Audio controller type Audio channel Audio function control Mono or stereo Compatibility Music synthesizer Sampling rate MPU-401 UART support Microphone/Headphone jack
Specification Intel Q65 HDA controller ALC662-VC codec 5.1CH Enable/disable by BIOS Setup Stereo...
Veriton X461x Desktop Series Service Guide - Page 20
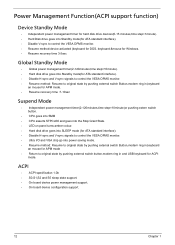
...(ACPI support function)
Device Standby Mode
• Independent power management timer for hard disk drive devices(0-15 minutes,time step=1minute). • Hard Disk drive goes into Standby mode(for ATA standard interface). • Disable V-sync to control the VESA DPMS monitor. • Resume method:device activated (keyboard for DOS, keyboard &mouse for Windows. • Resume recovery time...
Veriton X461x Desktop Series Service Guide - Page 23

... System BIOS
Version Build Date Processor Core Frequency Count Memory Size Product Name System Serial Number Asset Tag Number System Date System Time (hh:mm:ss)
Description
Version number of the BIOS setup utility. Date when the BIOS setup utility was built Type of CPU installed on the system. Core speed of the CPU installed on the system. Physical CPU count
Total size of system memory installed...
Veriton X461x Desktop Series Service Guide - Page 30
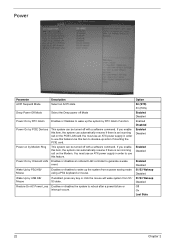
... action if inserting the PCIE card. This system can be turned off with a software commend. If you enable this item, the system can automatically resume if there is an incoming call on the Modem. You must use an ATX power supply in order to use this feature. Enables or disables an onboard LAN controller to generate a wake...
Veriton X461x Desktop Series Service Guide - Page 31
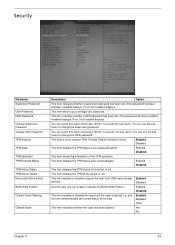
... Supervisor Password User Password HDD Password Change Supervisor Password Change HDD Password TPM Support
TPM State
TPM Operation TPM Enabled Status
TPM Active Status TPM Owner Status Removable Device Boot
BIOS Write Protect
Chassis Open Warning
Chassis Open
Description
Option
This item indicates whether a supervisor password has been set. If the password has been installed, Installed displays...
Veriton X461x Desktop Series Service Guide - Page 42
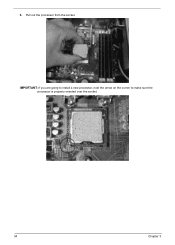
3. Pull out the processor from the socket.
IMPORTANT: If you are going to install a new processor, note the arrow on the corner to make sure the processor is properly oriented over the socket.
34
Chapter 3
Veriton X461x Desktop Series Service Guide - Page 66
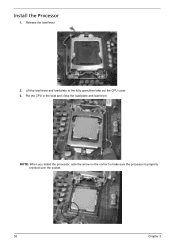
Install the Processor
1. Release the load lever.
2. Lift the load lever and load plate to the fully open,then take out the CPU cover. 3. Put the CPU in the seat and close the load plate and load lever.
NOTE: When you install the processor, note the arrow on the corner to make sure the processor is properly oriented over the socket.
58
Chapter 3
Veriton X461x Desktop Series Service Guide - Page 67
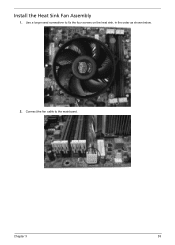
Install the Heat Sink Fan Assembly
1. Use a long-nosed screwdriver to fix the four screws on the heat sink, in the order as shown below.
2. Connect the fan cable to the mainboard.
Chapter 3
59
Veriton X461x Desktop Series Service Guide - Page 68
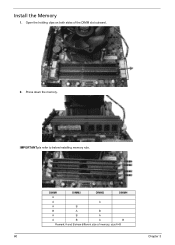
Install the Memory
1. Open the holding clips on both sides of the DIMM slot outward.
2. Press down the memory.
IMPORTANT:pls refer to below installing memory rule.
DIMM1
DIMM2
DIMM3
DIMM4
A
A
A
A
B
B
A
B
A
B
A
A
B
A
B
Remark:A and B show different size of memory, size:A>B
60
Chapter 3
Veriton X461x Desktop Series Service Guide - Page 71
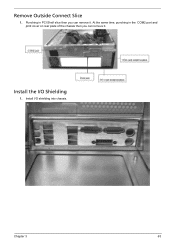
Remove Outside Connect Slice
1. Punching in PCI Shelf slice then you can remove it. At the same time, punching in the COM2 port and print cover on rear plate of the chassis then you can remove it.
Install the I/O Shielding
1. Install I/O shielding into chassis.
Chapter 3
63
Veriton X461x Desktop Series Service Guide - Page 72
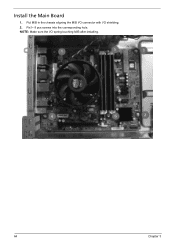
Install the Main Board
1. Put M/B in the chassis aligning the M/B I/O connector with I/O shielding. 2. Fix1~ 8 pcs screws into the corresponding hole. NOTE: Make sure the I/O spring touching M/B after installing.
64
Chapter 3
Veriton X461x Desktop Series Service Guide - Page 90
... is enabled.
Test base 512KB memory. Adjust policies and cache first 8MB. Set stack.
Bootblock code is copied from ROM to lower system memory and control is given to it. BIOS now executes out of RAM. Copies compressed boot block code to memory in right segments. Copies BIOS from ROM to RAM for faster access. Performs main BIOS checksum and updates recovery status accordingly.
Both key sequence...
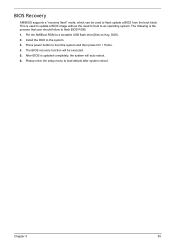
Veriton X461x Desktop Series Service Guide - Page 93
... user should follow to flash BIOS ROM. 1. Put the AMIBoot.ROM to a bootable USB flash drive(Disk on Key, DOK). 2. Install the DOK to the system. 3. Press power button to boot the system and then press Ctrl + Home. 4. The BIOS recovery function will be executed. 5. After BIOS is updated completely, the system will auto reboot. 6. Please enter the setup menu to load default after system reboot...