Acer X203H driver and firmware

Related Acer X203H Manual Pages
Download the free PDF manual for Acer X203H and other Acer manuals at ManualOwl.com
Acer X203H Service Guide - Page 2
...View 21 4.2 Disassembly /Assembly 23
5. Level 1 Cosmetic / Appearance / Alignment Service 34
5.1 Alignment procedure (for function adjustment 34 5.2 Software / Firmware Upgrade Process 38 5.3 EDID Upgrade Procedure 42 5.4 OSD Operation Guide 46
6. Level 2 Circuit Board and Standard Parts Replacement 51
6.1 Trouble Shooting Guide 51 6.2 Circuit Operation Theory 57 6.3 Spare Parts List 61...
Acer X203H Service Guide - Page 13
...
typical lifetime of CCFL is on the condition at 7.0mA lamp current.
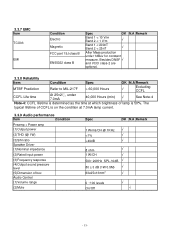
3.3.9 Audio performance
Item
Condition
Preamp + Power amp (1)Output power
(2)THD (@ 1W)
(3)S/N ratio Speaker Driver (1)Nominal impedance
(2)Rated input power
(3)Frequency response (4)Output sound pressure level (5)Dimension of box Audio Control (1)Volume range
(2)Mute
Spec
OK N.A Remark
1 Wrms/CH @ 1KHz √
40dB...
Acer X203H Service Guide - Page 17

Acer eColor Management
User/Text/Standard/Graphi c/Movie
√
Exit
√
PS: "E-key" +" Power" to enter factory mode The detailed firmware functions' specification, please refer to C212 S/W spec. document.
3.6 Mechanical Characteristics
3.6.1 Dimension Item Bezel opening Monitor without Stand
Condition W x H x D mm
Monitor with Stand
W x H x D mm
Carton Box (...
Acer X203H Service Guide - Page 23
...
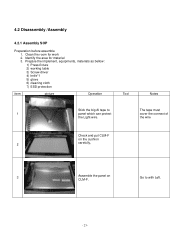
Preparation before assemble 1. Clean the room for work 2. Identify the area for material 3. Prepare the implement, equipments, materials as bellow: 1) Press-fixture 2) working table 3) Screw-driver 4) knife*1 5) glove 6) cleaning cloth 7) ESD protection
item
picture
Operation
Tool
Notes
Stick the big Al tape to
The tape must
1
panel which can protect
cover...
Acer X203H Service Guide - Page 24
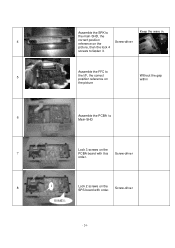
Assemble the SPK to
Keep the ware in.
the main-SHD, the
4
correct position reference on the
Screw-driver
picture, then the lock 4
screws to fasten it.
Assemble the FFC to
5
the I/F, the correct position reference on
Without the gap within
the picture
6
Assemble ...
Acer X203H Service Guide - Page 25
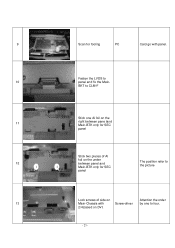
9
Scan for fooling
PC
Card go with panel.
Fasten the LVDS to
10
panel and fix the Main-
BKT to CLM-F
Stick one Al foil on the
11
right between ... Main-BTK only for SEC panel
The position refer to the picture
Lock screws of side on
Attention the order
13
Main-Chassis with
Screw-driver by one to four.
2/4,based on DVI.
- 25 -
Acer X203H Service Guide - Page 29
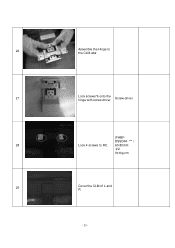
26
Assemble the Hinge to the CLM-abs
27
Lock screws*6 onto the hinge with screw-driver
Screw-driver
(FABF-
DSSDA1-***α
28
Lock 4 screws to RC. 60-80mm
Ϟ2
9±1kg.cm
29
Cover the CLM of L and R
- 29 -
Acer X203H Service Guide - Page 30
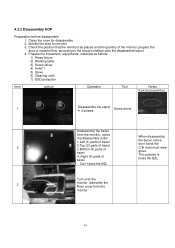
... the disassemble layout 4. Prepare the implement, equipments, materials as bellow: 1) Press-fixture 2) Working table 3) Screw-driver 4) Knife*1 5) Glove 6) Cleaning cloth 7) ESD protection
item
picture
Operation
Tool
Notes Kick the board first.
1
Disassemble the stand 4 screws
Screw-driver
Disassembly the bezel
2
from the monitor, notice the disassembly order : 1.Left (1) parts of bezel...
Acer X203H Service Guide - Page 31
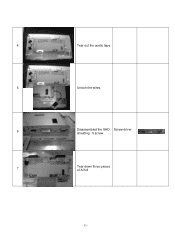
4
Tear out the acetic tape
5
Unlock the wires.
6
Disassembled the SHD Screw-driver shielding : 5 screw
7
Tear down three pieces of Al foil
- 31 -
Acer X203H Service Guide - Page 32
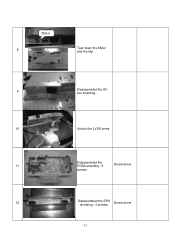
Mylar 8
Tear down the Mylar and the tap
9
Disassembled the ACsoc shielding .
10
Unlock the LVDS wires.
11
Disassembled the PCBA shielding : 5
Screw-driver
screws
12
Disassembled the SPK shielding : 4 screws
Screw-driver
- 32 -
Acer X203H Service Guide - Page 38
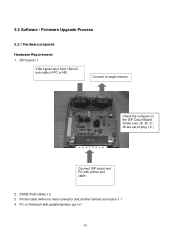
5.2 Software / Firmware Upgrade Process
5.2.1 Hardware prepared:
Hardware Requirement: 1. ISP board x 1
VGA signal input from 15pin Dsub cable of PC or NB.
Connect to target monitor
Check the Jumpers on the ISP Circuit Board (make sure J5, J6, J7, J8 are set at ping 1,2 )
Connect ISP board and PC with printer port cable
2. DSUB VGA cables x 2 3. Printer cable (with one male connector and ...
Acer X203H Service Guide - Page 39
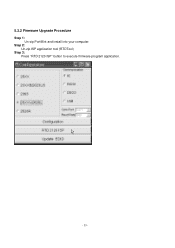
5.2.2 Firmware Upgrade Procedure Step 1:
Un-zip Port95nt and install into your computer. Step 2:
Un-zip ISP application tool (RTDTool) Step 3:
Press "RTD 2120 ISP" button to execute firmware program application.
- 39 -
Acer X203H Service Guide - Page 40
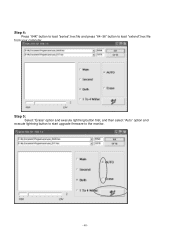
Step 4: Press "64K" button to load *series*.hex file and press "64~96" button to load *extend*.hex file
from your computer.
Step 5: Select "Erase" option and execute lightning button first, and then select "Auto" option and
execute lightning button to start upgrade firmware to the monitor.
- 40 -
Acer X203H Service Guide - Page 41
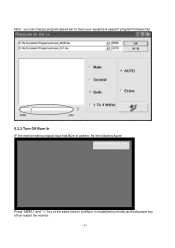
Note: you can change program speed bar to meet your equipment speed if program firmware fail.
5.2.3 Turn Off Burn In IF the monitor without signal input has Burn In pattern. As the following figure
ENTER and RIGHT to Burn In Off
Press "MENU" and ">" key at the same time to exit Burn in mode(factory mode),and soft power key off/on restart the monitor.
- 41 -
Acer X203H Service Guide - Page 42
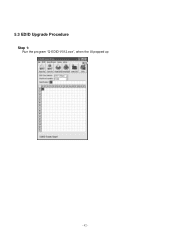
5.3 EDID Upgrade Procedure
Step 1: Run the program "Q-EDID-V012.exe", when the UI popped up
- 42 -
Acer X203H Service Guide - Page 44
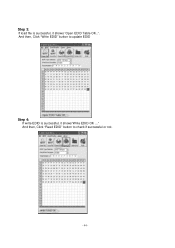
Step 3: If load file is successful, it shows "Open EDID Table OK..". And then, Click "Write EDID" button to update EDID
Step 4: If write EDID is successful, it shows"Write EDID OK ..." And then, Click "Read EDID" button to check if successful or not.
- 44 -
User Manual - Page 4
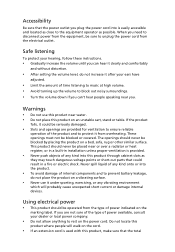
...power from the equipment, be sure to unplug the power cord from the electrical outlet.
Safe listening
To protect your hearing, follow these instructions.
• Gradually increase the volume until you can hear it clearly and comfortably
and without distortion.
• After setting...in installation unless ...devices.
Using electrical power
• This product should be operated from the type of power...
User Manual - Page 9
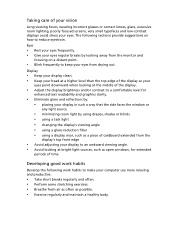
...reflections by: • placing your display in such a way that the side faces the window or
any light source
• ...display's top front edge
• Avoid adjusting your display to an awkward viewing angle. • Avoid looking at bright light sources, such as open windows, for extended
periods of time.
Developing good work habits
Develop the following work habits to make your computer...
User Manual - Page 13
...
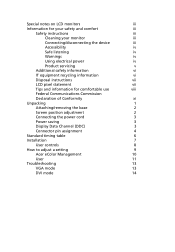
Declaration of Conformity
xi
Unpacking
1
Attaching/removing the base
2
Screen position adjustment
2
Connecting the power cord
3
Power saving
3
Display Data Channel (DDC)
3
Connector pin assignment
4
Standard timing table
6
Installation
7
User controls
8
How to adjust a setting
9
Acer eColor Management
10
User
11
Troubleshooting
13
VGA mode
13
DVI mode
14
User Manual - Page 17
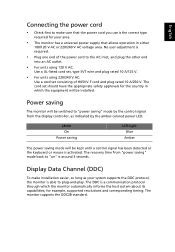
...-colored power LED.
Mode On
Power saving
LED light Blue
Amber
The power saving mode will be kept until a control signal has been detected or the keyboard or mouse is activated. The recovery time from "power saving" mode back to "on" is around 3 seconds.
Display Data Channel (DDC)
To make installation easier, so long as your system supports the...