Acer XS-X10 driver and firmware

Related Acer XS-X10 Manual Pages
Download the free PDF manual for Acer XS-X10 and other Acer manuals at ManualOwl.com
User Manual - Page 3
... for cleaning.
Caution for plug as disconnecting device
Observe the following guidelines when connecting and disconnecting power to the external power supply unit:
• Install the power supply unit before connecting the power cord to the AC
power outlet.
• Unplug the power cord before removing the power supply unit from the
projector.
• If the system has multiple sources...
User Manual - Page 5
... damaged • the product exhibits a distinct change in performance, indicating a need
for service
• the product does not operate normally after following the operating
instructions
Note: Adjust only those controls that are covered by the operating instructions, since improper adjustment of other controls may result in damage and will often require extensive work by a qualified...
User Manual - Page 6
... the remote control.
• The lamp becomes extremely hot during operation. Allow the projector to
...servicing only to suitable qualified professional service personnel.
• Do not stand the projector on end vertically. It may cause the projector to
fall over, causing injury or damage.
• This product is capable of displaying inverted images for ceiling mount
installation. Only use acer...
User Manual - Page 9
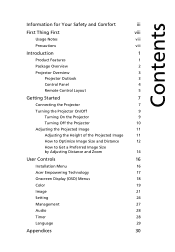
...Projector Overview
3
Projector Outlook
3
Control Panel
4
Remote Control Layout
5
Getting Started
7
Connecting the Projector
7
Turning the Projector On/Off
9
Turning On the Projector
9
Turning Off the Projector...
User Controls
16
Installation Menu
16
Acer Empowering Technology
17
Onscreen Display (OSD) Menus
18
Color
19
Image
21
Setting
24
Management
27
Audio
28
Timer...
User Manual - Page 10

Troubleshooting
30
LED & Alarm Definition Listing
34
Replacing the Lamp
35
Ceiling Mount Installation
36
Specifications
39
Compatibility Modes
41
Regulations and safety notices
45
User Manual - Page 11
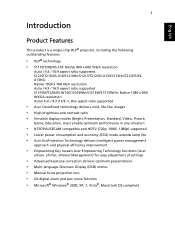
...XS-X10/S1210Hn/S1213/T212/XS-X13/S1213Hn/T212DT/XSX13HG: Native 1024 x 768 XGA resolution Auto / 4:3 / 16:9 aspect ratio supported S1310W/T220/XS-W10/S1310WHn/S1313W/S1313WHn: Native 1280 x 800 WXGA resolution Auto/ Full / 4:3 /16:9 / L.Box aspect ratio supported
• Acer ColorBoost technology delivers vivid, life-like images • High brightness and contrast ratio • Versatile display...
User Manual - Page 26
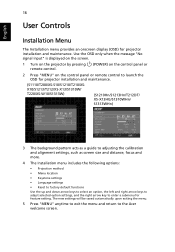
... remote control.
(POWER) on the control panel or
2 Press "MENU" on the control panel or remote control to launch the OSD for projector installation and maintenance.
(S1110/T200/XS-S10/S1210/T210/XSX10/S1213/T212/XS-X13/S1310W/ T220/XS-W10/S1313W)
(S1210Hn/S1213Hn/T212DT/ XS-X13HG/S1310WHn/ S1313WHn)
3 The background pattern acts as a guide to adjusting the calibration and alignment settings...
User Manual - Page 33
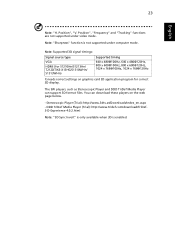
... not supported under computer mode.
Note: Supported 3D signal timings:
Signal source type
VGA
HDMI (for S1210Hn/S1213Hn/ T212DT/XS-X13HG/S1310WHn/ S1313WHn)
Supported timing
640 x 480@100Hz, 640 x 480@120Hz, 800 x 600@100Hz, 800 x 600@120Hz, 1024 x 768@100Hz, 1024 x 768@120Hz
It needs correct settings on graphics card 3D application program for correct 3D display.
The SW players, such...
User Manual - Page 42

...
• Press "RESYNC" on the control panel or remote
or incorrectly
control.
displayed image
(For PC (Windows • For an incorrectly displayed image:
95/98/2000/XP/
• Open "My Computer > Control Panel," and
Win7/Vista))
then double-click the "Display" icon.
• Select the "Settings" tab.
• Verify that your display resolution setting is
lower than or equal to 1600...
User Manual - Page 43
31
English
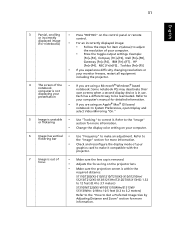
3 Partial, scrolling or incorrectly displayed image (For notebooks)
• Press "RESYNC" on the control panel or remote
control.
• For an incorrectly displayed image: • Follow the steps for item 2 (above) to adjust
the resolution of your computer.
• Press the toggle output settings. Example:
[Fn]+[F4], Compaq [Fn]+[F4], Dell [Fn]+[F8], Gateway [Fn]+[F4], IBM...
User Manual - Page 45
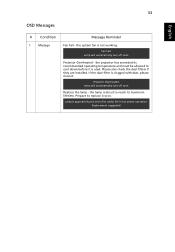
...the system fan is not working.
Fan Fail. Lamp will automatically turn off soon.
Projector Overheated - the projector has exceeded its recommended operating temperature and must be allowed to cool down before it ... Please also check the dust filters if they are installed. If the dust filter is clogged with dust, please clean it.
Projector Overheated. Lamp will automatically turn off soon.
Replace the...
User Manual - Page 48
English
8.4 mm
2 0
36
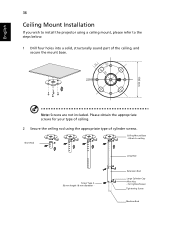
Ceiling Mount Installation
If you wish to install the projector using a ceiling mount, please refer to the steps below:
1 Drill four holes into a solid, structurally sound part of the ceiling, and secure the mount base.
...
User Manual - Page 57
... receiver is connected. • Consult the dealer or an experienced radio/television technician for help.
Notice: Shielded cables
All connections to other computing devices must be made using shielded cables to maintain compliance with FCC regulations.
Notice: Peripheral devices
Only peripherals (input/output devices, terminals, printers, etc.) certified to comply with the Class B limits may be...
User Manual - Page 58
... Canada.
Declaration of Conformity for EU countries
Acer hereby, declares that this projector series is in compliance with the essential requirements and other relevant provisions of Directive 1999/5/EC. Compliant with Russian regulatory certification
Radio device regulatory notice
Note: The regulatory information below is for models with wireless LAN and/or Bluetooth only.
General
This...