Acer AL1716 driver and firmware
Related Acer AL1716 Manual Pages
Download the free PDF manual for Acer AL1716 and other Acer manuals at ManualOwl.com
AL1716e Service Guide - Page 1
Acer AL1716e Service Guide
Service guide files and updates are available on the CSD web: for more information, Please refer to http://csd.acer.com.tw/
100% Recycled Paper
- 1 -
AL1716e Service Guide - Page 2

... in a retrieval system, or translated into any language or computer language, in any form or by any means, electronic, mechanical, magnetic, optical, chemical, manual or otherwise, without the prior written permission of Acer Incorporated.
Disclaimer
The information in this guide is subject to change without notice. Acer Incorporated makes no representations or warranties, either expresses or...
AL1716e Service Guide - Page 3
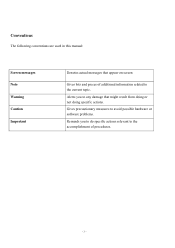
... this manual:
Screen messages Note Warning Caution Important
Denotes actual messages that appear on screen
Gives bits and pieces of additional information related to the current topic. Alerts you to any damage that might result from doing or not doing specific actions. Gives precautionary measures to avoid possible hardware or software problems...
AL1716e Service Guide - Page 5
... for a Class B digital device, pursuant to Part 15 of the FCC Rules. These limits are designed to provide reasonable protection against harmful interference in a residential installation. This equipment generates, uses... interface cables and AC power cord, if any, must be used in order to comply with the emission
limits. 3. The manufacturer is not responsible for any radio or TV interference caused...
AL1716e Service Guide - Page 6
... and follow the kit instructions.
z Slots and openings...servicing to qualified service personnel. z To ensure satisfactory operation, use the monitor only with UL listed computers which have
appropriate configured receptacles marked between 100-240V AC, Min. 3.5A. z The wall socket shall be installed near the equipment and shall be easily accessible. z For use only with the attached power adapter...
AL1716e Service Guide - Page 18
....
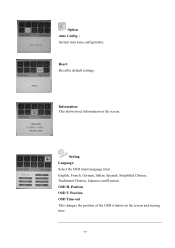
Reset: Recall to default settings.
Information: This shows brief information on the screen.
Setting Language: Select the OSD menu language from English, French, German, Italian, Spanish, Simplified Chinese, Traditional Chinese, Japanese and Russian. OSD H. Position OSD V. Position OSD Time-out This changes the position of the OSD window on the screen and staying...
AL1716v Service Guide - Page 3
... in a retrieval system, or translated into any language or computer language, in any form or by any means, electronic, mechanical, magnetic, optical, chemical, manual or otherwise, without the prior written permission of Acer Incorporated.
Disclaimer
The information in this guide is subject to change without notice. Acer Incorporated makes no representations or warranties, either expressed or...
AL1716v Service Guide - Page 4
... FRU list of this printed Service Guide. You MUST use the list provided by your regional Acer office to order FRU parts for repair and service of customer machines.
Warning: (For FCC Certified Models)
Note: This equipment has been tested and found to comply with the limits for a Class B digital device, pursuant to Part 15 of...
AL1716v Service Guide - Page 5
... power outlet as a safety feature. If your outlet does not accommodate the three-wire plug, have an electrician install the correct outlet, or use an adapter to...servicing to qualified service personnel To ensure satisfactory operation, use the monitor only with UL listed computers which have appropriate configured receptacles marked between 100 - 240V AC, Min. 5A. The wall socket shall be installed...
AL1716v Service Guide - Page 6
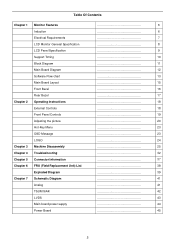
...Support Timing
10
Block Diagram
11
Main Board Diagram
12
Software Flow chart
13
Main Board Layout
15
Front Bezel
16
Rear Bezel
17
Chapter 2 Operating Instructions
18
External Controls
18
Front Panel Controls
...7 Schematic Diagram
41
Analog
41
TSUM16AK
42
LVDS
43
Main board power supply
44
Power Board
45
5
AL1716v Service Guide - Page 15
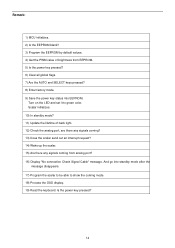
... AUTO and SELECT keys pressed? 8) Enter factory mode. 9) Save the power key status into EEPROM.
Turn on the LED and set it to green color. Scalar initializes. 10) In standby mode? 11) Update the lifetime of back light. 12) Check the analog port, are there any signals coming? 13) Does the scalar send out...
AL1716v Service Guide - Page 20
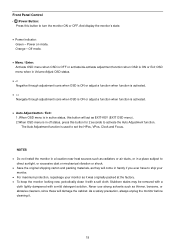
Front Panel Control • /Power Button:
Press this button to turn the monitor ON or OFF. And display the monitor's state.
• Power Indicator: Green - Power on mode. Orange - Off mode.
•... the Auto Adjustment function. The Auto Adjustment function is used to set the HPos, VPos, Clock and Focus.
NOTES • Do not install the monitor in a location near heat sources such as radiators or...
AL1716v Service Guide - Page 21
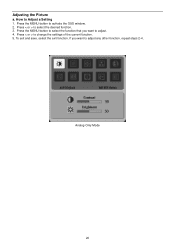
Adjusting the Picture
a. How to Adjust a Setting 1. Press the MENU-button to activate the OSD window. 2. Press < or > to select the desired function. 3. Press the MENU-button to select the function that you want to adjust. 4. Press < or > to change the settings of the current function. 5. To exit and save, select the exit function...
AL1716W Service Guide - Page 5

..., the firmware shall save the current adjustments and exit. Also, if the video controller changes video mode while the OSD is active, the current settings shall be saved immediately, the OSD turned off, and the new mode is displayed.
1.5.4 Key Function Overview: All functions are controllable
by OSD using five buttons including Power button,
Menu/Exit...
AL1716W Service Guide - Page 11
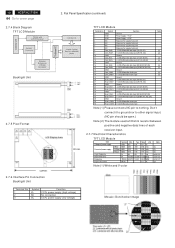
Connector CN1
Y-driver IC
10
ACER AL1716W
Go to cover page
2.7.4 Block Diagram TFT LCD Module
TCON with LVDS Receiver
DC/DC Converter
Gamma Reference
Voltage G enerator
Backlight Unit
2.7.5 Pixel Format
2. Flat Panel Specification (continued)
X-driver IC
Liquid Crystal Panel 1440x900
pixels
TFT LCD Module
Terminal no. Symbol
Function
Note
1
GND
Ground
2
VDD
Power Supply...
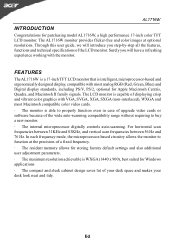
AL1716W User's Guide - Page 1

... notes on LCD monitors 1 Introduction 2 Features ...2 Unpacking 3 Attaching/Removing the base 4 Screen position adjustment 4 Connecting the power cord 5 Safety precaution 5 Cleaning your monitor 5 Preset modes 6 Power saving 7 DDC ...7 Installation 8 User controls 9 Troubleshooting 13 Specification 15
For more information and help in recycling, please visit the following websites...
AL1716W User's Guide - Page 3
... displaying crisp and vibrant color graphics with VGA, SVGA, XGA, SXGA (non-interlaced), WXGA and most Macintosh compatible color video cards. · The monitor is able to properly function even in case of upgrade video cards or software because of the wide auto-scanning compatibility range without requiring to buy a new monitor. · The internal microprocessor digitally controls auto-scanning...
AL1716W User's Guide - Page 5
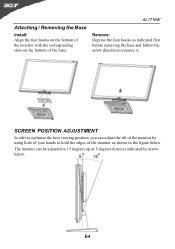
Attaching / Removing the Base
Install: Align the four hooks on the bottom of the monitor with the corresponding slots on the bottom of the base.
AL1716W
Remove: Depress the four ...
AL1716W User's Guide - Page 6
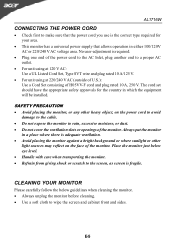
... and plug rated 10 A, 250 V. The cord set should have the appropriate safety approvals for the country in which the equipment will be installed.
SAFETY PRECAUTION · Avoid placing the monitor, or any other heavy object, on the power cord to avoid
damage to the cable. · Do not expose the monitor to rain...
AL1716W User's Guide - Page 7
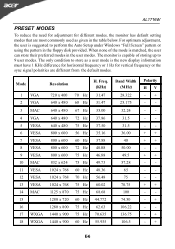
...Auto Setup under Windows "Full Screen" pattern or using the pattern in the floppy disk ...display information must have 1 KHz difference for horizontal frequency or 1 Hz for vertical frequency or the sync signal polarities are different from the default modes.
Mode
1 VGA 2 VGA 3 MAC 4 VGA 5 VESA 6 VESA 7 VESA 8 VESA 9 VESA 10 MAC 11 VESA 12 VESA 13 VESA 14 MAC 15 16 17 WXGA 18 WXGA
Resolution...