Asus A7V8X-X driver and firmware

Related Asus A7V8X-X Manual Pages
Download the free PDF manual for Asus A7V8X-X and other Asus manuals at ManualOwl.com
A7V8X-X User Manual - Page 3
... (CPU 1-10 1.8.1 Installing the CPU 1-10 1.9 System memory 1-11 1.10 Expansion slots 1-11 1.10.1 Configuring an expansion card 1-12 1.10.2 Standard interrupt assignments 1-12
IRQ assignments for this motherboard 1-12 1.10.3 AGP slot 1-13 1.11 Jumpers 1-13 1.12 Connectors 1-15
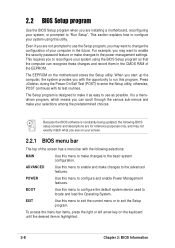
Chapter 2: BIOS information
2.1 Managing and updating your BIOS 2-2 2.1.1 Using ASUS EZ Flash to update the BIOS...
A7V8X-X User Manual - Page 4
... 2.4.3 PCI Configuration 2-19
2.5 Power Menu 2-21 2.5.1 Power Up Control 2-23 2.5.2 Hardware Monitor 2-24
2.6 Boot Menu 2-25 2.7 Exit Menu 2-26
Chapter 3: Software support
3.1 Install an operating system 3-2 3.2 Support CD information 3-2
3.2.1 Running the support CD 3-2 3.2.2 Drivers menu 3-3 3.2.3 Utilities menu 3-3 3.2.4 ASUS Contact Information 3-4 3.2.5 Multi-channel audio feature...
A7V8X-X User Manual - Page 7
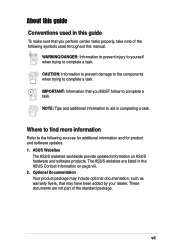
About this guide
Conventions used in this guide
To make sure that you perform certain tasks properly, take note of the following symbols used throughout this manual.
WARNING/DANGER:...and for product and software updates. 1. ASUS Websites
The ASUS websites worldwide provide updated information on ASUS hardware and software products. The ASUS websites are listed in the ASUS Contact Information on page...
A7V8X-X User Manual - Page 10
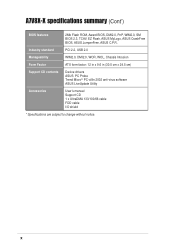
...BIOS, ASUS JumperFree, ASUS C.P.R.
Industry standard
PCI 2.2, USB 2.0
Manageability
WfM2.0, DMI2.0, WOR, WOL, Chassis Intrusion
Form Factor
ATX form factor: 12 in x 9.6 in (30.5 cm x 24.5 cm)
Support CD contents
Device drivers ASUS PC Probe Trend Microtm PC-cillin 2002 anti-virus software ASUS LiveUpdate Utility
Accessories
User's manual Support CD 1 x UltraDMA 133/100/66 cable FDD cable...
A7V8X-X User Manual - Page 12
... you start installing the motherboard, and hardware devices on it, check the items in your package with the list below.
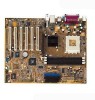
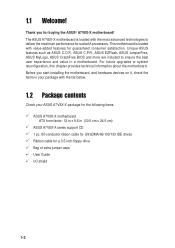
1.2 Package contents
Check your ASUS A7V8X-X package for the following items. ASUS A7V8X-X motherboard ATX form factor: 12 in x 9.6 in (30.5 cm x 24.5 cm) ASUS A7V8X-X series support CD 1 pc. 80-conductor ribbon cable for UltraDMA/66/100/133 IDE drives Ribbon cable for...
A7V8X-X User Manual - Page 13
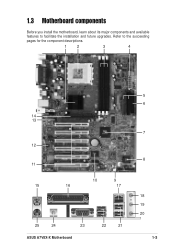
1.3 Motherboard components
Before you install the motherboard, learn about its major components and available features to facilitate the installation and future upgrades. Refer to the succeeding pages for the component descriptions.
1
2
3
4
14 13
12 11
15
10
9
16
17
25
24
23
ASUS A7V8X-X Motherboard
22
21
5 6
7
8
18 19 20
1-3
A7V8X-X User Manual - Page 16
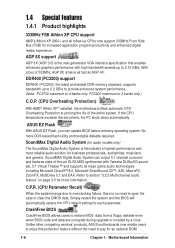
...8482; installed, the motherboard offers automatic CPU Overheating Protection to prolong the life of the entire system. If the CPU temperature exceeds the set criteria, the PC shuts down automatically.
ASUS EZ Flash
With ASUS EZ Flash, you can update BIOS before entering operating system. No more DOS-based flash utility and bootable diskette required.
SoundMax Digital Audio System (on audio models...
A7V8X-X User Manual - Page 21
... and the expansion cards that they support.
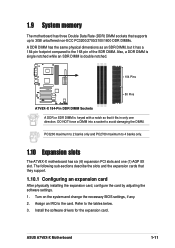
1.10.1 Configuring an expansion card
After physically installing the expansion card, configure the card by adjusting the software settings. 1. Turn on the system and change the necessary BIOS settings, if any. 2. Assign an IRQ to the card. Refer to the tables below. 3. Install the software drivers for the expansion card.
ASUS A7V8X-X Motherboard
1-11
A7V8X-X User Manual - Page 32
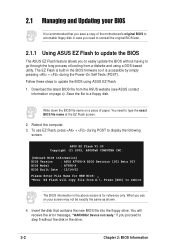
... utility. The EZ Flash is built-in the BIOS firmware so it is accessible by simply pressing + during the Power-On Self Tests (POST). Follow these steps to update the BIOS using ASUS EZ Flash. 1. Download the latest BIOS file from the ASUS website (see ASUS contact
information on page x). Save the file to a floppy disk.
Write down the BIOS file name on a piece...
A7V8X-X User Manual - Page 33

... block area.
Flash Memory: SST 49LF004
1. Update Main BIOS area 2. Update Boot Block area
(Y/N)? _ (Y/N)? _
DO NOT shutdown or reset the system while updating the BIOS boot block area! Doing so may cause system boot failure.
8. When the update process is done, the message, "Press a key to reboot" appears. Press any key to reboot the system with the new BIOS.
ASUS A7V8X-X Motherboard
2-3
A7V8X-X User Manual - Page 34
... disk.
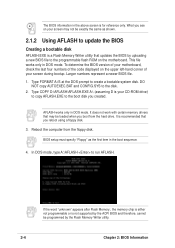
2. Type COPY D:\AFLASH\AFLASH.EXE A:\ (assuming D is your CD-ROM drive) to copy AFLASH.EXE to the boot disk you created.
AFLASH works only in DOS mode. It does not work with certain memory drivers that may be loaded when you boot from the hard drive. It is recommended that you reboot using a floppy disk.
3. Reboot the computer from the floppy disk.
BIOS setup...
A7V8X-X User Manual - Page 35
... created earlier.
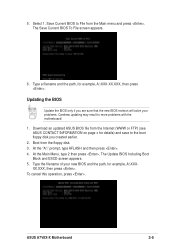
2. Boot from the floppy disk. 3. At the "A:\" prompt, type AFLASH and then press . 4. At the Main Menu, type 2 then press . The Update BIOS Including Boot
Block and ESCD screen appears. 5. Type the filename of your new BIOS and the path, for example, A:\XXX-
XX.XXX, then press . To cancel this operation, press .
ASUS A7V8X-X Motherboard
2-5
A7V8X-X User Manual - Page 38
...password feature or make changes to the power management settings. This requires you to reconfigure your system using the BIOS Setup program so that the computer can recognize these changes and record them in the CMOS RAM of the EEPROM.
The EEPROM on the motherboard stores the Setup....
Because the BIOS software is constantly being updated, the following BIOS setup screens and descriptions are...
A7V8X-X User Manual - Page 41

...) RAM. The RAM data containing the password information is powered by the onboard button cell battery. If you need to erase the CMOS RAM, unplug the all the power cables and remove the button cell battery. Re-install the battery after about 2 seconds, then power up the system. Refer to section "2.1 Managing and updating your BIOS" on how to update the BIOS.
ASUS A7V8X-X Motherboard
2-11
A7V8X-X User Manual - Page 52
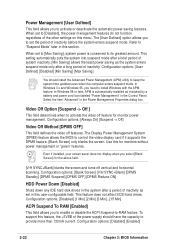
... BIOS to control the video display card if it supports the DPMS feature. [Blank Screen] only blanks the screen. Use this for monitors without power management or "green" features.
Even if installed, your screen saver does not display when you select [Blank Screen] for the above field.
[V/H SYNC+Blank] blanks the screen and turns off vertical and horizontal scanning...
A7V8X-X User Manual - Page 59
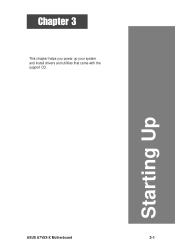
Chapter 3
This chapter helps you power up your system and install drivers and utilities that came with the support CD.
Starting Up
ASUS A7V8X-X Motherboard
3-1
A7V8X-X User Manual - Page 60

... the motherboard features.
The contents of the support CD are subject to change at any time without notice. Visit the ASUS website for updates.
3.2.1 Running the support CD
To begin using the support CD, simply insert the CD into your CD-ROM drive. The CD automatically displays the Drivers menu if Autorun is enabled in your computer.
Click an item to install...
A7V8X-X User Manual - Page 61
...system versions.
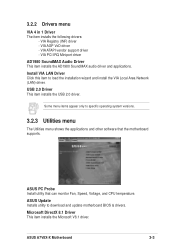
3.2.3 Utilities menu
The Utilities menu shows the applications and other software that the motherboard supports.
ASUS PC Probe
Install utility that can monitor Fan, Speed, Voltage, and CPU temperature.
ASUS Update
Installs utility to download and update motherboard BIOS & drivers.
Microsoft DirectX 8.1 Driver
This item installs the Microsoft V8.1 driver.
ASUS A7V8X-X Motherboard...
A7V8X-X User Manual - Page 62
... 3D graphics output.
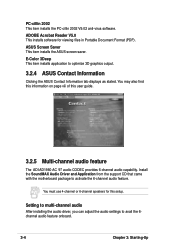
3.2.4 ASUS Contact Information
Clicking the ASUS Contact Information tab displays as stated. You may also find this information on page viii of this user guide.
3.2.5 Multi-channel audio feature
The ADI AD1980 AC '97 audio CODEC provides 6-channel audio capability. Install the SoundMAX Audio Driver and Application from the support CD that came with the motherboard package to...
A7V8X-X User Manual - Page 64
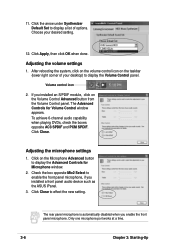
... button to display the Advanced Controls for Microphone window.
2. Check the box opposite Mic2 Select to enable the front panel microphone, if you installed a front panel audio device such as the ASUS iPanel.
3. Click Close to effect the new setting.
The rear panel microphone is automatically disabled when you enable the front panel microphone. Only one microphone port works...