Asus A8N-VM CSM NBP driver and firmware

Related Asus A8N-VM CSM NBP Manual Pages
Download the free PDF manual for Asus A8N-VM CSM NBP and other Asus manuals at ManualOwl.com
A8N-VM CSM/NBP User's Manual for English Edition - Page 2
... the express written permission of ASUSTeK COMPUTER INC. ("ASUS"). Product warranty or service will not be extended if: (1) the product is repaired, modified or altered, unless such repair, modification of alteration is authorized in writing by ASUS; or (2) the serial number of the product is defaced or missing. ASUS PROVIDES THIS MANUAL "AS IS" WITHOUT WARRANTY OF...
A8N-VM CSM/NBP User's Manual for English Edition - Page 3
... information vii A8N-VM CSM specifications summary viii Chapter 1: Product introduction 1.1 Special features 1-2
1.1.1 Product highlights 1-2 1.1.2 Innovative ASUS features 1-4 1.2 Before you proceed 1-5 1.3 Motherboard overview 1-6 1.3.1 Motherboard layout 1-6 1.3.2 Placement direction 1-7 1.3.3 Screw holes 1-7 1.4 Central Processing Unit (CPU 1-8 1.5 System memory 1-10 1.5.1 Overview...
A8N-VM CSM/NBP User's Manual for English Edition - Page 4
... 2: BIOS setup 2.1 Managing and updating your BIOS 2-2
2.1.1 Creating a bootable floppy disk 2-2 2.1.2 ASUS EZ Flash utility 2-3 2.1.3 AFUDOS utility 2-4 2.1.4 ASUS Update utility 2-6 2.2 BIOS setup program 2-8 2.2.1 BIOS menu screen 2-9 2.2.2 Menu bar 2-9 2.2.3 Navigation keys 2-9 2.2.4 Menu items 2-10 2.2.5 Sub-menu items 2-10 2.2.6 Configuration fields 2-10 2.2.7 Pop-up window 2-10...
A8N-VM CSM/NBP User's Manual for English Edition - Page 6
...limits for a Class B digital device, pursuant to Part 15 of the FCC Rules. These limits are designed to provide reasonable protection against harmful interference in a residential installation. This equipment generates, ... the dealer or an experienced radio/TV technician for help.
The use of shielded cables for connection of the monitor to the graphics card is required to assure compliance with ...
A8N-VM CSM/NBP User's Manual for English Edition - Page 7
... to fix it by yourself. Contact a qualified service technician or your retailer.
Operation safety • Before installing the motherboard and adding devices on it, carefully read
all the manuals that came with the package. • Before using the product, make sure all cables are correctly connected
and the power cables are not damaged. If you detect any damage...
A8N-VM CSM/NBP User's Manual for English Edition - Page 12
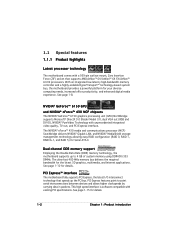
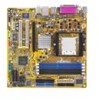
... PCI Express interface.
The NVIDIA® nForce™ 430 media and communications processor (MCP) Southbridge delivers NVIDIA® Gigabit LAN, and NVIDIA® MediaShield storage management technology allowing easy RAID configuration (RAID 0, RAID 1, RAID 0+1, and RAID 5) for Serial ATA II.
Dual-channel DDR memory support Employing the Double Data Rate (DDR) memory technology, the motherboard...
A8N-VM CSM/NBP User's Manual for English Edition - Page 14
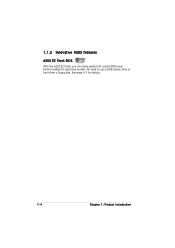
1.1.2 Innovative ASUS features
ASUS EZ Flash BIOS With the ASUS EZ Flash, you can easily update the system BIOS even before loading the operating system. No need to use a DOS-based utility or boot from a floppy disk. See page 2-3 for details.
1-4
Chapter 1: Product introduction
A8N-VM CSM/NBP User's Manual for English Edition - Page 15
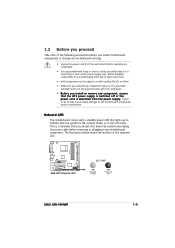
... the system is ON, in sleep mode, or in soft-off mode. This is a reminder that you should shut down the system and unplug the power cable before removing or plugging in any motherboard component. The illustration below shows the location of the onboard LED.
A8N-VM
®
A8N-VM Onboard LED
SB_PWR
ON
Standby Power
OFF
Powered Off
ASUS A8N-VM/NBP
1-5
A8N-VM CSM/NBP User's Manual for English Edition - Page 17
... rear part of the chassis as indicated in the image below.
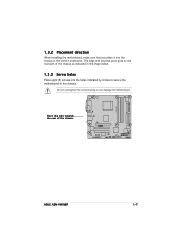
1.3.3 Screw holes Place eight (8) screws into the holes indicated by circles to secure the motherboard to the chassis.
Do not overtighten the screws! Doing so can damage the motherboard.
Place this side towards the rear of the chassis
®
A8N-VM
ASUS A8N-VM/NBP
1-7
A8N-VM CSM/NBP User's Manual for English Edition - Page 18
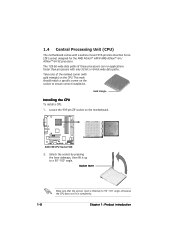
... faster than processors with only 32-bit or 64-bit wide data paths. Take note of the marked corner (with gold triangle) on the CPU. This mark should match a specific corner on the socket to ensure correct installation.
Gold triangle
Installing the CPU To install a CPU.
1. Locate the 939-pin ZIF socket on the motherboard.
A8N-VM
®
A8N-VM CPU Socket 939...
A8N-VM CSM/NBP User's Manual for English Edition - Page 23

... system cover.
1.6.2 Configuring an expansion card
After installing the expansion card, configure it by adjusting the software settings.
1. Turn on the system and change the necessary BIOS settings, if any. See Chapter 2 for information on BIOS setup.
2. Assign an IRQ to the card. Refer to the tables on the next page. 3. Install the software drivers for the expansion card.
ASUS A8N-VM/NBP
1-13
A8N-VM CSM/NBP User's Manual for English Edition - Page 33
...GND RSATA_RXN2 RSATA_RXP2 GND RSATA_TXN2 RSATA_TXP2 GND
A8N-VM
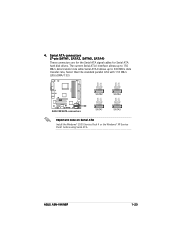
SATA2
SATA4
®
GND RSATA_RXN3 RSATA_RXP3 GND RSATA_TXN3 RSATA_TXP3 GND
GND RSATA_RXN1 RSATA_RXP1 GND RSATA_TXN1 RSATA_TXP1 GND
A8N-VM SATA connectors
SATA1
SATA3
Important note on Serial ATA
Install the Windows® 2000 Service Pack 4 or the Windows® XP Service Pack1 before using Serial ATA.
ASUS A8N-VM/NBP
1-23
A8N-VM CSM/NBP User's Manual for English Edition - Page 42
... a s h (Updates the BIOS using a floppy disk during POST.)
ASUS EZ Flash only support VGA/RGB output. These utilities do not support VGA/DVI-D output.
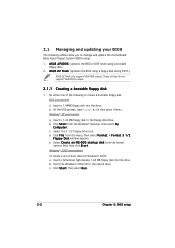
2.1.1 Creating a bootable floppy disk
1. Do either one of the following to create a bootable floppy disk. DOS environment
a. Insert a 1.44MB floppy disk into the drive. b. At the DOS prompt, type format A:/S then press . Windows® XP environment...
A8N-VM CSM/NBP User's Manual for English Edition - Page 43
... shut down or reset the system while updating the BIOS to prevent system boot failure!
• A "Floppy not found!" error message appears if there is no floppy disk in the drive. A "A8NVMCSM.ROM not found!" error message appears if the correct BIOS file is not found in the floppy disk. Make sure that you rename the BIOS file to A8NVMCSM.ROM.
ASUS A8N-VM/NBP
2-3
A8N-VM CSM/NBP User's Manual for English Edition - Page 44
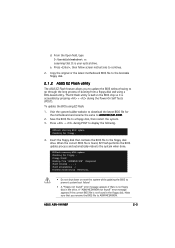
... and three alphanumeric characters for the extension name.
A:\>afudos /oOLDBIOS1.ROM
Main filename Extension name
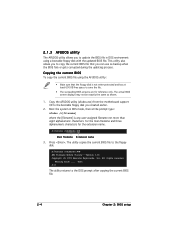
3. Press . The utility copies the current BIOS file to the floppy disk.
A:\>afudos /oOLDBIOS1.ROM AMI Firmware Update Utility - Version 1.10 Copyright (C) 2002 American Megatrends, Inc. All rights reserved.
Reading flash ..... done A:\>
The utility returns to the DOS prompt after...
A8N-VM CSM/NBP User's Manual for English Edition - Page 45
...!
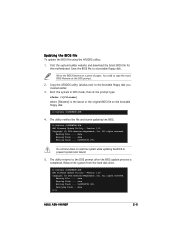
5. The utility returns to the DOS prompt after the BIOS update process is completed. Reboot the system from the hard disk drive.
A:\>afudos /iA8NVMCSM.ROM AMI Firmware Update Utility - Version 1.10 Copyright (C) 2002 American Megatrends, Inc. All rights reserved.
Reading file ..... done Erasing flash .... done Writing flash .... 0x0008CC00 (9%) Verifying flash .. done A:\>
ASUS A8N-VM/NBP
2-5
A8N-VM CSM/NBP User's Manual for English Edition - Page 46

... Update utility
The ASUS Update is a utility that allows you to manage, save, and update the motherboard BIOS in Windows® environment. The ASUS Update utility allows you to:
• Save the current BIOS file • Update the BIOS from an updated BIOS file • View the BIOS version information.
Installing ASUS Update To install ASUS Update:
1. Place the support CD in the optical drive...
A8N-VM CSM/NBP User's Manual for English Edition - Page 47
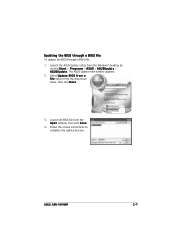
...; desktop by
clicking S t a r t > P r o g r a m s > A S U S > A S U S U p d a t e > A S U S U p d a t e. The ASUS Update main window appears. 2. Select U p d a t e B I O S f r o m a f i l e option from the drop-down menu, then click N e x t.
3. Locate the BIOS file from the O p e n window, then click S a v e.
4. Follow the screen instructions to complete the update process.
ASUS A8N-VM/NBP
2-7
A8N-VM CSM/NBP User's Manual for English Edition - Page 48
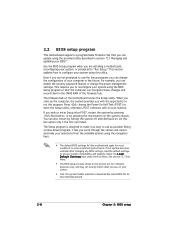
... can enable the security password feature or change the power management settings. This requires you to reconfigure your system using the BIOS Setup program so that the computer can recognize these changes and record them in the CMOS RAM of the firmware hub.
The firmware hub on the motherboard stores the Setup utility. When you start up the computer, the system provides you...
A8N-VM CSM/NBP User's Manual for English Edition - Page 66
... and install/clear TPM owner. Configuration options: [Don't change] [Clear].
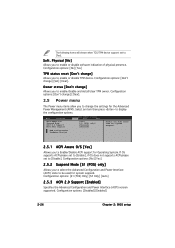
2.5 Power menu
The Power menu items allow you to change the settings for the Advanced Power Management (APM). Select an item then press to display the configuration options.
Main
Advanced
ACPI Aware O/S Suspend Mode ACPI 2.0 Support ACPI APIC Support
APM Configuration Hardware Monitor
BIOS SETUP UTILITY
Power...