Asus CG8565 driver and firmware

Related Asus CG8565 Manual Pages
Download the free PDF manual for Asus CG8565 and other Asus manuals at ManualOwl.com
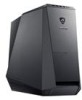
User Manual - Page 8
...guide
To ensure that you perform certain tasks properly, take note of the following symbols used throughout this manual... task.
IMPORTANT: Instructions that you MUST ...software updates.
ASUS websites
The ASUS website provides updated information on ASUS hardware and software products. Refer to the ASUS website www.asus.com.
ASUS Local Technical Support
Visit ASUS website at http://support.asus...
User Manual - Page 9
English
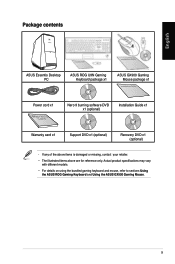
Package contents
ASUS Essentio Desktop PC
ASUS ROG U9N Gaming Keyboard package x1
ASUS GX900 Gaming Mouse package x1
Installation Guide
Power cord x1
Nero 9 burning software DVD x1 (optional)
Installation Guide x1
Warranty card x1
Support DVD x1 (optional)
Recovery DVD x1 (optional)
• If any of the above items is damaged or missing, contact your retailer.
• The ...
User Manual - Page 12
...; card
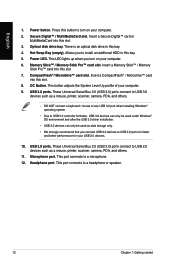
into this slot. 8. OC Button. This button adjusts the System Level Up profile of your computer. 9. USB 3.0 ports. These Universal Serial Bus 3.0 (USB 3.0) ports connect to USB 3.0
devices such as a mouse, printer, scanner, camera, PDA, and others.
• DO NOT connect a keyboard / mouse to any USB 3.0 port when installing Windows® operating system.
• Due to USB 3.0 controller...
User Manual - Page 13
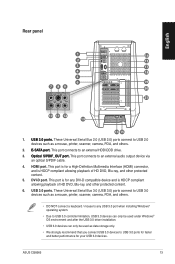
... Serial Bus 3.0 (USB 3.0) ports connect to USB 3.0 devices such as a mouse, printer, scanner, camera, PDA, and others.
• DO NOT connect a keyboard / mouse to any USB 3.0 port when installing Windows® operating system.
• Due to USB 3.0 controller limitation, USB 3.0 devices can only be used under Windows® OS environment and after the USB 3.0 driver installation.
• USB...
User Manual - Page 21
... license terms. Tick I accept the license terms and click Next. 7. Select Use recommended settings or Install important updates only to set up the
security settings for your computer. To skip this step, select Ask me later. 8. Review your date and time settings. Click Next. The system loads the new settings and
restarts. You may now start using your computer.
ASUS CG8565
21
User Manual - Page 22
English
Using Windows® 7 desktop
Click the Start icon > Help and Support to obtain more information about Windows® 7.
Using the Start menu
The Start menu gives you access to programs, utilities, and other useful items on your computer. It also provides you with more information about Windows 7 through its Help and Support feature.
Launching items from the...
User Manual - Page 27
... check and install the latest updates to enhance the security and performance of your computer.
Launching Windows® Update To launch Windows® Update:
1. From the Windows® taskbar, click the Start icon to launch the Start menu. 2. Select All Programs > Windows Update. 3. From the Windows Update screen, click the task that you want to do.
Setting up a user account and password
You may...
User Manual - Page 28
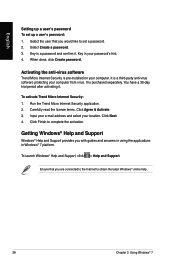
...Select the user that you would like to set a password. 2. Select Create a password. 3. Key in a password and confirm it. Key in your password's hint. 4. When done, click Create password.
Activating the anti-virus software
Trend Micro Internet Security is pre-installed on your computer. It is a third-party anti-virus software protecting your computer from virus. It is purchased separately. You have...
User Manual - Page 33

English
Connecting multiple external displays
Your desktop PC may come with VGA, HDMI, or DVI ports and allows you to connect multiple external displays.
When a graphics card is installed in your computer, connect the monitors on the output ports of the graphics card.
Setting up multiple displays
When using multiple monitors, you are allowed to set display modes. You can use the additional ...
User Manual - Page 40
....
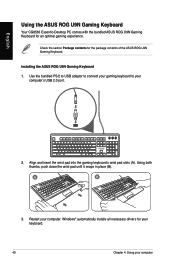
Installing the ASUS ROG U9N Gaming Keyboard
1. Use the bundled PS/2 to USB adaptor to connect your gaming keyboard to your computer's USB 2.0 port.
. Align and insert the wrist pad into the gaming keyboard's wrist pad slots (A). Using both thumbs, push down the wrist pad until it snaps in place (B).
A
B
3. Restart your computer. Windows® automatically installs all necessary drivers...
User Manual - Page 51
... simultaneously.
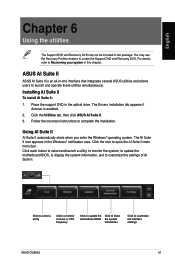
Installing AI Suite II
To install AI Suite II:
1. Place the support DVD in the optical drive. The Drivers installation tab appears if Autorun is enabled.
2. Click the Utilities tab, then click ASUS AI Suite II. 3. Follow the onscreen instructions to complete the installation.
Using AI Suite II
AI Suite II automatically starts when you enter the Windows® operating...
User Manual - Page 60
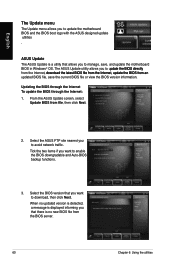
... BIOS through the Internet:
1. From the ASUS Update screen, select Update BIOS from file, then click Next.
2. Select the ASUS FTP site nearest you to avoid network traffic. Tick the two items if you want to enable the BIOS downgradable and Auto-BIOS backup functions.
3. Select the BIOS version that you want to download, then click Next. When no updated version is detected, a message is displayed...
User Manual - Page 61
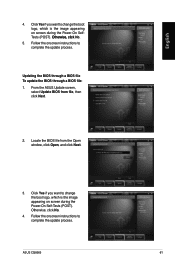
..., then click Next.
2. Locate the BIOS file from the Open window, click Open, and click Next.
3. Click Yes if you want to change the boot logo, which is the image appearing on screen during the Power‑On Self-Tests (POST).� Otherwise, click No.
4. Follow the onscreen instructions to complete the update process.
ASUS CG8565
61
User Manual - Page 64
... the optical drive. If Autorun is enabled, the Drivers installation
wizard appears.
If Autorun is disabled, double-click the setup.exe file from the ASUS AI Manager folder in the support DVD.
2. Click the Utilities tab, then click ASUS AI Manager. 3. Follow the onscreen instructions to complete the installation.
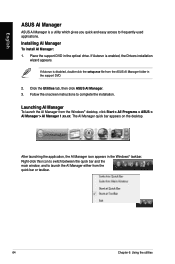
Launching AI Manager
To launch the AI Manager from the Windows® desktop...
User Manual - Page 68
English
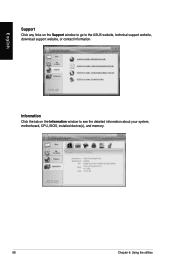
Support Click any links on the Support window to go to the ASUS website, technical support website, download support website, or contact information.
Information Click the tab on the Information window to see the detailed information about your system, motherboard, CPU, BIOS, installed device(s), and memory.
68
Chapter 6: Using the utilities
User Manual - Page 69
..., share, and update different kinds of data.
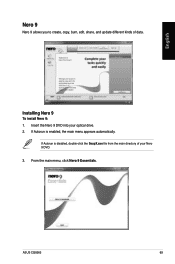
Installing Nero 9
To install Nero 9: 1. Insert the Nero 9 DVD into your optical drive. 2. If Autorun is enabled, the main menu appears automatically.
If Autorun is disabled, double-click the SeupX.exe file from the main directory of your Nero 9 DVD. 3. From the main menu, click Nero 9 Essentials.
ASUS CG8565
69
User Manual - Page 73
....com
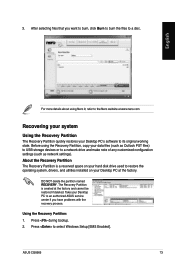
Recovering your system
Using the Recovery Partition
The Recovery Partition quickly restores your Desktop PC's software to its original working state. Before using the Recovery Partition, copy your data files (such as Outlook PST files) to USB storage devices or to a network drive and make note of any customized configuration settings (such as network settings). About the Recovery Partition...
User Manual - Page 74
...make a backup copy of the support DVD.
4. Follow the onscreen instructions to complete the recovery process.
Visit the ASUS website at www.asus.com for updated drivers and utilities.
Using the Recovery DVD (on selected models)
Prepare 1~3 blank writable DVDs as instructed to create the Recovery DVD.
Remove the external hard disk drive before performing system recovery on your Desktop PC. According...
User Manual - Page 76
...connect
the monitors to the output port on the graphics card. • Check if the multiple displays settings are correct. Refer to section
Connecting multiple external displays in Chapter 3 for details.
? My computer cannot detect my USB storage device.
• The first time you connect your USB storage device to your computer, Windows automatically installs a driver for it. Wait for a while and...
User Manual - Page 79
...not, try another LAN cable. If it still does not work, contact the ASUS service center.
Ensure that your computer is properly connected to a router or hub.
Contact your Internet Service Provider (ISP) for the correct LAN settings.
Close the anti-virus software.
Reinstall the LAN driver
Audio
Problem
No Audio
Possible Cause
Speaker or headphone is connected to the wrong port.
Speaker or headphone...