Asus EB1505 driver and firmware

Related Asus EB1505 Manual Pages
Download the free PDF manual for Asus EB1505 and other Asus manuals at ManualOwl.com
User's Manual for English Edition - Page 2
... ASUS. ASUS ASSUMES NO RESPONSIBILITY OR LIABILITY FOR ANY ERRORS OR INACCURACIES THAT MAY APPEAR IN THIS MANUAL, INCLUDING THE PRODUCTS AND SOFTWARE DESCRIBED IN IT.
Copyright © 2012 ASUSTeK COMPUTER INC. All Rights Reserved.
LIMITATION OF LIABILITY
Circumstances may arise where because of a default on ASUS' part or other liability, you are entitled to recover damages from ASUS...
User's Manual for English Edition - Page 3
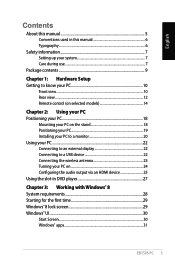
... 18 Positioning your PC 19 Installing your PC to a monitor 20 Using your PC...22 Connecting to an external display 22 Connecting to a USB device 22 Connecting the wireless antenna 23 Turning your PC on 24 Configuring the audio output via an HDMI device 25 Using the slot-in DVD player 27
Chapter 3: Working with Windows® 8 System requirements 28...
User's Manual for English Edition - Page 4
... 41 Entering the BIOS Setup 41
Quickly enter the BIOS 42
Chapter 4: Connecting to the Internet Connecting on Windows® 7 43
Wireless connection 43 Wired connection 44 Connecting on Windows® 8 50 Wi-Fi connection 50 Wired connection 52
Chapter 5: Recovering your system Recovery options on Windows®7 53
Using the Recovery Partition 53 Recovery options on Windows®8 55...
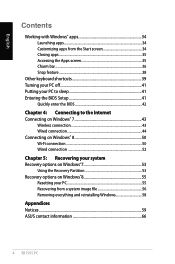
User's Manual for English Edition - Page 5
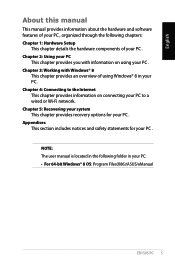
... your PC to a wired or Wi-Fi network. Chapter 5: Recovering your system This chapter provides recovery options for your PC . Appendices This section includes notices and safety statements for your PC .
NOTE: The user manual is located in the following folder in your PC: • For 64-bit Windows® 8 OS: Program Files(X86)/ASUS/eManual
EB1505 PC
User's Manual for English Edition - Page 9
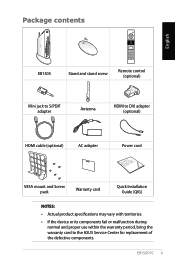
Package contents
English
EB1505
Stand and stand screw
Remote control (optional)
Mini jack to S/PDIF adapter
Antenna
HDMI to DVI adapter (optional)
HDMI cable (optional)
AC adapter
Power cord
VESA mount and Screw pack
Warranty card
Quick Installation Guide (QIG)
NOTES:
• Actual product specifications may vary with territories.
• If the device or its components fail or ...
User's Manual for English Edition - Page 14
English
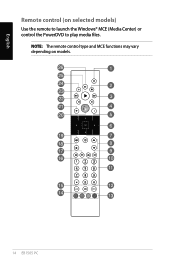
Remote control (on selected models)
Use the remote to launch the Windows® MCE (Media Center) or control the PowerDVD to play media files.
NOTE: The remote control type and MCE functions may vary depending on models.
14 EB1505 PC
User's Manual for English Edition - Page 15
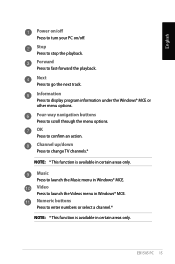
... Press to go the next track. Information Press to display program information under the Windows® MCE or other menu options. Four-way navigation buttons Press to scroll through the menu options. OK Press to confirm an action. Channel up/down Press to change TV channels.*
NOTE: * This function is available in certain...
User's Manual for English Edition - Page 16
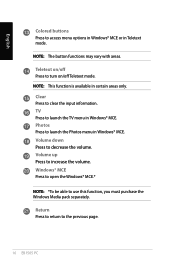
... Teletext mode. NOTE: This function is available in certain areas only. Clear Press to clear the input information. TV Press to launch the TV menu in Windows® MCE. Photos Press to launch the Photos menu in Windows® MCE. Volume down Press to decrease the volume. Volume up Press to increase the volume...
User's Manual for English Edition - Page 20
English
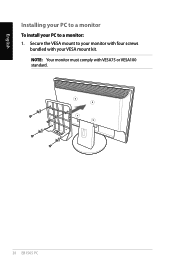
Installing your PC to a monitor
To install your PC to a monitor: 1. Secure the VESA mount to your monitor with four screws
bundled with your VESA mount kit. NOTE: Your monitor must comply with VESA75 or VESA100 standard.
20 EB1505 PC
User's Manual for English Edition - Page 24
English
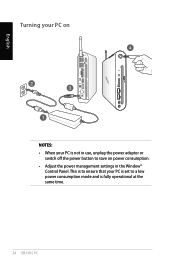
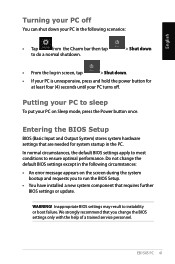
Turning your PC on
NOTES: • When your PC is not in use, unplug the power adapter or
switch off the power button to save on power consumption. • Adjust the power management settings in the Window®
Control Panel. This is to ensure that your PC is set to a low power consumption mode and is fully operational at the same time.
24 EB1505 PC
User's Manual for English Edition - Page 25
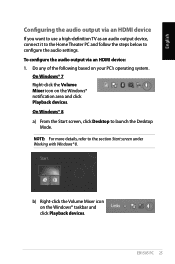
... below to configure the audio settings. To configure the audio output via an HDMI device: 1. Do any of the following based on your PC's operating system.
On Windows® 7 Right-click the Volume Mixer icon on the Windows® notification area and click Playback devices. On Windows® 8 a) From the Start screen, click Desktop to launch the Desktop
Mode. NOTE: For...
User's Manual for English Edition - Page 28
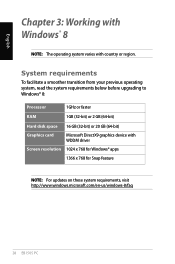
... system requirements below before upgrading to Windows® 8:
Processor
1GHz or faster
RAM
1GB (32-bit) or 2 GB (64-bit)
Hard disk space 16 GB (32-bit) or 20 GB (64-bit)
Graphics card
Microsoft DirectX9 graphics device with WDDM driver
Screen resolution 1024 x 768 for Windows® apps
1366 x 768 for Snap feature
NOTE: For updates on these system requirements...
User's Manual for English Edition - Page 29
... appear to guide you in configuring the basic settings of your Windows® 8 operating system.
To start for the first time: 1. Turn your computer on. Wait for a few minutes until the setup
screen appears. 2. Carefully read the license terms. Tick I accept the license terms
for using Windows and click Accept. 3. Follow the next onscreen instructions to configure...
User's Manual for English Edition - Page 30
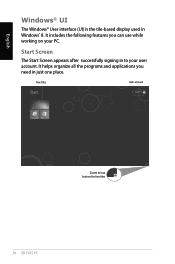
...; User interface (UI) is the tile-based display used in Windows® 8. It includes the following features you can use while working on your PC.
Start Screen
The Start Screen appears after successfully signing in to ... helps organize all the programs and applications you need in just one place.
live tiles
User account
Zoom in/out button for live tiles
30 EB1505 PC
User's Manual for English Edition - Page 31
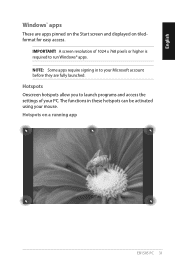
... Start screen and displayed on tiledformat for easy access.
IMPORTANT! A screen resolution of 1024 x 768 pixels or higher is required to run Windows® apps. NOTE: Some apps require signing in to your Microsoft account before they are fully launched.
Hotspots Onscreen hotspots allow you to launch programs and access the settings of your...
User's Manual for English Edition - Page 33
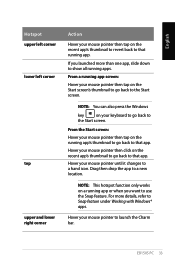
...pointer then tap on the Start screen's thumbnail to go back to the Start screen.
NOTE: You can also press the Windows
key
on your keyboard to go back to
the Start screen.
From the Start screen:
Hover your mouse pointer then tap ...when you want to use the Snap feature. For more details, refer to Snap feature under Working with Windows® apps.
Hover your mouse pointer to launch the Charm bar...
User's Manual for English Edition - Page 41
...; An error message appears on the screen during the system bootup and requests you to run the BIOS Setup.
• You have installed a new system component that requires further BIOS settings or update.
WARNING! Inappropriate BIOS settings may result to instability or boot failure. We strongly recommend that you change the BIOS settings only with the help of a trained service personnel.
EB1505 PC...
User's Manual for English Edition - Page 42
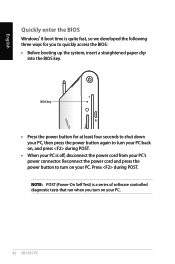
... press during POST.
• When your PC is off, disconnect the power cord from your PC's power connector. Reconnect the power cord and press the power button to turn on your PC. Press during POST. NOTE: POST (Power-On Self Test) is a series of software controlled diagnostic tests that run when you turn on your PC.
42...
User's Manual for English Edition - Page 53
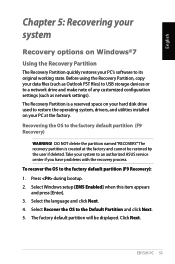
... Before using the Recovery Partition, copy your data files (such as Outlook PST files) to USB storage devices or to a network drive and make note of any customized configuration settings (such as network settings). The Recovery Partition is a reserved space on your hard disk drive used to restore the operating system, drivers, and utilities installed on your PC at the factory. Recovering the OS to...
User's Manual for English Edition - Page 55
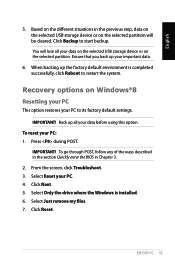
... on the selected USB storage device or on the selected partition. Ensure that you back up your important data.
6. When backing up the factory default environment is completed successfully, click Reboot to restart the system.
Recovery options on Windows®8 Resetting your PC
This option restores your PC to its factory default settings.
IMPORTANT! Back up...