Asus Eee PC 2G Linux driver and firmware


Related Asus Eee PC 2G Linux Manual Pages
Download the free PDF manual for Asus Eee PC 2G Linux and other Asus manuals at ManualOwl.com
User Manual - Page 1
E3484
Windows® XP Installation Guide
November 2007 15G06Q009000
User Manual - Page 4
...174; XP 1-2 Installing Windows® XP 1-2 Adjusting the Display Resolution 1-5 Optimizing Windows® XP 1-6
Changing Virtual Memory 1-6 Turning off System Restore 1-7 Compressing Disk Drive 1-8 Relocating Files 18 Deleting unnecessary Windows Components 1-10 Clearing System Backup Data 1-10 Deleting unnecessary document files 1-11
Chapter 2: Support CD & System Recovery Support CD...
User Manual - Page 5
Preparing to Install Windows® XP Installing Windows® XP Adjusting the Display Resolution Optimizing Windows® XP
1 Installing & Optimizing Windows® XP
Chapter 1: Installing & Optimizing Windows® XP
1-
User Manual - Page 6

...® XP
Follow the instructions below to install Windows® XP service pack 2:
1. Connect the power cord to your Eee PC. 2. Insert the Windows XP Service Pack 2 disc to the USB CD/DVD-
ROM and connect the USB optical drive to your Eee PC. 3. Press during the bootup screen.
Press F2 to run Setup, Press TAB to display BIOS POST Message
1-
ASUS Eee PC Windows® XP Installation Guide
User Manual - Page 7
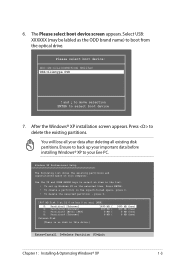
... boot device
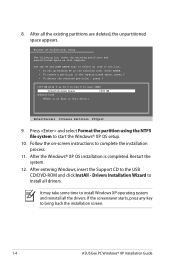
7. After the Windows® XP installation screen appears. Press to delete the existing partitions.
You will lose all your data after deleting all existing disk partitions. Ensure to back up your important data before installing Windows® XP to your Eee PC.
Windows XP Professional Setup
The following list shows the existing partitions and unpartitioned space on this computer...
User Manual - Page 8
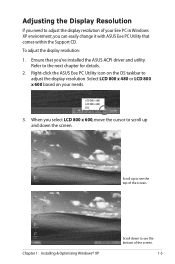
...completed. Restart the system.
12. After entering Windows, insert the Support CD to the USB CD/DVD-ROM and click InstAll - Drivers Installation Wizard to install all drivers.
It may take some time to install Windows XP operating system and reinstall all the drivers. If the screensaver starts, press any key to bring back the installation screen.
1-
ASUS Eee PC Windows® XP Installation Guide
User Manual - Page 9
Adjusting the Display Resolution
If you need to adjust the display resolution of your Eee PC in Windows XP environment, you can easily change it with ASUS Eee PC Utility that comes within the Support CD. To adjust the display resolution: 1. Ensure that you've installed the ASUS ACPI driver and utility.
Refer to the next chapter for details. 2. Right-click the ASUS Eee PC Utility icon on the OS...
User Manual - Page 10

... to Mircrosoft website (http://www.microsoft.com) for more information.
Changing Virtual Memory
Change the virtual memory based on your needs. 1. Go to Control Panel > System. 2. Click the Advanced tab on
the top and click the Settings button in Performance area.
3. Click Advanced tab and the Change button to change the virtual memory.
1-
ASUS Eee PC Windows® XP Installation Guide
User Manual - Page 11
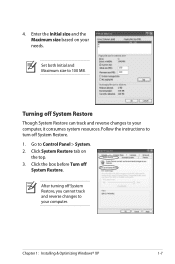
... changes to your computer, it consumes system resources. Follow the instructions to turn off System Restore. 1. Go to Control Panel > System. 2. Click System Restore tab on
the top. 3. Click the box before Turn off
System Restore.
After turning off System Restore, you cannot track and reverse changes to your computer.
Chapter 1: Installing & Optimizing Windows® XP
1-
User Manual - Page 12
....
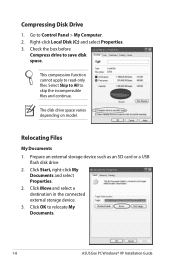
The disk drive space varies depending on model.
Relocating Files
My Documents 1. Prepare an external storage device such as an SD card or a USB
flash disk drive. 2. Click Start, right-click My
Documents and select Properties. 2. Click Move and select a destination in the connected external storage device. 3. Click OK to relocate My Documents.
1-
ASUS Eee PC Windows® XP Installation Guide
User Manual - Page 13
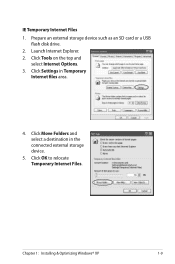
...an external storage device such as an SD card or a USB
flash disk drive. 2. Launch Internet Explorer. 2. Click Tools on the top and
select Internet Options. 3. Click Settings in Temporary
Internet files area.
4. Click Move Folders and select a destination in the connected external storage device.
5. Click OK to relocate Temporary Internet Files.
Chapter 1: Installing & Optimizing Windows® XP...
User Manual - Page 18
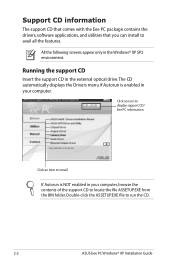
... the drivers, software applications, and utilities that you can install to avail all the features.
All the following screens appear only in the Windows® XP SP2 environment.
Running the support CD
Insert the support CD in the external optical drive.The CD automatically displays the Drivers menu if Autorun is enabled in your computer.
Click an icon to display support CD/ Eee PC information...
User Manual - Page 20
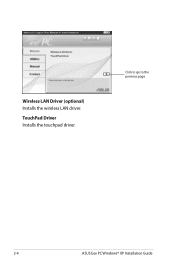
Wireless LAN Driver (optional) Installs the wireless LAN driver.
TouchPad Driver Installs the touchpad driver.
Click to go to the previous page
2-
ASUS Eee PC Windows® XP Installation Guide
User Manual - Page 21
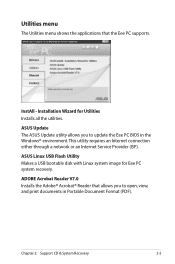
... the Eee PC supports.
InstAll - Installation Wizard for Utilities Installs all the utilities.
ASUS Update The ASUS Update utility allows you to update the Eee PC BIOS in the Windows® environment. This utility requires an Internet connection either through a network or an Internet Service Provider (ISP).
ASUS Linux USB Flash Utility Makes a USB bootable disk with Linux system image for Eee PC...
User Manual - Page 23
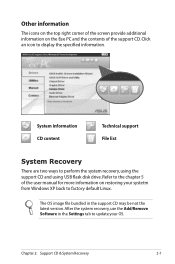
... USB flask disk drive. Refer to the chapter 5 of the user manual for more information on restoring your systetm from Windows XP back to factory default Linux.
The OS image file bundled in the support CD may be not the latest version. After the system recovery, use the Add/Remove Software in the Settings tab to update your OS.
Chapter 2: Support CD & System Recovery...
User Manual - Page 70

... the top to switch the category and the screen will display the available software on the server.
3. Locate the software you want to install/update.
4. Click the Install/Update button to install/update the selected
software.
Click to switch the
2
category
3
4
Press the Update button to update
the software
Locate the software you want to install/update
4-36
Chapter 4: Using the Eee PC
User Manual - Page 71
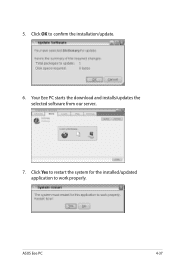
5. Click OK to confirm the installation/update.
6. Your Eee PC starts the download and installs/updates the selected software from our server..
7. Click Yes to restart the system for the installed/updated application to work properly.
ASUS Eee PC
4-37
User Manual - Page 72
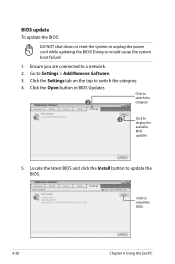
...you are connected to a network.
2. Go to Settings > Add/Remove Software.
3. Click the Settings tab on the top to switch the category.
4. Click the Open button in BIOS Updates
Click to
switch the
3
category
4
Click to display the
available
BIOS
updates
5. Locate the latest BIOS and click the Install button to update the BIOS.
Click to install the BIOS
4-38
Chapter 4: Using the Eee PC
User Manual - Page 80
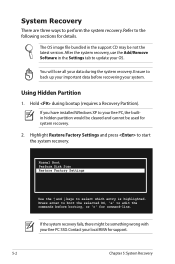
... the latest version. After the system recovery, use the Add/Remove Software in the Settings tab to update your OS.
You will lose all your data during the system recovery. Ensure to back up your important data before recovering your system.
Using Hidden Partition
1. Hold during bootup (requires a Recovery Partition). If you have installed WIndows XP to your Eee PC, the builtin...
User Manual - Page 107
... COMPUTER Inc. has exposed the full source code of the GPL licensed software, including any scripts to control compilation and installation of the object code. All future firmware updates will also be accompanied with their respective source code. For more information on how you can obtain our open source code, visit our website (http://support.asus.com.tw/download/).
ASUS Eee PC...