Asus G1Sn driver and firmware

Related Asus G1Sn Manual Pages
Download the free PDF manual for Asus G1Sn and other Asus manuals at ManualOwl.com
User Manual - Page 3
... Disabling (Synaptics 42 Gaming Optical Mouse (on selected models 43
Storage Devices ...45 Expansion Card 45 Optical Drive ...46 Flash Memory Card Reader 48 Hard Disk Drive...49 Memory (RAM)...50
Connections...51 Modem Connection 51 Network Connection 52 Wireless LAN Connection (on selected models 53 Windows Wireless Network Connection 54 Bluetooth Wireless Connection (on selected models...
User Manual - Page 9
1 Introducing the Notebook PC
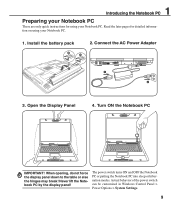
Preparing your Notebook PC
These are only quick instructions for using your Notebook PC. Read the later pages for detailed information on using your Notebook PC.
1. Install the battery pack
3 1
2
2. Connect the AC Power Adapter
E-SATA
HDMI
3. Open the Display Panel
Power Options > System Settings.
9
User Manual - Page 13
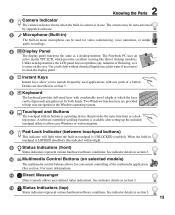
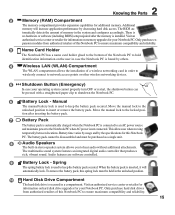
2 Knowing the Parts
2
Camera Indicator
The camera indicator shows when the built-in camera is in use. The camera may be auto-activated
by supported software.
3
Microphone (Built-in)
The built-in mono microphone can be used for video conferencing, voice narrations, or simple
audio recordings.
4
Display Panel
The display panel functions the same as a desktop monitor. The Notebook PC uses ...
User Manual - Page 15
... increase application performance by decreasing hard disk access. The BIOS au-
tomatically detects the amount of memory in the system and configures accordingly. There is
no hardware or software (including BIOS) setup required after the memory is installed. Visit an
authorized service center or retailer for information on memory upgrades for your Notebook PC. Only purchase ex-
pansion...
User Manual - Page 18
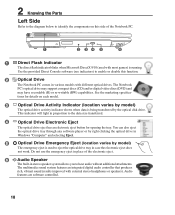
... by the optical disk drive.
This indicator will light in proportion to the data size transferred.
4 Optical Drive Electronic Eject
The optical drive eject has an electronic eject button for opening the tray. You can also eject the optical drive tray through any software player or by right clicking the optical drive in Windows "Computer" and selecting Eject.
5
Optical Drive Emergency Eject...
User Manual - Page 26
... requires servicing. If any critical hard disk drive warning is given during bootup, backup your data immediately and run Windows disk checking program. To run Window's disk checking program: click Start > select Computer > right-click a hard disk drive icon > choose Properties > click the Tools tab > click Check Now > click Start. You can also select "Scan ... sectors" for more effective scan and...
User Manual - Page 28
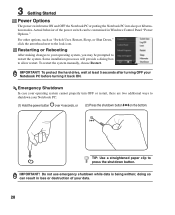
... can be customized in Windows Control Panel "Power Options." For other options, such as "Switch User, Restart, Sleep, or Shut Down," click the arrowhead next to the lock icon.
Restarting or Rebooting
After making changes to your operating system, you may be prompted to restart the system. Some installation processes will provide a dialog box...
User Manual - Page 30
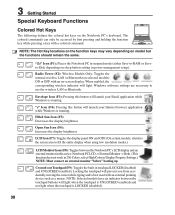
... mode (either Save-to-RAM or Saveto-Disk depending on sleep button setting in power management setup).
Radio Tower (F2): Wireless Models Only: Toggles the internal wireless LAN or Bluetooth (on selected models) ON or OFF with an on-screen-display. When enabled, the corresponding wireless indicator will light. Windows software settings are necessary to use the wireless LAN or Bluetooth.
Envelope...
User Manual - Page 40
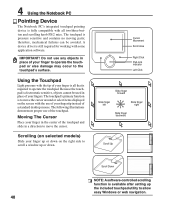
... items displayed on the screen with the use of your fingertip instead of a standard desktop mouse....window up or down.
Cursor Movement Scroll Area
Right Click Pad-lock indicator Left Click
Slide finger forward
Slide finger left
Slide finger right
Slide finger backward
Scroll Up
Scroll Down
NOTE: A software-controlled scrolling function is available after setting...
User Manual - Page 47

... labels on the CD.
Listening to Audio CD
The optical drives can play audio CDs, but only the DVD-ROM drive can play DVD audio. Insert the audio CD and Windows automatically opens an audio player and begins playing. Depending on the DVD audio disc and installed software, it may require that you open a DVD player to listen to DVD audio. You can adjust the volume...
User Manual - Page 50
4 Using the Notebook PC
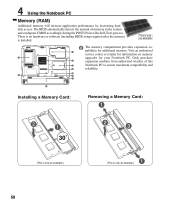
Memory (RAM)
Additional memory will increase application performance by decreasing hard disk access. The BIOS automatically detects the amount of memory in the system and configures CMOS accordingly during the POST (Power-On-Self-Test) process. There is no hardware or software (including BIOS) setup required after the memory is installed.
This is only an example.
2...
User Manual - Page 51

4 Using the Notebook PC
Connections
NOTE: The built-in modem and network cannot be installed later as an upgrade. After purchase, modem and/or network can be installed as an expansion card.
Modem Connection
The telephone wire used to connect the Notebook PC's internal modem should have either two or four wires (only two wires (telephone line #1) is used by the...
User Manual - Page 62
... provided by the native operating system. If updates or replacement of the support disc is necessary, contact your dealer for web sites to download individual software drivers and utilities. The support disc contains all drivers, utilities and software for all popular operating systems including those that have been pre-installed. The support disc does not include the operating system itself...
User Manual - Page 65
... the "ATK0100" driver from the driver CD or download it from the ASUS website.
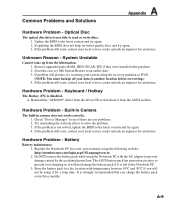
Hardware Problem - Built-in Camera
The built-in camera does not work correctly. 1. Check "Device Manager" to see if there are any problems. 2. Try reinstalling the webcam driver to solve the problem. 3. If the problem is not solved, update the BIOS to the latest version and try...
User Manual - Page 67

... memory. 2. Un-install software applications. If you have installed software applications recently, they may not be compatible with your system. Try to un-install them in Windows Safe Mode. 3. Check your system for viruses. 4. Update the BIOS to the latest version with WINFLASH in Windows or AFLASH in DOS mode. These utilities and BIOS files can be downloaded from the ASUS website...
User Manual - Page 68

A Appendix
Software Problem - BIOS
Updating the BIOS. 1. Please verify the Notebook PC's exact model and download the latest BIOS file for your model from the ASUS website. 2. Use the "WINFLASH" utility to update your BIOS. The utility can be found in your Driver & Utility CD that came with your Notebook PC. 3. Extract the BIOS file to a temporary location (such as...
User Manual - Page 69
.... Change the security configuration to a lower level. NIS scans virus while downloading data so network speed will be decreased.
4. Cannot login to MSN or Yahoo messenger services. Make sure NIS has been updated and also update the Windows system by using "Windows Update". If the problem still exist, try: 1. Open NIS 200x by clicking on the NIS...
User Manual - Page 70
... Problems and Solutions (Cont.)
9. Windows Firewall must be stopped before installing "Norton Internet Security" or "Norton Personal Firewall". How to stop Windows Firewall: 1. Click Start and then Control Panel. 2. You will have one of two control panels. Click on the Security Center icon. 3. Click on the Windows Firewall icon beneath the status updates. 4. Click Off and then click...
User Manual - Page 71
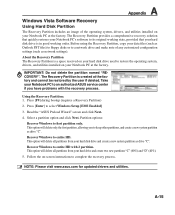
... all partitions from your hard disk drive and create a new system partition as drive "C". Recover Windows to entire HD with 2 partition. This option will delete all partitions from your hard drive and create two new partitions "C" (60%) and "D" (40%). 5. Follow the on-screen instructions to complete the recovery process.
NOTE: Please visit www.asus.com for updated drivers and utilities.
A-15
User Manual - Page 72
... network settings). Using the Recovery DVD: 1. Insert the Recovery DVD into the optical drive (Notebook PC needs to be powered ON). 2. Restart the Notebook PC and press on bootup and select the optical drive (may be labeled as
"CD/DVD") using the down cursor and press to boot from the Recovery DVD. 3. Select a partition option and click Next. Partition options:
Recover Windows...