Asus MAXIMUS IV EXTREME-Z driver and firmware
Drivers and firmware downloads for this Asus item

Related Asus MAXIMUS IV EXTREME-Z Manual Pages
Download the free PDF manual for Asus MAXIMUS IV EXTREME-Z and other Asus manuals at ManualOwl.com
User Manual - Page 5
...II 4-13 4.3.7 ROG CPU-Z 4-14 4.3.8 MemTweakIt 4-15 4.3.9 ROG Connect 4-16 4.3.10 Audio configurations 4-19 4.4 RAID configurations 4-21 4.4.1 RAID definitions 4-21 4.4.2 Installing Serial ATA hard disks 4-22 4.4.3 Setting the RAID item in BIOS 4-22 4.4.4 Intel® Rapid Storage Technology Option ROM utility..... 4-22 4.4.5 Marvell RAID utility 4-28 4.5 Creating a RAID driver disk 4-32...
User Manual - Page 6
... support 5.1 ATI® CrossFireX™ technology 5-1
5.1.1 Requirements 5-1 5.1.2 Before you begin 5-1 5.1.3 Installing CrossFireX graphics cards 5-2 5.1.4 Installing the device drivers 5-3 5.1.5 Enabling the ATI® CrossFireX™ technology 5-3 5.2 NVIDIA® SLI™ technology 5-5 5.2.1 Requirements 5-5 5.2.2 Installing two SLI-ready graphics cards 5-5 5.2.3 Installing...
User Manual - Page 13
... the BIOS Setup menus. Detailed descriptions of the BIOS parameters are also provided. • Chapter 4: Software support This chapter describes the contents of the support DVD that comes with the motherboard package and the software. • Chapter 5: Multiple GPU technology support This chapter describes how to install and configure multiple ATI® CrossFireX™ and NVIDIA® SLI...
User Manual - Page 15
... Chipset built-in: - 2 x SATA 6Gb/s ports (Red) - 4 x SATA 3Gb/s ports (Gray) - Intel® Rapid Storage Technology supports SATA
RAID 0, 1, 5, and 10 - Supports Intel® Smart Response Technology* on 2nd generation Intel® Core™ processor family * Intel® Smart Response Technology supports Windows® 7/ Vista operating systems.
Marvell® 9182 controller: - 2 x SATA...
User Manual - Page 30
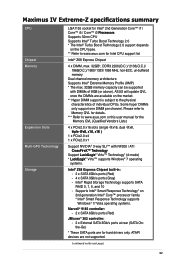
... this tool and update BIOS from a USB flash disk before entering the OS. You can update your BIOS only in a few clicks without preparing an additional floppy diskette or using an OSbased flash utility.
SATA on the Go The motherboard supports the next-generation hard drives based on the Serial ATA (SATA) 3Gb/s storage specification, delivering enhanced scalability and doubling the bus bandwidth for...
User Manual - Page 38
... is recommended to protect the CPU.
• Always install DIMMs with the same CAS latency. For optimum compatibility, we recommend that you obtain memory modules from the same vendor.
• Due to the memory address limitation on 32-bit Windows OS, when you install 4GB or more memory on the motherboard, the actual usable memory for the OS can be...
User Manual - Page 135
... a network or an Internet Service Provider (ISP).
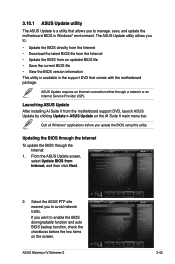
Launching ASUS Update After installing AI Suite II from the motherboard support DVD, launch ASUS Update by clicking Update > ASUS Update on the AI Suite II main menu bar.
Quit all Windows® applications before you update the BIOS using this utility.
Updating the BIOS through the Internet
To update the BIOS through the Internet:
1. From the ASUS...
User Manual - Page 145
...drivers, software applications, and utilities that you can install to avail all motherboard features.
The contents of the support DVD are subject to change at any time without notice. Visit the ASUS website at www.asus.com for updates.
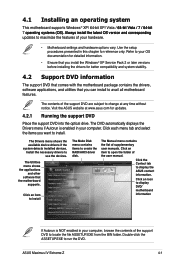
4.2.1 Running the support DVD
Place the support DVD into the optical drive. The DVD automatically displays the Drivers menu if Autorun is enabled in your computer...
User Manual - Page 147
... TurboV EVO function.
• The applications in the Tool menu vary with models.
• The screeshots of AI Suite II in this user manual are for reference only. The actual screenshots vary with models.
• Refer to the software manual in the support DVD or visit the ASUS website at www.asus.com for detailed software configuration.
ASUS Maximus IV Extreme-Z
4-3
User Manual - Page 163
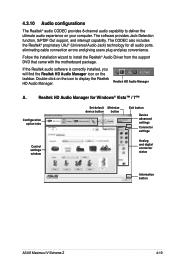
...-click on the icon to display the Realtek HD Audio Manager.
Realtek HD Audio Manager
A.
Realtek HD Audio Manager for Windows® Vista™ / 7™
Configuration option tabs
Set default Minimize device button button
Exit button
Device advanced settings Connector settings
Control settings window
Analog and digital connector status
Information button
ASUS Maximus IV Extreme-Z
4-19
User Manual - Page 165
... configurations
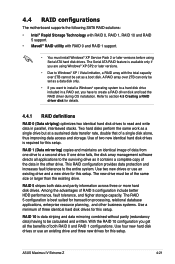
The motherboard supports the following SATA RAID solutions:
• Intel® Rapid Storage Technology with RAID 0, RAID 1, RAID 10 and RAID 5 support.
• Mavell® RAID utility with RAID 0 and RAID 1 support.
• You must install Windows® XP Service Pack 2 or later versions before using Serial ATA hard disk drives. The Serial ATA RAID feature is available only...
User Manual - Page 170
..., set the SATA Mode BIOS item to [RAID mode] in BIOS setup. Refer to section 3.5.4 SATA Configuration for details.
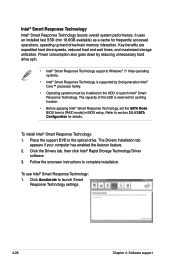
To install Intel® Smart Response Technology: 1. Place the support DVD to the optical drive. The Drivers installation tab
appears if your computer has enabled the Autorun feature. 2. Click the Drivers tab, then click Intel® Rapid Storage Technology Driver
software. 3. Follow...
User Manual - Page 176
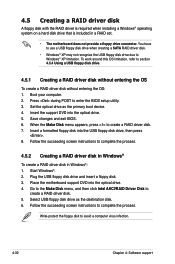
...your computer. 2. Press during POST to enter the BIOS setup utility. 3. Set the optical drive as the primary boot device. 4. Insert the support DVD into the optical drive. 5. Save changes and exit BIOS. 6. When the Make Disk menu appears, press to create a RAID driver disk. 7. Insert a formatted floppy disk into the USB floppy disk drive, then press
. 8. Follow the succeeding screen instructions...
User Manual - Page 177
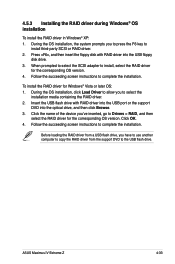
... name of the device you've inserted, go to Drivers > RAID, and then
select the RAID driver for the corresponding OS version. Click OK. 4. Follow the succeeding screen instructions to complete the installation.
Before loading the RAID driver from a USB flash drive, you have to use another computer to copy the RAID driver from the support DVD to the USB flash drive.
ASUS Maximus IV Extreme-Z
4-33
User Manual - Page 178
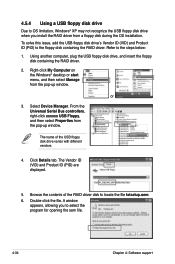
... floppy disk containing the RAID driver. Refer to the steps below:
1. Using another computer, plug the USB floppy disk drive, and insert the floppy disk containing the RAID driver.
2. Right-click My Computer on the Windows® desktop or start menu, and then select Manage from the pop-up window.
or
3. Select Device Manager. From the Universal Serial Bus controllers, right-click xxxxxx USB Floppy...
User Manual - Page 183
... cards to your system.
To uninstall existing graphics card drivers
1. Close all current applications. 2. For Windows XP, go to Control Panel > Add/Remove Programs.
For Windows Vista, go to Control Panel > Programs and Features. 3. Select your current graphics card driver/s. 4. For Windows XP, select Add/Remove.
For Windows Vista, select Uninstall. 5. Turn off your computer.
ROG Maximus IV Extreme...
User Manual - Page 185
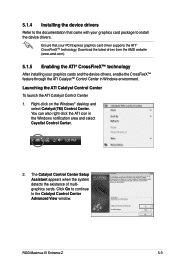
... on the Windows® desktop and
select Catalyst(TM) Control Center. You can also right-click the ATI icon in the Windows notification area and select Cayalist Control Center.
2. The Catalyst Control Center Setup Assistant appears when the system detects the existance of multigraphics cards. Click Go to continue to the Catalyst Control Center Advanced View window.
ROG Maximus IV Extreme-Z
5-3
User Manual - Page 188
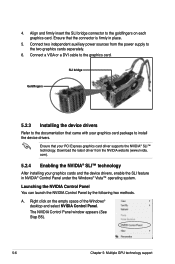
... the power supply to the two graphics cards separately.
6. Connect a VGA or a DVI cable to the graphics card.
SLI bridge
Goldfingers
5.2.3 Installing the device drivers
Refer to the documentation that came with your graphics card package to install the device drivers.
Ensure that your PCI Express graphics card driver supports the NVIDIA® SLI™ technology. Download the latest driver from...
User Manual - Page 191
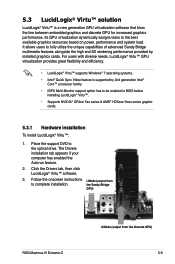
...174; Virtu™:
1. Place the support DVD to the optical drive. The Drivers installation tab appears if your computer has enabled the Autorun feature.
2. Click the Drivers tab, then click LucidLogix® Virtu™ software.
3. Follow the onscreen instructions i-Mode (output from
to complete installation.
the Sandy Bridge
GPU)
ROG Maximus IV Extreme-Z
d-Mode (output from the discrete...
User Manual - Page 193
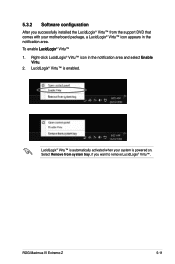
5.3.2 Software configuration
After you successfully installed the LucidLogix® Virtu™ from the support DVD that comes with your motherboard package, a LucidLogix® Virtu™ icon appears in...174; Virtu™ is automatically activated when your system is powered on. Select Remove from system tray, if you want to remove LucidLogix® Virtu™.
ROG Maximus IV Extreme-Z
5-11