Asus MEW-AML driver and firmware

Related Asus MEW-AML Manual Pages
Download the free PDF manual for Asus MEW-AML and other Asus manuals at ManualOwl.com
MEW-AML User Manual - Page 2
... NOTICE, AND SHOULD NOT BE CONSTRUED AS A COMMITMENT BY ASUS. ASUS ASSUMES NO RESPONSIBILITY OR LIABILITY FOR ANY ERRORS OR INACCURACIES THAT MAY APPEAR IN THIS MANUAL, INCLUDING THE PRODUCTS AND SOFTWARE DESCRIBED IN IT.
Copyright © 1999 ASUSTeK COMPUTER INC. All Rights Reserved.
Product Name: ASUS MEW-AML Manual Revision: 1.01 E420 Release Date: July 1999
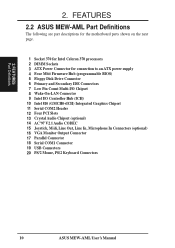
2
ASUS MEW-AML User's Manual
MEW-AML User Manual - Page 4
... Settings 14
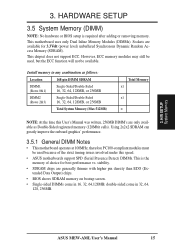
3.5.1 General DIMM Notes 15 3.5 System Memory (DIMM 15
3.5.2 DIMM Memory Installation 16 3.6 Central Processing Unit (CPU 17 3.7 Expansion Cards 18
3.7.1 Expansion Card Installation Procedure 18 3.8 External Connectors 19 3.9 Power Connection Procedures 27 4.1 Managing and Updating Your BIOS 28
4.1.1 Upon First Use of the Computer System 28
4
ASUS MEW-AML User's Manual
MEW-AML User Manual - Page 5
... 29
4.2 BIOS Setup Program 31 4.2.1 BIOS Menu Bar 32 4.2.2 Legend Bar 32
4.3 Main Menu 34 4.3.1 Primary & Secondary Master/Slave 35 4.3.2 Keyboard Features 38
4.4 Advanced Menu 40 4.4.1 I/O Device Configuration 41
4.5 Security Menu 42 4.6 Power Menu 44
General Power Settings 44 Power-Up Events 44 4.7 Boot Menu 45 Boot Sequence 45 4.8 Exit Menu 46
ASUS MEW-AML User's Manual
5
MEW-AML User Manual - Page 6
... does not exceed the Class B limits for radio noise emissions from digital apparatus set out in the Radio Interference Regulations of the Canadian Department of Communications.
This Class B digital apparatus complies with Canadian ICES-003.
Cet appareil numérique de la classe B est conforme à la norme NMB-003 du Canada.
6
ASUS MEW-AML User's Manual
MEW-AML User Manual - Page 7
... Serial COM2 connector with bracket (1) 40-pin ribbon cable for internal UltraDMA/33 IDE drives (1) 80-wire ribbon cable for internal UltraDMA/66 or UltraDMA/33 IDE drives
(Note: The 80-wire cable has a 40-pin connector.)
(1) Ribbon cable for (1) 5.25" and (2) 3.5" floppy drives (1) Bag of spare jumper caps (1) Support CD with drivers and utilities (1) This Motherboard User's Manual
ASUS MEW-AML...
MEW-AML User Manual - Page 8
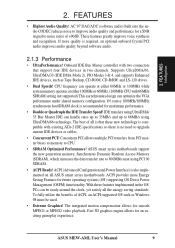
.... Hardware random number generator supports new security software for data protection and secured Internet transactions.
• Enhanced ACPI & Anti-Boot Virus Protection! Programmable BIOS (Flash EEPROM), offering enhanced ACPI for Windows 98 compatibility, built-in firmware-based virus protection, and autodetection of most devices for virtually automatic setup.
8
ASUS MEW-AML User's Manual
MEW-AML User Manual - Page 9
... is compatible with existing ATA-2 IDE specifications so there is no need to upgrade current IDE devices or cables.
• Concurrent PCI! Concurrent PCI allows multiple PCI transfers from PCI master buses to memory to CPU.
• SDRAM Optimized Performance! ASUS smart series motherboards support the new generation memory, Synchronous Dynamic Random Access Memory (SDRAM), which increases the...
MEW-AML User Manual - Page 10
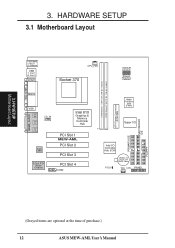
...processors 2 DIMM Sockets 3 ATX Power Connector for connection to an ATX power supply 4 Four Mbit Firmware Hub (programmable BIOS) 5 Floppy Disk Drive Connector 6 Primary and Secondary IDE Connectors 7 Low Pin Count Multi-I/O Chipset 8 Wake-On-LAN Connector 9 Intel I/O Controller Hub (ICH) 10 Intel 810 (GMCH0+ICH) Integrated Graphics Chipset 11 Serial COM2 Header 12 Four PCI Slots 13 Crystal Audio...
MEW-AML User Manual - Page 12
... SETUP
3.1 Motherboard Layout
PS2KBMS
T: Mouse B: Keyboard
USB
T: Port 1 B: Port 2
COM1
CPU_FAN
Socket 370
FS4
FS3
FS2
External Frequency Selection
FS1 FS0
DIMM Socket 1 (64/72-bit, 168-pin module) DIMM Socket 2 (64/72-bit, 168-pin module)
PRINTER
GAME_AUDIO
VGA
Line Out
Line In
Mic In
CD_IN
Audio Codec
Intel 810
Graphics & Memory Controller Hub
PCI Slot 1
MEW-AML
PCI Slot 2
PCI...
MEW-AML User Manual - Page 13
...)
23) ATXPWR
p.26 ATX Power Supply Connector (20 pins)
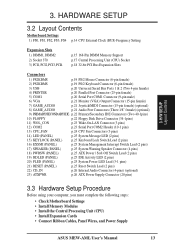
3.3 Hardware Setup Procedure
Before using your computer, you must complete the following steps:
• Check Motherboard Settings • Install Memory Modules • Install the Central Processing Unit (CPU) • Install Expansion Cards • Connect Ribbon Cables, Panel Wires, and Power Supply
ASUS MEW-AML User's Manual
13
MEW-AML User Manual - Page 14
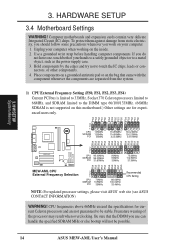
...
FS3
FS4
FS0
FS1
FS2
FS3
FS4
MEW-AML CPU External Frequency Selection
3 2 1
CPU SDRAM
PCI
70MHz 105MHz
35MHz
66.0MHz 100.0MHz
33.4MHz
Recommended CPU Setting
NOTE: For updated processor settings, please visit ASUS' web site (see ASUS CONTACT INFORMATION)
WARNING! CPU frequencies above 66MHz exceed the specifications for current Celeron processors and are not guaranteed to be stable...
MEW-AML User Manual - Page 15
...hardware or BIOS setup is required after adding or removing memory.
This motherboard uses only Dual Inline Memory Modules (DIMMs). Sockets are available for 3.3Volt (power level) unbuffered Synchronous Dynamic Random Access Memory (SDRAM).
This chipset does not support ECC. However, ECC memory modules may still be used, but the ECC function will not be available.
Install memory in any combination...
MEW-AML User Manual - Page 16
3. HARDWARE SETUP
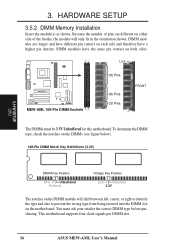
3.5.2 DIMM Memory Installation
Insert the module(s) as shown. Because the number of pins are different on either side of ... type and also to prevent the wrong type from being inserted into the DIMM slot on the motherboard. You must ask your retailer the correct DIMM type before purchasing. This motherboard supports four clock signals per DIMM slot.
16
ASUS MEW-AML User's Manual
MEW-AML User Manual - Page 17

... setting is available only on unlocked processors) for your Socket 370 processor or else boot-up may not be possible.
CAUTION! Be careful not to scrape the motherboard when mounting a clampstyle processor fan or else damage may occur to the motherboard.
Socket 370 CPU (Top) Socket 370 CPU (Bottom)
3. H/W SETUP Expansion Cards
1
MEW-AML
MEW-AML Socket 370
Notch
ASUS MEW-AML User's Manual...
MEW-AML User Manual - Page 18
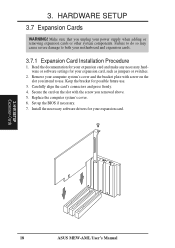
... on the slot you intend to use. Keep the bracket for possible future use.
3. Carefully align the card's connectors and press firmly. 4. Secure the card on the slot with the screw you removed above. 5. Replace the computer system's cover. 6. Set up the BIOS if necessary. 7. Install the necessary software drivers for your expansion card.
3. H/W SETUP Expansion Cards
18
ASUS MEW-AML User's Manual
MEW-AML User Manual - Page 28
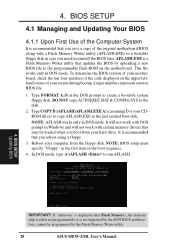
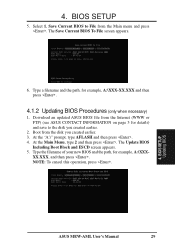
... disk. NOTE: BIOS setup must specify "Floppy" as the first item in the boot sequence.
4. In DOS mode, type A:\AFLASH to run AFLASH.
4. BIOS SETUP Updating BIOS
IMPORTANT! If "unknown" is displayed after Flash Memory:, the memory chip is either not programmable or is not supported by the ACPI BIOS and therefore, cannot be programmed by the Flash Memory Writer utility.
28
ASUS MEW-AML User...
MEW-AML User Manual - Page 29
... disk you created earlier. 3. At the "A:\" prompt, type AFLASH and then press . 4. At the Main Menu, type 2 and then press . The Update BIOS
Including Boot Block and ESCD screen appears. 5. Type the filename of your new BIOS and the path, for example, A:\XXX-
XX.XXX, and then press . NOTE: To cancel this operation, press .
4. BIOS SETUP Updating BIOS
ASUS MEW-AML...
MEW-AML User Manual - Page 31
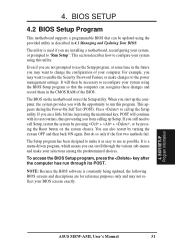
... make your selections among the predetermined choices.
To access the BIOS Setup program, press the key after the computer has run through its POST.
NOTE: Because the BIOS software is constantly being updated, the following BIOS screens and descriptions are for reference purposes only and may not reflect your BIOS screens exactly.
4. BIOS SETUP Program Information
ASUS MEW-AML User's Manual
31
MEW-AML User Manual - Page 35
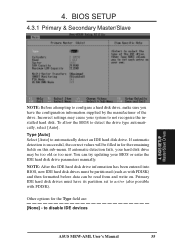
... entered into BIOS, new IDE hard disk drives must be partitioned (such as with FDISK) and then formatted before data can be read from and write on. Primary IDE hard disk drives must have its partition set to active (also possible with FDISK).
Other options for the Type field are:
[None] - to disable IDE devices
ASUS MEW-AML User's Manual
35
MEW-AML User Manual - Page 40
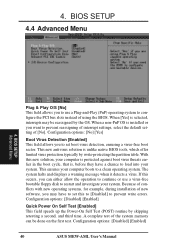
... set this to [Disabled] to prevent write errors. Configuration options: [Disabled] [Enabled]
Quick Power On Self Test [Enabled] This field speeds up the Power-On Self Test (POST) routine by skipping retesting a second, and third time. A complete test of the system memory can be done on the first test. Configuration options: [Disabled] [Enabled]
40
ASUS MEW-AML User's Manual