Asus P I-P65UP8 CP6ND driver and firmware

Related Asus P I-P65UP8 CP6ND Manual Pages
Download the free PDF manual for Asus P I-P65UP8 CP6ND and other Asus manuals at ManualOwl.com
User Manual - Page 2
... NOTICE, AND SHOULD NOT BE CONSTRUED AS A COMMITMENT BY ASUS. ASUS ASSUMES NO RESPONSIBILITY OR LIABILITY FOR ANY ERRORS OR INACCURACIES THAT MAY APPEAR IN THIS MANUAL, INCLUDING THE PRODUCTS AND SOFTWARE DESCRIBED IN IT.
Copyright © 1997 ASUSTeK COMPUTER INC. All Rights Reserved.
Product Name: P/I-P65UP8
Manual Revision: 1.03
Release Date:
November 1997
2
ASUS P/I-P65UP8 User's Manual
User Manual - Page 4
... Installation 33
Windows 95 Video Driver Installation 33 Windows 95 Video Driver Installation 34
Using Control Panel 34 Windows 95 Display Settings 35 Windows NT 4.0 Video Driver Installation 37 Windows NT 3.51 Video Driver Installation 38 IBM OS/2 Video Driver Installation 39 AutoCAD Video Driver Installation 39 Microstation Video Driver Installation 39
4
ASUS P/I-P65UP8 User's Manual
User Manual - Page 8
... DMI-enabled components.)
• Easy Installation: Is equipped with BIOS that supports auto detection of hard drives, PS/2 mouse, and Plug and Play devices to make setup of hard drives, expansion cards, and other devices virtually automatic.
• Optional IrDA Module: Supports an optional infrared port module for wireless file transfers and communication.
8
ASUS P/I-P65UP8 User's Manual
User Manual - Page 10
...Serial Bus 2Mbit Flash EEPROM (Programable BIOS)
ASUS P/I-P65UP8 User's Manual
Keyboard
CR2032
3Volts
CMOS Power
JP2
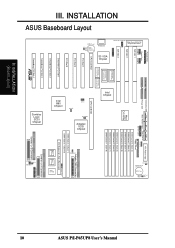
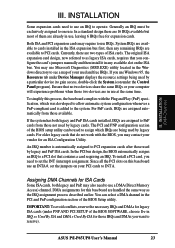
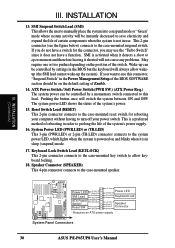
III. INSTALLATION
ASUS Baseboard Layout
Parallel Port Serial Ports COM 1 COM 2 ISA Slot 1
ISA Slot 2
ISA Slot 3
512KB DRAM for onboard VGA
S3 VGA Chipset
512KB DRAM for onboard VGA
512KB DRAM
512KB DRAM
for onboard VGA for onboard VGA
CPU Card Slot
Lithium Cell
PCI...
User Manual - Page 12
III. INSTALLATION (Jumpers)
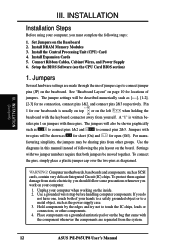
III. INSTALLATION
Installation Steps
Before using your computer, you must complete the following steps:
1. Set Jumpers on the Baseboard 2. Install DRAM Memory Modules 3. Install the Central Processing Unit (CPU) Card 4. Install Expansion Cards 5. Connect Ribbon Cables, Cabinet Wires, and Power Supply 6. Setup the BIOS Software (see the CPU Card BIOS section)
1. ...
User Manual - Page 18
... Local DRAM: The i960 requires 4MB to 256MB (16MB recommended) memory using one or two EDO DRAM modules when 960SEL jumper is set to "I2O." The i960 does not require memory in the "Bridge" mode. Use i960 SIMM socket 1 when using only one module. The i960 does not support parity or ECC.
18
ASUS P/I-P65UP8 User's Manual
User Manual - Page 22
... computer system's cover. 8. Set up the BIOS if necessary
(such as IRQ xx Used By ISA: Yes in PNP AND PCI SETUP) 9. Install the necessary software drivers for your expansion card.
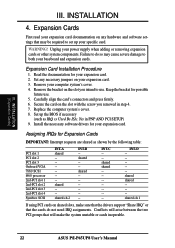
Assigning IRQs for Expansion Cards
IMPORTANT: Interrupt requests are shared as shown by the following table:
PCI slot 1 PCI slot 2 PCI slot 3 Onboard VGA 7880 SCSI i960 processor 2nd-PCI slot 1 2nd-PCI slot 2 2nd-PCI...
User Manual - Page 23
... the PCI and PnP configuration section of the BIOS Setup utility.
IMPORTANT: To avoid conflicts, reserve the necessary IRQs and DMAs for legacy ISA cards (under PNP AND PCI SETUP of the BIOS SOFTWARE, choose Yes in IRQ xx Used By ISA and DMA x Used By ISA for those IRQs and DMAs you want to reserve).
ASUS P/I-P65UP8 User's Manual
23
User Manual - Page 24
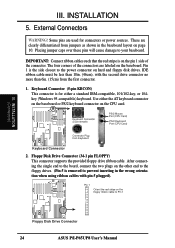
... baseboard or PS/2 keyboard connector on the CPU card.
Keyboard Connector (5-pin female)
PS/2 Mouse Port (CPU Card)
PS/2 Keyboard Port (CPU Card)
R
Connector Plug from Keyboard
Keyboard Connector
2. Floppy Disk Drive Connector (34-1 pin FLOPPY) This connector supports the provided floppy drive ribbon cable. After connecting the single end to the board, connect the two plugs on the other end...
User Manual - Page 25
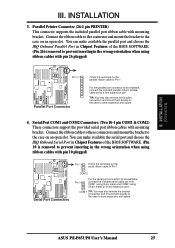
... the serial port and choose the IRQ Onboard Serial Port in Chipset Features of the BIOS SOFTWARE. (Pin 10 is removed to prevent inserting in the wrong orientation when using ribbon cables with pin 10 plugged)
Serial Port Connectors
Pin 1
Orient the red stripe on the serial ribbon cable to Pin 1
COM 2
Pin 1
For the serial port connectors to be available, connect the included serial cable set...
User Manual - Page 26

... diagram. You may also configure two hard disks to be both Masters using one ribbon cable on the primary IDE connector and another on the secondary IDE connector. A new BIOS feature allows SCSI hard drive bootup (see "HDD Sequence SCSI/IDE First" in the BIOS FEATURES SETUP of the BIOS software). (Pin 20 is removed to prevent inserting in the...
User Manual - Page 27
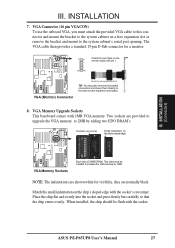
...'s serial port opening. The VGA cable then provides a standard 15-pin D-Sub connector for a monitor.
1
2
Orient the red stripe on the monitor cable with pin 1
15
16
R
VGA (Monitor) Connector
Bracket to end approximately 6inch
TIP: You may also remove the bracket connectors and mount them directly to the case to save expansion slot space.
8. VGA Memory Upgrade Sockets...
User Manual - Page 30
... the system). If you want to use this connector, "Suspend Switch" in the Power Management Setup of the BIOS SOFTWARE section should be on the default setting of Enable.
14. ATX Power Switch / Soft Power Switch (PWR SW.) (ATX Power Req.) The system power can be controlled by a momentary switch connected to this lead. Pushing the button once will switch...
User Manual - Page 33
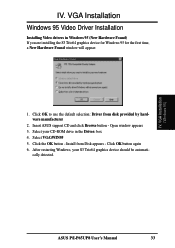
... manufacturer
2. Insert ASUS support CD and click Browse button - Open window appears 3. Select your CD-ROM drive in the Drives: box 4. Select VGA\WIN95 5. Click the OK button - Install from Disk appears - Click OK button again 6. After restarting Windows, your S3 Trio64 graphics device should be automati-
cally detected.
IV. VGA Installation (Windows 95)
ASUS P/I-P65UP8 User's Manual
33
User Manual - Page 34
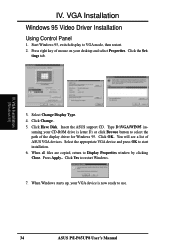
..... 5. Click Have Disk. Insert the ASUS support CD. Type D:\VGA\WIN95 (as-
suming your CD-ROM drive is letter D) or click Browse button to select the path of the display driver for Windows 95. Click OK. You will see a list of ASUS VGA devices. Select the appropriate VGA device and press OK to start installation. 6. When all files are copied, return to Display Properties window by clicking Close...
User Manual - Page 35

....
IV. VGA Installation (Windows 95)
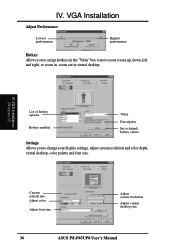
Adjust display position
Adjust display size
Current virtual desktop screen and color Change refresh rate
Adjust performance Set to default values
Change Refresh Rate:
List of refresh rate options
Customize refresh rate
Add to list
Delete from list
Set to default supported refresh rate
Test customized refresh rates
ASUS P/I-P65UP8 User's Manual
35
User Manual - Page 36
...VGA Installation (Windows 95)
List of hotkey options
Hotkey enabled
Value
Description
Set to default hotkey values
Settings: Allows you to change your display settings, adjust screen resolution and color depth, virtual desktop, color palette and font size.
Current refresh rate Adjust color
Adjust font size
Adjust screen resolution
Adjust virtual desktop size
36
ASUS P/I-P65UP8 User's Manual
User Manual - Page 37
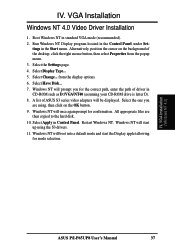
...OK button. 9. Windows NT will once again prompt for confirmation. All appropriate files are then copied to the hard disk. 10. Select Apply in Control Panel. Restart Windows NT. Windows NT will start up using the S3 drivers. 11. Windows NT will boot into a default mode and start the Display applet allowing for mode selection.
IV. VGA Installation (Windows NT 4.0)
ASUS P/I-P65UP8 User's Manual
37
User Manual - Page 38
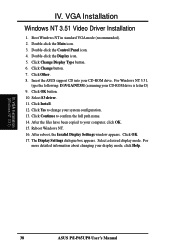
...path name. 14. After the files have been copied to your computer, click OK. 15. Reboot Windows NT. 16. After reboot, the Invalid Display Settings window appears. Click OK. 17. The Display Settings dialogue box appears. Select a desired display mode. For
more detailed information about changing your display mode, click Help.
IV. VGA Installation (Windows NT 3.51)
38
ASUS P/I-P65UP8 User's Manual
User Manual - Page 39

... drivers should be installed and ready to use.
Microstation Video Driver Installation
1. Enter DOS mode 2. Insert the ASUS support CD (assuming your CD-ROM drive is letter D) 3. Change current directory to D:\DOS\Mstation, type INSTALL 4. Follow the instructions to complete the installation of the drivers. Your video
drivers should be installed and ready to use.
ASUS P/I-P65UP8 User's Manual...