Asus P5G41C-M driver and firmware

Related Asus P5G41C-M Manual Pages
Download the free PDF manual for Asus P5G41C-M and other Asus manuals at ManualOwl.com
User Manual - Page 2
.../or LGPL Software, which will be no earlier than December 1, 2011, either (1) for free by downloading it from http://support.asus.com/download; or (2) for the cost of reproduction and shipment, which is dependent on the preferred carrier and the location where you want to have it shipped to, by sending a request to: ASUSTeK Computer Inc...
User Manual - Page 3
... (CPU 1-7 1.6.1 Installing the CPU 1-7 1.6.2 Installing the CPU heatsink and fan 1-10 1.6.3 Uninstalling the CPU heatsink and fan 1-11 1.7 System memory 1-12 1.7.1 Overview 1-12 1.7.2 Memory configurations 1-13 1.7.3 Installing a DIMM 1-19 1.7.4 Removing a DIMM 1-19 1.8 Expansion slots 1-20 1.8.1 Installing an expansion card 1-20 1.8.2 Configuring an expansion card 1-20 1.8.3 PCI slots...
User Manual - Page 4
... Master/Slave, SATA1~4 2-7 2.3.4 Storage Configuration 2-8 2.3.5 System Information 2-9 2.4 Advanced menu 2-9 2.4.1 JumperFree Configuration 2-9 2.4.2 CPU Configuration 2-11 2.4.3 Chipset 2-12 2.4.4 Onboard Devices Configuration 2-13 2.4.5 USB Configuration 2-14 2.4.6 PCI PnP 2-15 2.5 Power menu 2-15 2.5.1 Suspend Mode 2-15 2.5.2 ACPI 2.0 Support 2-15 2.5.3 ACPI APIC Support 2-15
iv
User Manual - Page 6
...limits for a Class B digital device, pursuant to Part 15 of the FCC Rules. These limits are designed to provide reasonable protection against harmful interference in a residential installation. This equipment generates, ... the dealer or an experienced radio/TV technician for help.
The use of shielded cables for connection of the monitor to the graphics card is required to assure compliance with ...
User Manual - Page 7
... to fix it by yourself. Contact a qualified service technician or your retailer.
Operation safety
• Before installing the motherboard and adding devices on it, carefully read all the manuals that came with the package.
• Before using the product, ensure that all cables are correctly connected and the power cables are not damaged. If you detect any damage...
User Manual - Page 8
...complete a task.
IMPORTANT: Instructions that you MUST follow to complete a task.
NOTE: Tips and additional information to help you complete a task.
Where to find more information
Refer to the following sources for additional information and for product and software updates.
1. ASUS websites
The ASUS website provides updated information on ASUS hardware and software products. Refer to...
User Manual - Page 9
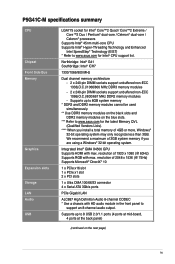
... resolution of 2048 x 1536 (@ 75Hz) Supports Microsoft® DirectX® 10
1 x PCIe x16 slot 1 x PCIe x1 slot 2 x PCI slots
1 x Ultra DMA 100/66/33 connector 4 x Serial ATA 3Gb/s ports
PCIe Gigabit LAN
ALC887 High Definition Audio 8-channel CODEC * Use a chassis with HD audio module in the front panel to
support an 8-channel audio output.
Supports up to 8 USB 2.0/1.1 ports (4 ports at mid-board...
User Manual - Page 10

... x COM connector 1 x CPU fan connector 1 x Chassis fan connector 1 x 24-pin EATX power connector 1 x 4-pin ATX 12V power connector
8Mb Flash ROM, AMI BIOS, PnP, DMI 2.0, WfM 2.0, ACPI 2.0a, SM BIOS 2.5
WOL, PXE, WOR by Ring, PME Wake up
1 x Ultra DMA 100/66/33 cable 2 x Serial ATA cables 1 x I/O shield 1 x User Manual
Drivers ASUS PC Probe II ASUS Update Anti-Virus software (OEM version)
uATX form...
User Manual - Page 13

... OS, which lets you instantly access the Internet and key applications before entering the Windows® OS.
• ASUS Express Gate supports installation on SATA HDDs, USB HDDs and flash drives with at least 1.2GB free disk space. When installing it on USB HDDs or flash drives, connect the drives to the motherboard USB port before turning on the computer.
• The actual boot time depends on...
User Manual - Page 18
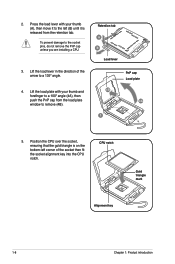
... cap unless you are installing a CPU.
3. Lift the load lever in the direction of the arrow to a 135º angle.
4. Lift the load plate with your thumb and forefinger to a 100º angle (4A), then push the PnP cap from the load plate window to remove (4B).
Retention tab A B
Load lever
PnP cap Load plate 4B
4A
3
5. Position...
User Manual - Page 23
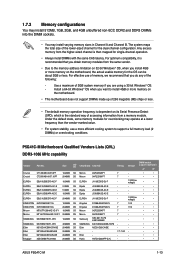
... you are using a 32-bit Windows® OS.
-
Install a 64-bit Windows® OS when you want to install 4GB or more memory on
the motherboard.
• This motherboard does not support DIMMs made up of 256 megabits (Mb) chips or less.
• The default memory operation frequency is dependent on its Serial Presence Detect (SPD), which is the standard...
User Manual - Page 30
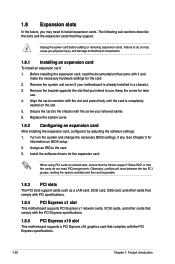
... drivers support "Share IRQ" or that the cards do not need IRQ assignments. Otherwise, conflicts will arise between the two PCI groups, making the system unstable and the card inoperable.
1.8.3 PCI slots
The PCI slots support cards such as a LAN card, SCSI card, USB card, and other cards that comply with PCI specifications.
1.8.4 PCI Express x1 slot
This motherboard supports PCI Express x1 network...
User Manual - Page 36
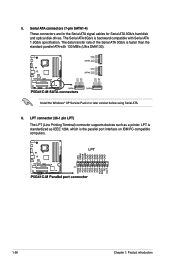
... optical disk drives. The Serial ATA 3Gb/s is backward compatible with Serial ATA 1.5Gb/s specification. The data transfer rate of the Serial ATA 3Gb/s is faster than the standard parallel ATA with 133 MB/s (Ultra DMA133).
Install the Windows® XP Service Pack 2 or later version before using Serial ATA.
6. LPT connector (26-1 pin LPT) The LPT (Line Printing Terminal) connector supports devices...
User Manual - Page 40
... without notice. Visit the ASUS website at www.asus.com for updates.
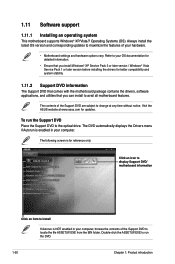
To run the Support DVD Place the Support DVD to the optical drive. The DVD automatically displays the Drivers menu if Autorun is enabled in your computer.
The following screen is for reference only.
Click an icon to display Support DVD/ motherboard information
Click an item to install
If Autorun is NOT...
User Manual - Page 41
... a network or an Internet Service Provider (ISP).
• This utility is available in the support DVD that comes with the motherboard package.
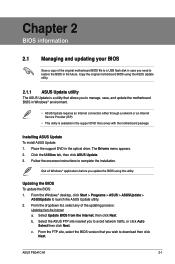
Installing ASUS Update To install ASUS Update: 1. Place the support DVD in the optical drive. The Drivers menu appears. 2. Click the Utilities tab, then click ASUS Update. 3. Follow the onscreen instructions to complete the installation.
Quit all Windows...
User Manual - Page 42
... instructions to complete the updating process.
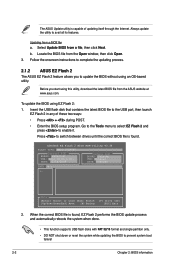
2.1.2 ASUS EZ Flash 2
The ASUS EZ Flash 2 feature allows you to update the BIOS without using an OS‑based utility.
Before you start using this utility, download the latest BIOS file from the ASUS website at www.asus.com.
To update the BIOS using EZ Flash 2:
1. Insert the USB flash disk that contains the latest BIOS file to the USB port...
User Manual - Page 43
... the latest version. Download the latest BIOS file from the ASUS website at www.asus.com.
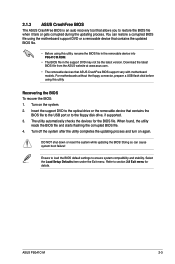
• The removable devices that ASUS CrashFree BIOS support vary with motherboard models. For motherboards without the floppy connector, prepare a USB flash disk before using this utility.
Recovering the BIOS To recover the BIOS: 1. Turn on the system. 2. Insert the support DVD to the optical drive or the...
User Manual - Page 44
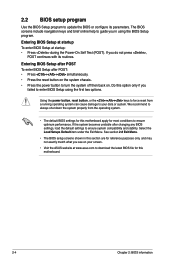
.... Select the Load Setups Default item under the Exit Menu. See section 2.8 Exit Menu.
• The BIOS setup screens shown in this section are for reference purposes only, and may not exactly match what you see on your screen.
• Visit the ASUS website at www.asus.com to download the latest BIOS file for this motherboard.
2-4
Chapter 2: BIOS information
User Manual - Page 57
...then press to display the sub-menu.
Main
Advanced
Power
BIOS SETUP UTILITY Boot Tools Exit
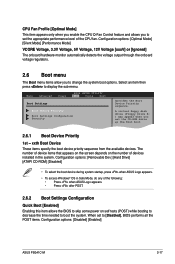
Boot Settings
Boot Device Priority
Boot Settings Configuration Security
Specifies the Boot Device Priority sequence.
A virtual floppy disk drive (Floppy Drive B: ) may appear when you set the CD-ROM drive as the first boot device.
2.6.1 Boot Device Priority
1st ~ xxth Boot Device
These items specify...
User Manual - Page 60
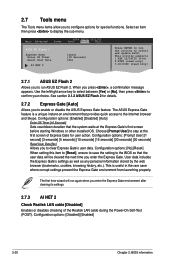
2.7 Tools menu
The Tools menu items allow you to configure options for special functions. Select an item then press to display the sub-menu.
Main Advanced
Power
BIOS SETUP UTILITY Boot Tools Exit
ASUS EZ Flash 2
Express Gate Enter OS Timer Reset User Data
AI NET 2
[Auto] [10 Seconds] [No]
Press ENTER to run the utility to...