Asus P5KPL-VM 1394 SI driver and firmware

Related Asus P5KPL-VM 1394 SI Manual Pages
Download the free PDF manual for Asus P5KPL-VM 1394 SI and other Asus manuals at ManualOwl.com
User Guide - Page 4
... Creating a bootable floppy disk 2-2 2.1.2 ASUS EZ Flash 2 utility 2-3 2.1.3 AFUDOS utility 2-4 2.1.4 ASUS CrashFree BIOS 3 utility 2-6 2.1.5 ASUS Update utility 2-8 2.2 BIOS setup program 2-11 2.2.1 BIOS menu screen 2-12 2.2.2 Menu bar 2-12 2.2.3 Navigation keys 2-12 2.2.4 Menu items 2-13 2.2.5 Sub-menu items 2-13 2.2.6 Configuration fields 2-13 2.2.7 Pop-up window 2-13 2.2.8 Scroll...
User Guide - Page 5
... 2.6.1 Boot Device Priority 2-30 2.6.2 Boot Settings Configuration 2-31 2.6.3 Security 2-32 2.7 Tools menu 2-34 ASUS EZ Flash 2 2-34 2.8 Exit menu 2-35 Chapter 3: Software support 3.1 Installing an operating system 3-2 3.2 Support CD information 3-2 3.2.1 Running the support CD 3-2 3.2.2 Drivers menu 3-3 3.2.3 Utilities menu 3-4 3.2.4 ASUS Contact information 3-5
Appendix: CPU features...
User Guide - Page 8
... guide is organized
This manual contains the following parts: • Chapter 1: Product introduction
This chapter describes the features of the motherboard and the new technology it supports. It also lists the hardware setup procedures that you have to perform when installing system components. It includes description of the jumpers and connectors on the motherboard. • Chapter 2: BIOS setup...
User Guide - Page 11
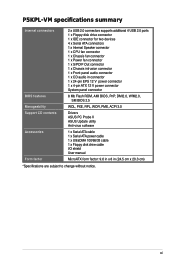
P5KPL-VM specifications summary
Internal connectors
BIOS features Manageability Support CD contents Accessories Form factor
2 x USB 2.0 connectors supports additional 4 USB 2.0 ports 1 x Floppy disk drive connector 1 x IDE connector for two devices 4 x Serial ATA connectors 1 x Internal Speaker connector 1 x CPU fan connector 1 x Chassis fan connector 1 x Power fan connector 1 x S/PDIF Out ...
User Guide - Page 23
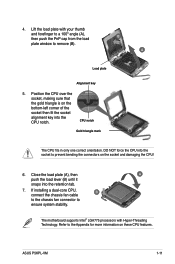
... the load plate (A), then
A
push the load lever (B) until it
snaps into the retention tab.
7. If installing a dual-core CPU, connect the chassis fan cable
B
to the chassis fan connector to
ensure system stability.
The motherboard supports Intel® LGA775 processors with Hyper-Threading Technology. Refer to the Appendix for more information on these CPU features.
ASUS P5KPL-VM
1-11
User Guide - Page 29
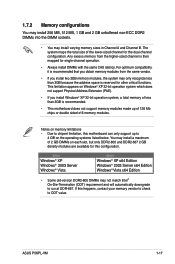
... Windows® Vista
64-bit
Windows® XP x64 Edition Windows® 2003 Server x64 Edition Windows® Vista x64 Edition
• Some old-version DDR2-800 DIMMs may not match Intel® On-Die-Termination (ODT) requirement and will automatically downgrade to run at DDR-667. If this heppens, contact your memory vendor to check to ODT value.
ASUS P5KPL-VM...
User Guide - Page 34
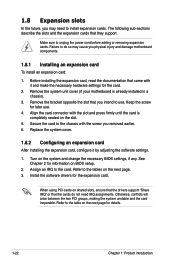
... card
After installing the expansion card, configure it by adjusting the software settings.
1. Turn on the system and change the necessary BIOS settings, if any. See Chapter 2 for information on BIOS setup.
2. Assign an IRQ to the card. Refer to the tables on the next page. 3. Install the software drivers for the expansion card.
When using PCI cards on shared slots, ensure that the drivers support...
User Guide - Page 50
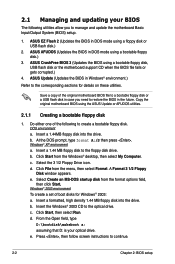
... floppy disk or a USB flash disk in case you need to restore the BIOS in the future. Copy the original motherboard BIOS using the ASUS Update or AFUDOS utilities.
2.1.1 Creating a bootable floppy disk
1. Do either one of the following to create a bootable floppy disk. DOS environment a. Insert a 1.44MB floppy disk into the drive. b. At the DOS prompt, type format A:/S then press . Windows®...
User Guide - Page 51
... floppy disk drive or the USB port.
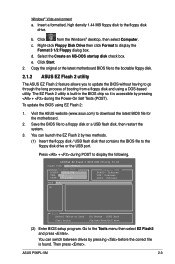
Press + during POST to display the following.
ASUSTek EZ Flash 2 BIOS ROM Utility V3.06
FLASH TYPE: SST 25VF016
Current ROM
BOARD: P5KPL-VM VER: 0111 DATE: 07/11/07
Update ROM BOARD: Unknown VER: Unknown DATE: Unknown
PATH: A:\
A:
Note Not[eEnter] Select or Load
[Tab] Switch
[B] Backup [ESC] Exit [Up/Down/Home/End] Move
(2) Enter BIOS setup program...
User Guide - Page 52
... alphanumeric characters for the extension name.
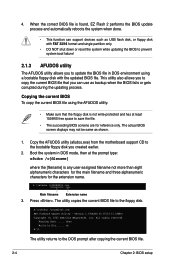
A:\>afudos /oOLDBIOS1.rom
Main filename Extension name
3. Press . The utility copies the current BIOS file to the floppy disk.
A:\>afudos /oOLDBIOS1.rom AMI Firmware Update Utility - Version 1.19(ASUS V2.07(03.11.24BB)) Copyright (C) 2002 American Megatrends, Inc. All rights reserved.
Reading flash ..... done Write to file...... ok A:\>
The utility...
User Guide - Page 53

...iP5KPLVM.ROM AMI Firmware Update Utility - Version 1.19(ASUS V2.07(03.11.24BB)) Copyright (C) 2002 American Megatrends, Inc. All rights reserved.
WARNING!! Do not turn off power during flash BIOS Reading file ....... done Reading flash ...... done
Advance Check ...... Erasing flash ...... done Writing flash ...... done Verifying flash .... done
Please restart your computer
A:\>
ASUS P5KPL-VM
2-
User Guide - Page 54
...
• Make sure that you rename the original or updated BIOS file in the floppy disk or the USB flash disk to P5KPLVM.ROM.
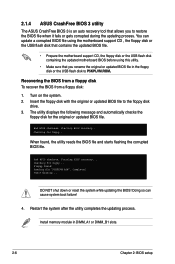
Recovering the BIOS from a floppy disk To recover the BIOS from a floppy disk:
1. Turn on the system. 2. Insert the floppy disk with the original or updated BIOS file to the floppy disk
drive. 3. The utility displays the following message and automatically checks the
floppy...
User Guide - Page 55
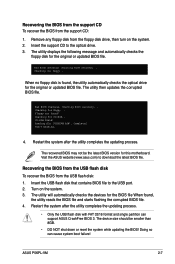
...updating process.
The recovered BIOS may not be the latest BIOS version for this motherboard. Visit the ASUS website (www.asus.com) to download the latest BIOS file.
Recovering the BIOS from the USB flash disk To recover the BIOS from the USB flash disk: 1. Insert the USB flash disk that contains BIOS file to the USB port. 2. Turn on the system. 3. The utility will automatically checks the devices...
User Guide - Page 56
...with the motherboard package.
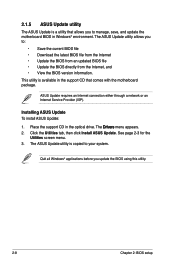
ASUS Update requires an Internet connection either through a network or an Internet Service Provider (ISP).
Installing ASUS Update To install ASUS Update:
1. Place the support CD in the optical drive. The Drivers menu appears. 2. Click the Utilities tab, then click Install ASUS Update. See page 2-3 for the
Utilities screen menu. 3. The ASUS Update utility is copied to...
User Guide - Page 58
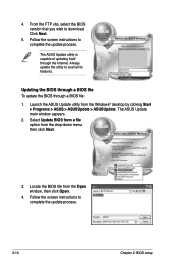
... the BIOS version that you wish to download. Click Next.
5. Follow the screen instructions to complete the update process.
The ASUS Update utility is capable of updating itself through the Internet. Always update the utility to avail all its features.
Updating the BIOS through a BIOS file To update the BIOS through a BIOS file:
1. Launch the ASUS Update utility from the Windows® desktop by...
User Guide - Page 59
.... For example, you can enable the security password feature or change the power management settings. This requires you to reconfigure your system using the BIOS Setup program so that the computer can recognize these changes and record them in the CMOS RAM of the SPI chip.
The firmware chip on the motherboard stores the Setup utility. When you start up the...
User Guide - Page 86
... the drivers, software applications, and utilities that you can install to avail all motherboard features.
The contents of the support CD are subject to change at any time without notice. Visit the ASUS website(www.asus.com) for updates.
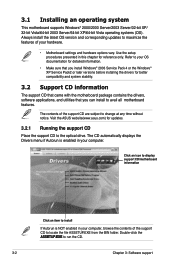
3.2.1 Running the support CD
Place the support CD to the optical drive. The CD automatically displays the Drivers menu if Autorun is enabled in your computer...
User Guide - Page 87
...Wizard Installs the ASUS InstAll-Drivers Installation Wizard.
Intel Chipset Inf Update Program Installs the Intel® chipset Inf update program.
Intel Graphics Accelerator Driver Installs the Intel Graphics Accelerator driver.
Realtek Audio Driver Installs the Realtek audio driver and application.
L1 Gigabit Ethernet Driver Installs the L1 Gigabit Ethernet driver and application.
ASUS P5KPL-VM...
User Guide - Page 88
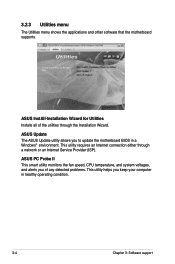
... and other software that the motherboard supports.
ASUS InstAll-Installation Wizard for Utilities Installs all of the utilities through the Installation Wizard.
ASUS Update The ASUS Update utility allows you to update the motherboard BIOS in a Windows® environment. This utility requires an Internet connection either through a network or an Internet Service Provider (ISP).
ASUS PC Probe...
User Guide - Page 92
...Intel® Pentium® 4 CPU that supports the Intel® EM64T. 2. Install a 64-bit operating system (Windows® XP Professional x64 Edition or
Windows® Server 2003 x64 Edition). 3. Install the 64-bit drivers for the motherboard components and devices from
the support CD. 4. Install the 64-bit drivers for expansion cards or add-on devices, if any.
Refer to the expansion card or add-on...