Asus P5N-EM HDMI driver and firmware

Related Asus P5N-EM HDMI Manual Pages
Download the free PDF manual for Asus P5N-EM HDMI and other Asus manuals at ManualOwl.com
User Manual - Page 31
... BIOS BIOS
BIOS 程式
BIOS 程式。
1.2MB
BIOS
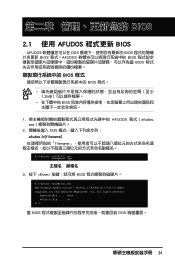
1 AFUDOS 程式(afudos. exe
2 DOS afudos /o[filename filename
A:\>afudos /oOLDBIOS1.rom
3. 按下 afudos /oOLDBIOS1.rom AMI Firmware Update Utility - Version 1.19(ASUS V2.07(03.11.24BB)) Copyright (C) 2002 American Megatrends, Inc. All rights reserved.
Reading flash...
User Manual - Page 32
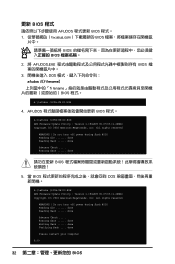
...afudos /iP5B-VM DO.ROM AMI Firmware Update Utility - Version 1.19(ASUS V2.07(03.11.24BB)) Copyright (C) 2002 American Megatrends, Inc. All rights reserved.
WARNING!! Do not turn off power during flash BIOS Reading file ....... done Reading flash ...... done
Advance Check ...... Erasing flash ...... done Writing flash ...... done Verifying flash .... done
Please restart your computer
A:\>
32 BIOS
User Manual - Page 4
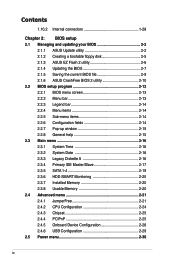
... Date 2-16 2.3.3 Legacy Diskette A 2-16 2.3.4 Primary IDE Master/Slave 2-17 2.3.5 SATA 1-4 2-19 2.3.6 HDD SMART Monitoring 2-20 2.3.7 Installed Memory 2-20 2.3.8 Usable Memory 2-20 2.4 Advanced menu 2-21 2.4.1 JumperFree 2-21 2.4.2 CPU Configuration 2-24 2.4.3 Chipset 2-25 2.4.4 PCIPnP 2-25 2.4.5 Onboard Device Configuration 2-26 2.4.6 USB Configuration 2-29 2.5 Power menu 2-30
iv
User Manual - Page 5
... Hard Disk Drives 2-35 2.6.4 Boot Settings Configuration 2-35 2.6.5 Security 2-37 2.7 Tools menu 2-38 ASUS EZ Flash 2 2-38 2.8 Exit menu 2-39
Chpater 3: Software Support 3.1 Installing an operating system 3-2 3.2 Support CD information 3-2
3.2.1 Running the support CD 3-2 3.2.2 Drivers menu 3-3 3.2.3 Utilities menu 3-4 3.2.4 Make Disk menu 3-5 3.2.5 Manual menu 3-6 3.2.6 ASUS Contact...
User Manual - Page 8
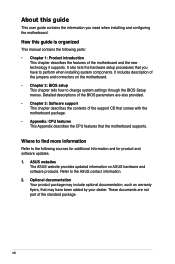
... procedures that you have to perform when installing system components. It includes description of the jumpers and connectors on the motherboard. • Chapter 2: BIOS setup This chapter tells how to change system settings through the BIOS Setup menus. Detailed descriptions of the BIOS parameters are also provided. • Chapter 3: Software support This chapter describes the contents of the...
User Manual - Page 11
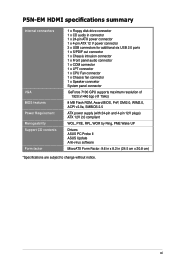
P5N-EM HDMI specifications summary
Internal connectors
VGA BIOS features Power Requirement Manageability Support CD contents Form factor
1 x Floppy disk drive connector 1 x CD audio in connector 1 x 24-pin ATX power connector 1 x 4-pin ATX 12 V power connector 3 x USB connectors for additional six USB 2.0 ports 1 x S/PDIF out connector 1 x Chassis intrusion connector 1 x Front panel audio ...
User Manual - Page 21
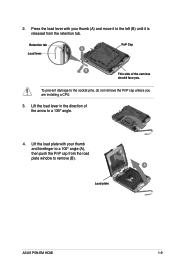
... damage to the socket pins, do not remove the PnP cap unless you are installing a CPU.
3. Lift the load lever in the direction of the arrow to a 135º angle.
4. Lift the load plate with your thumb and forefinger to a 100º angle (A), then push the PnP cap from the load plate window to remove (B).
B A
Load plate
ASUS P5N-EM HDMI
1-
User Manual - Page 32
...system cover.
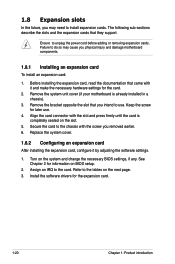
1.8.2 Configuring an expansion card
After installing the expansion card, configure it by adjusting the software settings.
1. Turn on the system and change the necessary BIOS settings, if any. See Chapter 2 for information on BIOS setup.
2. Assign an IRQ to the card. Refer to the tables on the next page. 3. Install the software drivers for the expansion card.
1-20
Chapter 1: Product...
User Manual - Page 35
...slot
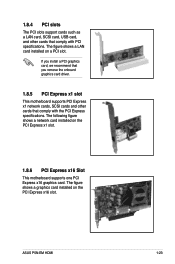
This motherboard supports PCI Express x1 network cards, SCSI cards and other cards that comply with the PCI Express specifications. The following figure shows a network card installed on the PCI Express x1 slot.
1.8.6 PCI Express x16 Slot
This motherboard supports one PCI Express x16 graphics card. The figure shows a graphics card installed on the PCI Express x16 slot.
ASUS P5N-EM HDMI
1-23
User Manual - Page 39
... HDCP compliant monitor.
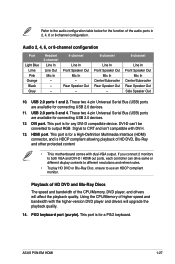
Playback of HD DVD and Blu-Ray Discs
The speed and bandwidth of the CPU/Memory, DVD player, and drivers will affect the playback quality. Using the CPU/Memory of higher speed and bandwidth with the higher-version DVD player and drivers will upgrade the playback quality.
14. PS/2 keyboard port (purple). This port is for a PS/2 keyboard.
ASUS P5N-EM HDMI
1-27
User Manual - Page 50
... connection either through a network or an Internet Service Provider (ISP).
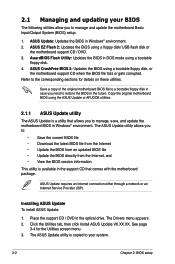
Installing ASUS Update To install ASUS Update:
1. Place the support CD / DVD in the optical drive. The Drivers menu appears. 2. Click the Utilities tab, then click Install ASUS Update VX.XX.XX. See page
3-4 for the Utilities screen menu. 3. The ASUS Update utility is copied to your system.
2-
Chapter 2: BIOS setup
User Manual - Page 51
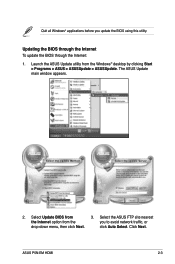
... the Internet: 1. Launch the ASUS Update utility from the Windows® desktop by clicking Start
> Programs > ASUS > ASUSUpdate > ASUSUpdate. The ASUS Update main window appears.
2. Select Update BIOS from
3. Select the ASUS FTP site nearest
the Internet option from the
you to avoid network traffic, or
drop‑down menu, then click Next.
click Auto Select. Click Next.
ASUS P5N-EM HDMI...
User Manual - Page 52
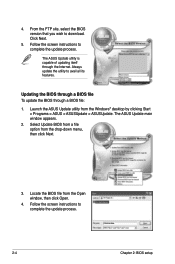
... Windows® desktop by clicking Start > Programs > ASUS > ASUSUpdate > ASUSUpdate. The ASUS Update main window appears.
2. Select Update BIOS from a file option from the drop‑down menu, then click Next.
3. Locate the BIOS file from the Open window, then click Open.
4. Follow the screen instructions to complete the update process.
P5N-EM HDMI.bin
P5N-EM HDMI
2-
Chapter 2: BIOS setup
User Manual - Page 55
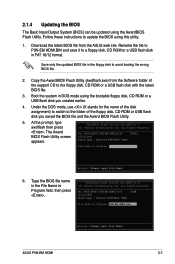
... ASUS web site. Rename the file to P5N-EM HDMI.BIN and save it to a floppy disk, CD ROM or a USB flash disk in FAT 16/12 format.
Save only the updated BIOS file in the floppy disk to avoid loading the wrong BIOS file.
2. Copy the AwardBIOS Flash Utility (awdflash.exe) from the Software folder of the support CD to the floppy disk, CD ROM or a USB flash disk with the latest BIOS...
User Manual - Page 60

... example, you can enable the security password feature or change the power management settings. This requires you to reconfigure your system using the BIOS Setup program so that the computer can recognize these changes and record them in the CMOS RAM of the SPI chip.
The SPI chip on the motherboard stores the Setup utility. When you start up the...
User Manual - Page 86
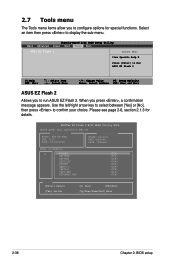
... Utility B326
FLASH TYPE: MXIC MX25L8005 8MB SPI Current ROM
Update ROM
BOARD: P5N-EM HDMI VER: 0115 DATE: 01/08/2008
BOARD: Unknown VER: Unknown DATE: Unknown
PATH: A:\M2NPVOC
A:
WIN98ESE
C:
NETTERM
DRIVERS
RECYCLED
WUTEMP
NEWFOL~1
INSTALL
TEST-REB
MSDOWNLD.TMP
Note [Enter] Select
[Tab] Switch
[S] Save
[ESC]Exit
[Up/Down/Home/End] Move
2-38
Chapter 2: BIOS setup
User Manual - Page 90
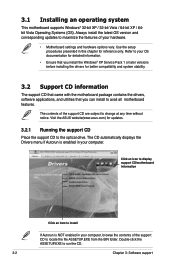
... the drivers, software applications, and utilities that you can install to avail all motherboard features.
The contents of the support CD are subject to change at any time without notice. Visit the ASUS website(www.asus.com) for updates.
3.2.1 Running the support CD
Place the support CD to the optical drive. The CD automatically displays the Drivers menu if Autorun is enabled in your computer...
User Manual - Page 92
....
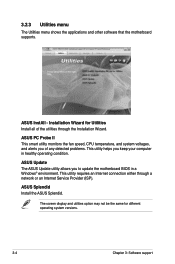
ASUS Update The ASUS Update utility allows you to update the motherboard BIOS in a Windows® environment. This utility requires an Internet connection either through a network or an Internet Service Provider (ISP).
ASUS Splendid Install the ASUS Splendid.
The screen display and utilities option may not be the same for different operating system versions.
3-
Chapter 3: Software support
User Manual - Page 97

... you to press the F6 key to install third-party SCSI or RAID driver.
2. Press then insert the floppy disk with RAID driver into the floppy disk drive.
3. Follow the succeeding screen instructions to complete the installation.
Due to chipset limitation, the Serial ATA ports supported by the NVIDIA chipset does not support Serial Optical Disk Drives (Serial ODD) under DOS.
ASUS P5N-EM HDMI
3-
User Manual - Page 100
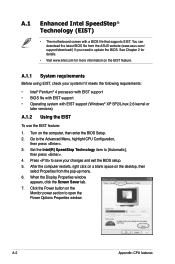
...® Pentium® 4 processor with EIST support • BIOS file with EIST support • Operating system with EIST support (Windows® XP SP2/Linux 2.6 kernel or
later versions)
A.1.2 Using the EIST
To use the EIST feature:
1. Turn on the computer, then enter the BIOS Setup. 2. Go to the Advanced Menu, highlight CPU Configuration,
then press . 3. Set the Intel(R) SpeedStep Technology...