Asus P5V-VM DH driver and firmware

Related Asus P5V-VM DH Manual Pages
Download the free PDF manual for Asus P5V-VM DH and other Asus manuals at ManualOwl.com
P5VD2-MX/P5V-VM DH English Edition User''s Manual - Page 4
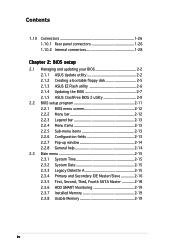
... your BIOS 2-2 2.1.1 ASUS Update utility 2-2 2.1.2 Creating a bootable floppy disk 2-5 2.1.3 ASUS EZ Flash utility 2-6 2.1.4 Updating the BIOS 2-7 2.1.5 ASUS CrashFree BIOS 2 utility 2-9
2.2 BIOS setup program 2-11 2.2.1 BIOS menu screen 2-12 2.2.2 Menu bar 2-12 2.2.3 Legend bar 2-13 2.2.4 Menu items 2-13 2.2.5 Sub-menu items 2-13 2.2.6 Configuration fields 2-13 2.2.7 Pop-up window...
P5VD2-MX/P5V-VM DH English Edition User''s Manual - Page 5
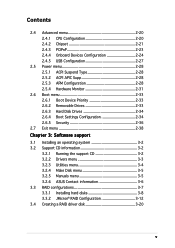
... Hard Disk Drives 2-34 2.6.4 Boot Settings Configuration 2-34 2.6.5 Security 2-36
2.7 Exit menu 2-38
Chapter 3: Software support
3.1 Installing an operating system 3-2 3.2 Support CD information 3-2
3.2.1 Running the support CD 3-2 3.2.2 Drivers menu 3-3 3.2.3 Utilities menu 3-4 3.2.4 Make Disk menu 3-5 3.2.5 Manuals menu 3-5 3.2.6 ASUS Contact information 3-6 3.3 RAID configurations...
P5VD2-MX/P5V-VM DH English Edition User''s Manual - Page 8
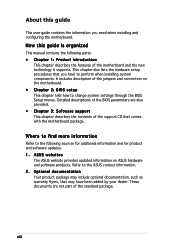
... to change system settings through the BIOS Setup menus. Detailed descriptions of the BIOS parameters are also provided. • Chapter 3: Software support This chapter describes the contents of the support CD that comes with the motherboard package.
Where to find more information
Refer to the following sources for additional information and for product and software updates. 1. ASUS websites
The...
P5VD2-MX/P5V-VM DH English Edition User''s Manual - Page 11
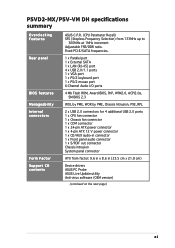
...-MX/P5V-VM DH specifications summary
Overclocking Features
Rear panel
BIOS features Manageability Internal connectors
Form Factor Support CD contents
ASUS C.P.R. (CPU Parameter Recall) SFS (Stepless Frequency Selection) from 133MHz up to
300MHz at 1MHz increment Adjustable FSB/DDR ratio. Fixed PCI-E/SATA frequencies.
1 x Parallel port 1 x External SATA 1 x LAN (RJ-45) port 4 x USB 2.0/1.1 ports...
P5VD2-MX/P5V-VM DH English Edition User''s Manual - Page 23
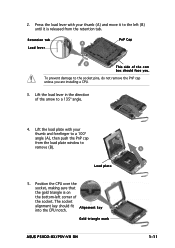
... to a 100º angle (A), then push the PnP cap
B
from the load plate window to
remove (B).
Load plate
5. Position the CPU over the socket, making sure that the gold triangle is on the bottom-left corner of the socket. The socket alignment key should fit A l i g n m e n t k e y into the CPU notch.
Gold triangle mark
ASUS P5VD2-MX/P5V-VM DH
A 1-11
P5VD2-MX/P5V-VM DH English Edition User''s Manual - Page 24

...174; Pentium® 4 CPU in the 775-land package that supports Hyper-Threading Technology.
2. Power up the system and enter the BIOS Setup (see Chapter 2: BIOS setup). Under the Advanced Menu, make sure that the item Hyper-Threading Technology is set to Enabled. The item appears only if you installed a CPU that supports Hyper-Threading Technology.
3. Reboot the computer.
1-12
Chapter 1: Product...
P5VD2-MX/P5V-VM DH English Edition User''s Manual - Page 32
...system cover.
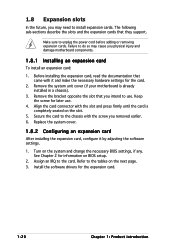
1.8.2 Configuring an expansion card
After installing the expansion card, configure it by adjusting the software settings.
1. Turn on the system and change the necessary BIOS settings, if any. See Chapter 2 for information on BIOS setup.
2. Assign an IRQ to the card. Refer to the tables on the next page. 3. Install the software drivers for the expansion card.
1-20
Chapter 1: Product...
P5VD2-MX/P5V-VM DH English Edition User''s Manual - Page 42
... t i o n" in the BIOS for details on SATA RAID configuration.
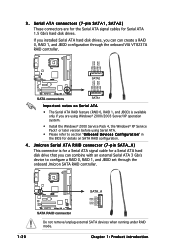
4 . Jmicron Serial ATA RAID connector (7-pin SATA_A)
This connector is for a Serial ATA signal cable for a Serial ATA hard disk drive that you can combine with an external Serial ATA 3 Gb/s device to configure a RAID 0, RAID 1, and JBOD set through the onboard Jmicron SATA RAID controller.
1-30
SATA_A
®
GND RSATA_TXP2 RSATA_TXN2...
P5VD2-MX/P5V-VM DH English Edition User''s Manual - Page 50
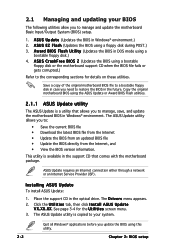
... BIOS file • Update the BIOS directly from the Internet, and • View the BIOS version information.
This utility is available in the support CD that comes with the motherboard package.
ASUS Update requires an Internet connection either through a network or an Internet Service Provider (ISP).
Installing ASUS Update
To install ASUS Update:
1. Place the support CD in the optical drive...
P5VD2-MX/P5V-VM DH English Edition User''s Manual - Page 51
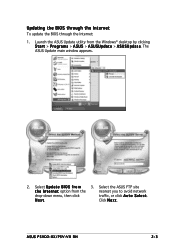
...174; desktop by clicking S t a r t > P r o g r a m s > A S U S > A S U S U p d a t e > A S U S U p d a t e. The ASUS Update main window appears.
2. Select U p d a t e B I O S f r o m
3. Select the ASUS FTP site
t h e I n t e r n e t option from the
nearest you to avoid network
drop-down menu, then click
traffic, or click A u t o S e l e c t.
N e x t.
Click N e x t.
ASUS P5VD2-MX/P5V-VM DH...
P5VD2-MX/P5V-VM DH English Edition User''s Manual - Page 52
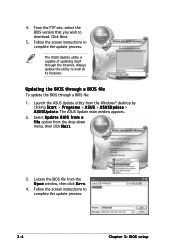
... the BIOS version that you wish to download. Click Next.
5. Follow the screen instructions to complete the update process.
The ASUS Update utility is capable of updating itself through the Internet. Always update the utility to avail all its features.
Updating the BIOS through a BIOS file
To update the BIOS through a BIOS file:
1. Launch the ASUS Update utility from the Windows® desktop by...
P5VD2-MX/P5V-VM DH English Edition User''s Manual - Page 54
...).
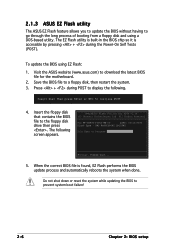
To update the BIOS using EZ Flash:
1. Visit the ASUS website (www.asus.com) to download the latest BIOS file for the motherboard.
2. Save the BIOS file to a floppy disk, then restart the system. 3. Press + during POST to display the following.
Insert Disk then press Enter or ESC to continue POST
4. Insert the floppy disk that contains the BIOS file to the floppy disk drive then...
P5VD2-MX/P5V-VM DH English Edition User''s Manual - Page 55
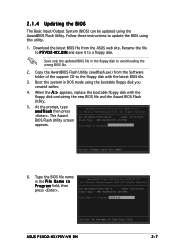
... these instructions to update the BIOS using this utility.
1. Download the latest BIOS file from the ASUS web site. Rename the file to P 5 V D 2 - M X . B I N and save it to a floppy disk.
Save only the updated BIOS file in the floppy disk to avoid loading the wrong BIOS file.
2. Copy the AwardBIOS Flash Utility (awdflash.exe) from the Software folder of the support CD to the floppy disk with...
P5VD2-MX/P5V-VM DH English Edition User''s Manual - Page 57
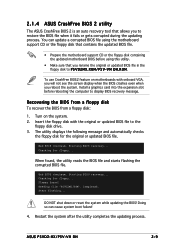
... VGA, you will not see the screen display when the BIOS crashes even when you reboot the system. Install a graphics card into the expansion slot before rebooting the computer to display BIOS recovery message.
Recovering the BIOS from a floppy disk
To recover the BIOS from a floppy disk:
1. Turn on the system. 2. Insert the floppy disk with the original or updated BIOS file to the
floppy disk drive...
P5VD2-MX/P5V-VM DH English Edition User''s Manual - Page 59
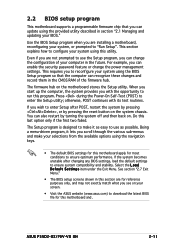
... can enable the security password feature or change the power management settings. This requires you to reconfigure your system using the BIOS Setup program so that the computer can recognize these changes and record them in the CMOS RAM of the firmware hub.
The firmware hub on the motherboard stores the Setup utility. When you start up the computer, the system provides you...
P5VD2-MX/P5V-VM DH English Edition User''s Manual - Page 90
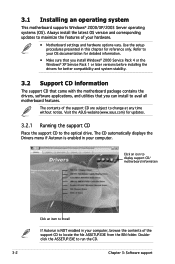
... the drivers, software applications, and utilities that you can install to avail all motherboard features.
The contents of the support CD are subject to change at any time without notice. Visit the ASUS website(www.asus.com) for updates.
3.2.1 Running the support CD
Place the support CD to the optical drive. The CD automatically displays the Drivers menu if Autorun is enabled in your computer...
P5VD2-MX/P5V-VM DH English Edition User''s Manual - Page 92
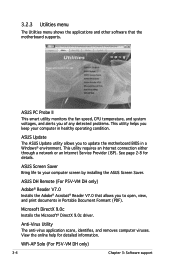
...Update
The ASUS Update utility allows you to update the motherboard BIOS in a Windows® environment. This utility requires an Internet connection either through a network or an Internet Service Provider (ISP). See page 2-8 for details.
ASUS Screen Saver Bring life to your computer screen by installing the ASUS Screen Saver.
ASUS DH Remote (For P5V-VM DH only)
Adobe® Reader V7.0 Installs...
P5VD2-MX/P5V-VM DH English Edition User''s Manual - Page 96
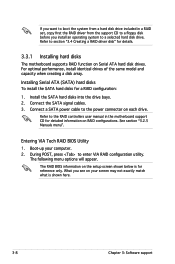
... for a RAID configuration:
1. Install the SATA hard disks into the drive bays. 2. Connect the SATA signal cables. 3. Connect a SATA power cable to the power connector on each drive.
Refer to the RAID controllers user manual in the motherboard support CD for detailed information on RAID configurations. See section "3.2.5 Manuals menu".
Entering VIA Tech RAID BIOS Utility 1. Boot-up your computer...
P5VD2-MX/P5V-VM DH English Edition User''s Manual - Page 100
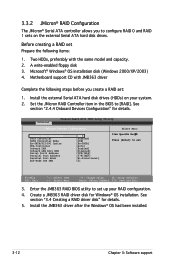
... Serial ATA hard disk drives (HDDs) on your system. 2. Set the JMicron RAID Controller item in the BIOS to [RAID]. See
section "2.4.4 Onboard Devices Configuration" for details.
Advanced
Phoenix-Award BIOS CMOS Setup Utility
Onboard Devices Configuration
Select Menu
JMicron RAID controller SATA Controller SATA Controller Mode Ex-SATA/PCI-E*1 Option HDA Controller Onboard LAN Onboard LAN...
P5VD2-MX/P5V-VM DH English Edition User''s Manual - Page 108
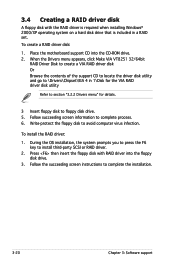
...-protect the floppy disk to avoid computer virus infection.
To install the RAID driver:
1. During the OS installation, the system prompts you to press the F6 key to install third-party SCSI or RAID driver.
2. Press then insert the floppy disk with RAID driver into the floppy disk drive.
3. Follow the succeeding screen instructions to complete the installation.
3-20
Chapter 3: Software support