Asus P5VD2 MX - SE Motherboard - Micro ATX driver and firmware
Drivers and firmware downloads for this Asus item

Related Asus P5VD2 MX Manual Pages
Download the free PDF manual for Asus P5VD2 MX and other Asus manuals at ManualOwl.com
P5VD2-MX/P5V-VM DH English Edition User's Manual - Page 4
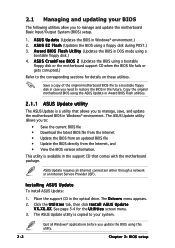
... your BIOS 2-2 2.1.1 ASUS Update utility 2-2 2.1.2 Creating a bootable floppy disk 2-5 2.1.3 ASUS EZ Flash utility 2-6 2.1.4 Updating the BIOS 2-7 2.1.5 ASUS CrashFree BIOS 2 utility 2-9
2.2 BIOS setup program 2-11 2.2.1 BIOS menu screen 2-12 2.2.2 Menu bar 2-12 2.2.3 Legend bar 2-13 2.2.4 Menu items 2-13 2.2.5 Sub-menu items 2-13 2.2.6 Configuration fields 2-13 2.2.7 Pop-up window...
P5VD2-MX/P5V-VM DH English Edition User's Manual - Page 5
... Hard Disk Drives 2-34 2.6.4 Boot Settings Configuration 2-34 2.6.5 Security 2-36
2.7 Exit menu 2-38
Chapter 3: Software support
3.1 Installing an operating system 3-2 3.2 Support CD information 3-2
3.2.1 Running the support CD 3-2 3.2.2 Drivers menu 3-3 3.2.3 Utilities menu 3-4 3.2.4 Make Disk menu 3-5 3.2.5 Manuals menu 3-5 3.2.6 ASUS Contact information 3-6 3.3 RAID configurations...
P5VD2-MX/P5V-VM DH English Edition User's Manual - Page 8
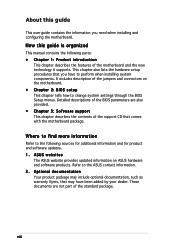
... to change system settings through the BIOS Setup menus. Detailed descriptions of the BIOS parameters are also provided. • Chapter 3: Software support This chapter describes the contents of the support CD that comes with the motherboard package.
Where to find more information
Refer to the following sources for additional information and for product and software updates. 1. ASUS websites
The...
P5VD2-MX/P5V-VM DH English Edition User's Manual - Page 11

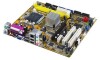
...LAN (RJ-45) port 4 x USB 2.0/1.1 ports 1 x VGA port 1 x PS/2 keyboard port 1 x PS/2 mouse port 6-Channel Audio I/O ports
4 Mb Flash ROM, Award BIOS, PnP, WfM2.0, ACPI2.0a, SM BIOS 2.3
WOL by PME, WOR by PME, Chassis Intrusion, PXE, RPL
2 x USB 2.0 connectors for 4 additional USB 2.0 ports 1 x CPU fan connector 1 x Chassis fan connector 1 x COM connector 1 x 24-pin ATX power connector 1 x 4-pin ATX...
P5VD2-MX/P5V-VM DH English Edition User's Manual - Page 32
...system cover.
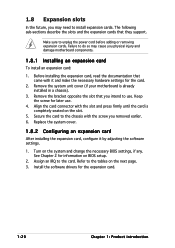
1.8.2 Configuring an expansion card
After installing the expansion card, configure it by adjusting the software settings.
1. Turn on the system and change the necessary BIOS settings, if any. See Chapter 2 for information on BIOS setup.
2. Assign an IRQ to the card. Refer to the tables on the next page. 3. Install the software drivers for the expansion card.
1-20
Chapter 1: Product...
P5VD2-MX/P5V-VM DH English Edition User's Manual - Page 50

...a network or an Internet Service Provider (ISP).
Installing ASUS Update
To install ASUS Update:
1. Place the support CD in the optical drive. The D r i v e r s menu appears. 2. Click the U t i l i t i e s tab, then click I n s t a l l A S U S U p d a t e
V X . X X . X X. See page 3-4 for the U t i l i t i e s screen menu. 3. The ASUS Update utility is copied to your system.
Quit all Windows®...
P5VD2-MX/P5V-VM DH English Edition User's Manual - Page 59

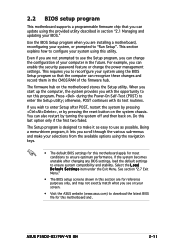
... can enable the security password feature or change the power management settings. This requires you to reconfigure your system using the BIOS Setup program so that the computer can recognize these changes and record them in the CMOS RAM of the firmware hub.
The firmware hub on the motherboard stores the Setup utility. When you start up the computer, the system provides you...
P5VD2-MX/P5V-VM DH English Edition User's Manual - Page 90

... time without notice. Visit the ASUS website(www.asus.com) for updates.
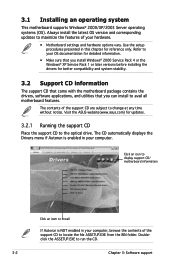
3.2.1 Running the support CD
Place the support CD to the optical drive. The CD automatically displays the Drivers menu if Autorun is enabled in your computer.
Click an icon to display support CD/ motherboard information
Click an item to install
If Autorun is NOT enabled in your computer, browse the contents of the...
P5VD2-MX/P5V-VM DH English Edition User's Manual - Page 92
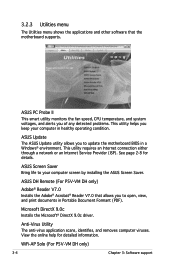
...Update
The ASUS Update utility allows you to update the motherboard BIOS in a Windows® environment. This utility requires an Internet connection either through a network or an Internet Service Provider (ISP). See page 2-8 for details.
ASUS Screen Saver Bring life to your computer screen by installing the ASUS Screen Saver.
ASUS DH Remote (For P5V-VM DH only)
Adobe® Reader V7.0 Installs...
P5VD2-MX/P5V-VM DH English Edition User's Manual - Page 96

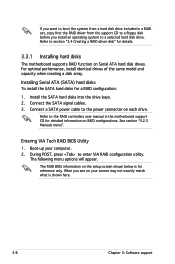
... for a RAID configuration:
1. Install the SATA hard disks into the drive bays. 2. Connect the SATA signal cables. 3. Connect a SATA power cable to the power connector on each drive.
Refer to the RAID controllers user manual in the motherboard support CD for detailed information on RAID configurations. See section "3.2.5 Manuals menu".
Entering VIA Tech RAID BIOS Utility 1. Boot-up your computer...
P5VD2-MX/P5V-VM DH English Edition User's Manual - Page 100

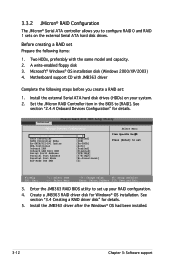
... create a RAID set:
1. Install the external Serial ATA hard disk drives (HDDs) on your system. 2. Set the JMicron RAID Controller item in the BIOS to [RAID]. See
section "2.4.4 Onboard Devices Configuration" for details.
Advanced
Phoenix-Award BIOS CMOS Setup Utility
Onboard Devices Configuration
Select Menu
JMicron RAID controller SATA Controller SATA Controller Mode Ex-SATA/PCI-E*1 Option...
P5VD2-MX/P5V-VM DH English Edition User's Manual - Page 108
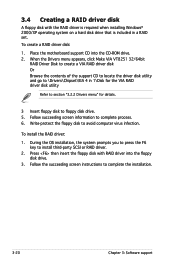
3.4 Creating a RAID driver disk
A floppy disk with the RAID driver is required when installing Windows® 2000/XP operating system on a hard disk drive that is included in a RAID set. To create a RAID driver disk:
1. Place the motherboard support CD into the CD-ROM drive. 2. When the Drivers menu appears, click Make VIA VT8251 32/64bit
RAID Driver Disk to create a VIA RAID driver disk Or Browse...
P5VD2-MX User's Manual for English Edition - Page 11

...LAN (RJ-45) port 4 x USB 2.0/1.1 ports 1 x VGA port 1 x PS/2 keyboard port 1 x PS/2 mouse port 6-Channel Audio I/O ports
4 Mb Flash ROM, Award BIOS, PnP, WfM2.0, ACPI2.0a, SM BIOS 2.3
WOL by PME, WOR by PME, Chassis Intrusion, PXE, RPL
2 x USB 2.0 connectors for 4 additional USB 2.0 ports 1 x CPU fan connector 1 x Chassis fan connector 1 x COM connector 1 x 24-pin ATX power connector 1 x 4-pin ATX...
P5VD2-MX User's Manual for English Edition - Page 50
...a network or an Internet Service Provider (ISP).
Installing ASUS Update
To install ASUS Update:
1. Place the support CD in the optical drive. The D r i v e r s menu appears. 2. Click the U t i l i t i e s tab, then click I n s t a l l A S U S U p d a t e
V X . X X . X X. See page 3-4 for the U t i l i t i e s screen menu. 3. The ASUS Update utility is copied to your system.
Quit all Windows®...
P5VD2-MX User's Manual for English Edition - Page 59
... can enable the security password feature or change the power management settings. This requires you to reconfigure your system using the BIOS Setup program so that the computer can recognize these changes and record them in the CMOS RAM of the firmware hub.
The firmware hub on the motherboard stores the Setup utility. When you start up the computer, the system provides you...
P5VD2-MX User's Manual for English Edition - Page 90
... time without notice. Visit the ASUS website(www.asus.com) for updates.
3.2.1 Running the support CD
Place the support CD to the optical drive. The CD automatically displays the Drivers menu if Autorun is enabled in your computer.
Click an icon to display support CD/ motherboard information
Click an item to install
If Autorun is NOT enabled in your computer, browse the contents of the...
P5VD2-MX User's Manual for English Edition - Page 92

...Update
The ASUS Update utility allows you to update the motherboard BIOS in a Windows® environment. This utility requires an Internet connection either through a network or an Internet Service Provider (ISP). See page 2-8 for details.
ASUS Screen Saver Bring life to your computer screen by installing the ASUS Screen Saver.
ASUS DH Remote (For P5V-VM DH only)
Adobe® Reader V7.0 Installs...
P5VD2-MX User's Manual for English Edition - Page 96
... for a RAID configuration:
1. Install the SATA hard disks into the drive bays. 2. Connect the SATA signal cables. 3. Connect a SATA power cable to the power connector on each drive.
Refer to the RAID controllers user manual in the motherboard support CD for detailed information on RAID configurations. See section "3.2.5 Manuals menu".
Entering VIA Tech RAID BIOS Utility 1. Boot-up your computer...
P5VD2-MX User's Manual for English Edition - Page 100
... create a RAID set:
1. Install the external Serial ATA hard disk drives (HDDs) on your system. 2. Set the JMicron RAID Controller item in the BIOS to [RAID]. See
section "2.4.4 Onboard Devices Configuration" for details.
Advanced
Phoenix-Award BIOS CMOS Setup Utility
Onboard Devices Configuration
Select Menu
JMicron RAID controller SATA Controller SATA Controller Mode Ex-SATA/PCI-E*1 Option...
P5VD2-MX User's Manual for English Edition - Page 108

3.4 Creating a RAID driver disk
A floppy disk with the RAID driver is required when installing Windows® 2000/XP operating system on a hard disk drive that is included in a RAID set. To create a RAID driver disk:
1. Place the motherboard support CD into the CD-ROM drive. 2. When the Drivers menu appears, click Make VIA VT8251 32/64bit
RAID Driver Disk to create a VIA RAID driver disk Or Browse...