Asus P7P55D-E DELUXE driver and firmware

Related Asus P7P55D-E DELUXE Manual Pages
Download the free PDF manual for Asus P7P55D-E DELUXE and other Asus manuals at ManualOwl.com
User Manual - Page 6
... Serial ATA hard disks 4-12
4.4.3 Setting the RAID item in BIOS 4-12
4.4.4 Intel® Matrix Storage Manager option ROM utility 4-12
4.5 Creating a RAID driver disk 4-16
4.5.1 Creating a RAID driver disk without entering the OS 4-16
4.5.2 Creating a RAID driver disk in Windows 4-16
4.5.3 Installing the RAID driver during Windows® OS installation....... 4-17
4.5.4 Using a USB...
User Manual - Page 10

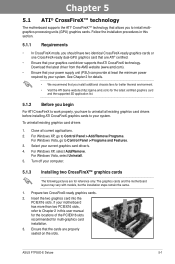
... motherboard package and the software. • Chapter 5: Multiple GPU technology support This chapter describes how to install and configure multiple ATI® CrossFireX™ and NVIDIA® SLI™ graphics cards.
Where to find more information
Refer to the following sources for additional information and for product and software updates. 1. ASUS websites
The ASUS website provides updated...
User Manual - Page 14
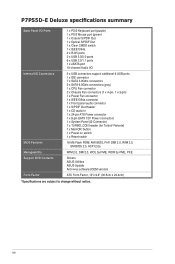
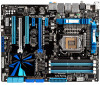
... System Panel (Q-Connector) 1 x TURBO_CON header (for TurboV Remote) 1 x MemOK! button 1 x Power on switch 1 x Reset switch
BIOS Features
16 Mb Flash ROM, AMI BIOS, PnP, DMI 2.0, WfM 2.0, SM BIOS 2.5, ACPI 2.0a
Manageability
WfM 2.0, DMI 2.0, WOL by PME, WOR by PME, PXE
Support DVD Contents
Drivers ASUS Utilities ASUS Update Anti-virus software (OEM version)
Form Factor
ATX Form Factor, 12...
User Manual - Page 41
... next page. 3. Install the software drivers for the expansion card.
When using PCI cards on shared slots, ensure that the drivers support "Share IRQ" or that the cards do not need IRQ assignments. Otherwise, conflicts will arise between the two PCI groups, making the system unstable and the card inoperable. Refer to the table on the next page for details.
ASUS P7P55D-E Deluxe
2-21
User Manual - Page 46
... computer and unplug the power cord for about 5-10 seconds.
• If your system fail to boot due to BIOS overclocking, press the MemOK! switch to boot and load BIOS default settings. A messgae will appear during POST reminding you that the BIOS has been restored to its default settings.
• We recommend that you download and update to the latest BIOS version...
User Manual - Page 55
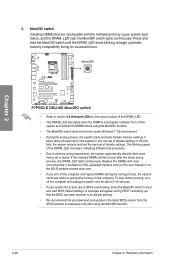
...ATA hard disk drive or optical disc drive via a Serial ATA signal cable.
Chapter 2
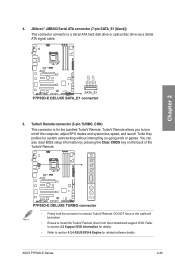
5. TurboV Remote connector (5-pin TURBO_CON)
This connector is for the bundled TurboV Remote. TurboV Remote allows you to turn on/off the computer, adjust EPU modes and system bus speed, and launch Turbo Key profiles for system overclocking without interrupting on-going work or games. You can also clear BIOS setup...
User Manual - Page 65

... Updater: Updates and backups the BIOS in DOS environment using the
motherboard support DVD and a USB flash disk drive. Refer to the corresponding sections for details on these utilities.
Save a copy of the original motherboard BIOS file to a USB flash drive in case you need to restore the BIOS in the future. Copy the original motherboard BIOS using the ASUS Update utility.
ASUS P7P55D-E Deluxe...
User Manual - Page 66
... the motherboard package.
ASUS Update requires an Internet connection either through a network or an Internet Service Provider (ISP).
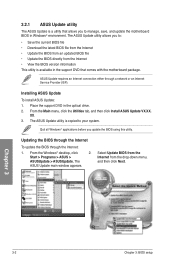
Installing ASUS Update
To install ASUS Update: 1. Place the support DVD in the optical drive. 2. From the Main menu, click the Utilities tab, and then click Install ASUS Update VX.XX.
XX. 3. The ASUS Update utility is copied to your system.
Quit all Windows®...
User Manual - Page 67
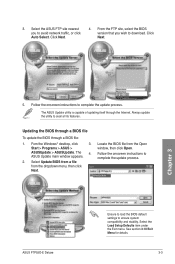
...from a file from the dropdown menu, then click Next.
3. Locate the BIOS file from the Open window, then click Open.
4. Follow the onscreen instructions to complete the update process.
P7P55EDX.ROM
ASUS P7P55D-E Deluxe
P7P55EDX
Ensure to load the BIOS default settings to ensure system compatibility and stability. Select the Load Setup Defaults item under the Exit menu. See section 3.10 Exit Menu...
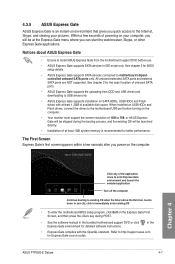
User Manual - Page 103
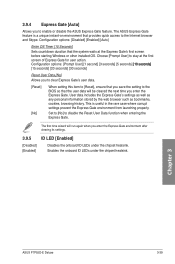
... Gate feature. The ASUS Express Gate feature is a unique instant-on environment that provides quick access to the Internet browser and Skype. Configuration options: [Disabled] [Enabled] [Auto]
Enter OS Timer [10 Seconds] Sets countdown duration that the system waits at the Express Gate's first screen before starting Windows or other installed OS. Choose [Prompt User...
User Manual - Page 105
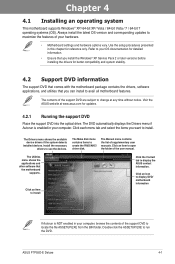
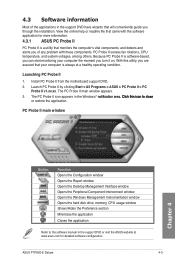
... drivers, software applications, and utilities that you can install to avail all motherboard features.
The contents of the support DVD are subject to change at any time without notice. Visit the ASUS website at www.asus.com for updates.
4.2.1 Running the support DVD
Place the support DVD into the optical drive. The DVD automatically displays the Drivers menu if Autorun is enabled in your computer...
User Manual - Page 107
... window Opens the Peripheral Component Interconnect window Opens the Windows Management Instrumentation window Opens the hard disk drive, memory, CPU usage window Shows/Hides the Preference section Minimizes the application
Closes the application
Refer to the software manual in the support DVD or visit the ASUS website at www.asus.com for detailed software configuration.
ASUS P7P55D-E Deluxe...
User Manual - Page 108
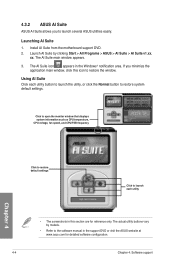
... monitor window that displays system information such as CPU temperature, CPU voltage, fan speed, and CPU/FSB frequency
Chapter 4
Click to restore default settings
Click to launch each utility
• The screenshots in this section are for reference only. The actual utility buttons vary by models.
• Refer to the software manual in the support DVD or visit the ASUS...
User Manual - Page 111
...uploading from ODD and USB drives and downloading to USB drives only.
• ASUS Express Gate supports installation on SATA HDDs, USB HDDs and Flash drives with at least 1.2GB of available disk space. When installed on USB HDDs and Flash drives, connect the drives to the motherboard USB port before turning on the computer.
• Your monitor must support the screen resolution of 1024 x 768, or...
User Manual - Page 112
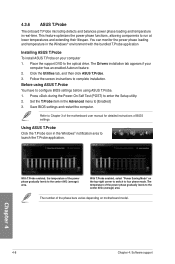
... the support DVD to the optical drive. The Drivers installation tab appears if your
computer has an enabled Autorun feature. 2. Click the Utilities tab, and then click ASUS T.Probe. 3. Follow the screen instructions to complete installation. Before using ASUS T.Probe You have to configure BIOS settings before using ASUS T.Probe. 1. Press during the Power-On Self Test (POST) to enter the Setup...
User Manual - Page 113
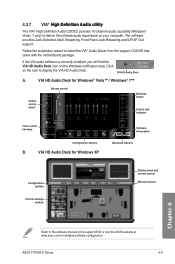
... indicator
Fold / unfold interface
Configuration options
B.
VIA HD Audio Deck for Windows XP
Software information
Advanced Options
Configuration options
Control settings window
Display panel and volume control
Minimize button
Chapter 4
Refer to the software manual in the support DVD or visit the ASUS website at www.asus.com for detailed software configuration.
ASUS P7P55D-E Deluxe
4-9
User Manual - Page 115
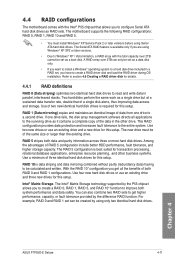
... the Intel® P55 chipset that allows you to configure Serial ATA hard disk drives as RAID sets. The motherboard supports the following RAID configurations: RAID 0, RAID 1, RAID 10 and RAID 5.
• You must install Windows® XP Service Pack 2 or later versions before using Serial ATA hard disk drives. The Serial ATA RAID feature is available only if you are using Windows® XP SP2 or...
User Manual - Page 120
...the OS 1. Boot your computer. 2. Press during POST to enter the BIOS setup utility. 3. Set the optical drive as the primary boot device. 4. Insert the support DVD into the optical drive. 5. Save changes and exit BIOS. 6. When the Make Disk menu appears, press to create a 32/64bit Intel AHCI/RAID
driver disk. 7. Insert a formatted floppy disk into the USB floppy disk drive, then press . 8. Follow...
User Manual - Page 125
... remain the same.
1. Prepare two CrossFireX-ready graphics cards.
2. Insert the two graphics card into the PCIEX16 slots. If your motherboard has more than two PCIEX16 slots, refer to Chapter 2 in this user manual for the locations of the PCIEX16 slots recommended for multi-graphics card installation.
3. Ensure that the cards are properly seated on the slots.
ASUS P7P55D-E Deluxe
5-1
User Manual - Page 129
... the power supply to the two graphics cards separately.
6. Connect a VGA or a DVI cable to the graphics card.
SLI bridge
Goldfingers
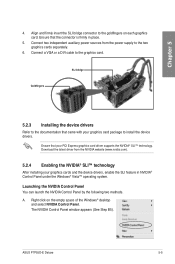
5.2.3 Installing the device drivers
Refer to the documentation that came with your graphics card package to install the device drivers.
Ensure that your PCI Express graphics card driver supports the NVIDIA® SLI™ technology. Download the latest driver from...