Asus P8H61-I LX RM driver and firmware

Related Asus P8H61-I LX RM Manual Pages
Download the free PDF manual for Asus P8H61-I LX RM and other Asus manuals at ManualOwl.com
User Guide - Page 2

.... Copies of these licenses are included in this product. Where the applicable license entitles you to the source code of such software and/or other additional data, you may obtain it for a period of three years after our last shipment of the product, either (1) for free by downloading it from http://support.asus.com/download or...
User Guide - Page 3
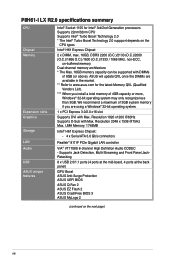
... About this guide vi P8H61-I LX R2.0 specifications summary viii
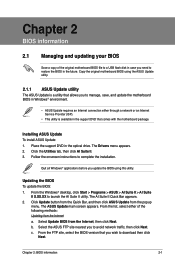
Chapter 1 Product introduction
1.1 Before you proceed 1-1 1.2 Motherboard overview 1-2
1.2.1 Placement direction 1-2 1.2.2 Screw holes 1-2 1.2.3 Motherboard layout 1-3 1.2.4 Layout contents 1-3 1.3 Central Processing Unit (CPU 1-4 1.3.1 Installing the CPU 1-5 1.3.2 Installing the CPU heatsink and fan 1-7 1.4 System memory...
User Guide - Page 6
... to fix it by yourself. Contact a qualified service technician or your retailer.
Operation safety
• Before installing the motherboard and adding devices on it, carefully read all the manuals that came with the package.
• Before using the product, ensure that all cables are correctly connected and the power cables are not damaged. If you detect any damage...
User Guide - Page 7
...complete a task.
IMPORTANT: Instructions that you MUST follow to complete a task.
NOTE: Tips and additional information to help you complete a task.
Where to find more information
Refer to the following sources for additional information and for product and software updates.
1. ASUS websites
The ASUS website provides updated information on ASUS hardware and software products. Refer to...
User Guide - Page 8
... UMA Memory: 1748MB
Intel® H61 Express Chipset:
- 4 x Serial ATA 3.0 Gb/s connectors
Realtek® 8111F PCIe Gigabit LAN controller
VIA® VT1708S 8-channel High Definition Audio CODEC - Supports Jack-Detection, Multi-Streaming and Front Panel JackRetasking
8 x USB 2.0/1.1 ports (4 ports at the mid-board, 4 ports at the back panel)
GPU Boost ASUS Anti-Surge Protection ASUS UEFI BIOS
ASUS...
User Guide - Page 9
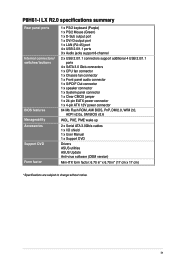
...x System panel connector 1 x Clear CMOS jumper 1 x 24-pin EATX power connector 1 x 4-pin ATX 12V power connector
64 Mb Flash ROM, AMI BIOS, PnP, DMI2.0, WfM 2.0, ACPI v2.0a, SM BIOS v2.6
WOL, PXE, PME wake up
2 x Serial ATA 3.0Gb/s cables 1 x I/O shield 1 x User Manual 1 x Support DVD
Drivers ASUS utilities ASUS Update Anti-virus software (OEM version)
Mini-ITX form factor: 6.70 in" x 6.70 in" (17...
User Guide - Page 11
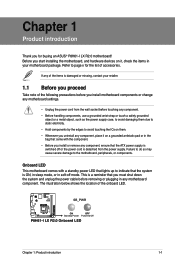
...you for buying an ASUS® P8H61-I LX R2.0 motherboard! Before you start installing the motherboard, and hardware devices on it, check the items in your motherboard package. Refer to page...the power cable before removing or plugging in any motherboard component. The illustration below shows the location of the onboard LED.
SB_PWR
P8H61-I LX R2.0
ON
OFF
Standby Power Powered Off
P8H61-I LX R2...
User Guide - Page 12
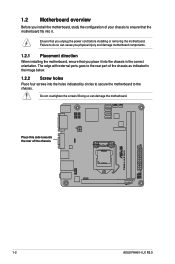
... rear part of the chassis as indicated in the image below.
1.2.2 Screw holes
Place four screws into the holes indicated by circles to secure the motherboard to the chassis.
Do not overtighten the screws! Doing so can damage the motherboard.
Place this side towards the rear of the chassis
P8H61-I LX R2.0
1-2
ASUS P8H61-I LX R2.0
User Guide - Page 20
... Tweaker menu for manual memory frequency adjustment.
• The Max. 16GB memory capacity can be supported with DIMMs of 8GB (or above). ASUS will update the QVL once the DIMMs are available in the market.
• For system stability, use a more efficient memory cooling system to support a full memory load (2 DIMMs) or overclocking condition.
P8H61-I LX R2.0 Motherboard Qualified Vendors Lists...
User Guide - Page 25
... card
After installing the expansion card, configure it by adjusting the software settings. 1. Turn on the system and change the necessary BIOS settings, if any. See Chapter 2 for
information on BIOS setup. 2. Assign an IRQ to the card. 3. Install the software drivers for the expansion card.
When using PCI cards on shared slots, ensure that the drivers support "Share IRQ" or that the cards...
User Guide - Page 31
...optical drives via Serial ATA 3.0 Gb/s signal cables.
SATA3G_1 SATA3G_2
SATA3G_3
SATA3G_4
P8H61-I LX R2.0 SATA 3.0Gb/s connectors • You must install Windows® XP Service Pack 3 or later version before using Serial ATA hard disk drives. • When using hot-plug and NCQ, set the SATA Mode item in the BIOS to [AHCI Mode]. See section 2.5.3 SATA Configuration for details.
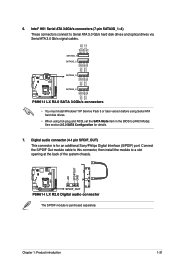
7. Digital audio...
User Guide - Page 33
... can install to avail all motherboard features.
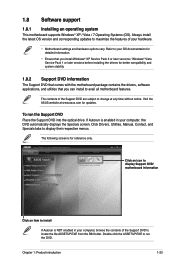
The contents of the Support DVD are subject to change at any time without notice. Visit the ASUS website at www.asus.com for updates.
To run the Support DVD Place the Support DVD into the optical drive. If Autorun is enabled in your computer, the DVD automatically displays the Specials screen. Click Drivers, Utilities, Manual, Contact...
User Guide - Page 35
... a network or an Internet Service Provider (ISP).
• This utility is available in the support DVD that comes with the motherboard package.
Installing ASUS Update To install ASUS Update: 1. Place the support DVD in the optical drive. The Drivers menu appears. 2. Click the Utilities tab, then click AI Suite II. 3. Follow the onscreen instructions to complete the installation.
Quit all Windows...
User Guide - Page 36
... the ASUS website at www.asus.com.
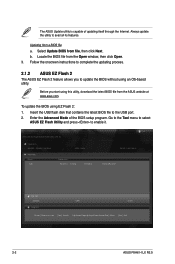
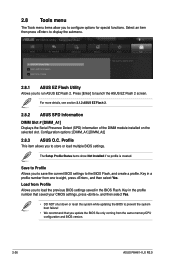
To update the BIOS using EZ Flash 2:
1. Insert the USB flash disk that contains the latest BIOS file to the USB port. 2. Enter the Advanced Mode of the BIOS setup program. Go to the Tool menu to select
ASUS EZ Flash Utility and press to enable it.
ASUSTek EZ Flash BIOS ROM Utility V01.04
Flash Info MODEL: P8H61-I LX R2.0
File Path: Drive
fs0...
User Guide - Page 37
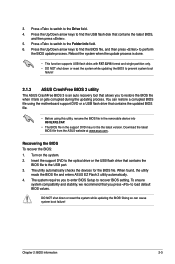
... the BIOS To recover the BIOS: 1. Turn on the system. 2. Insert the support DVD to the optical drive or the USB flash drive that contains the
BIOS file to the USB port. 3. The utility automatically checks the devices for the BIOS file. When found, the utility
reads the BIOS file and enters ASUS EZ Flash 2 utility automatically. 4. The system requires you to enter BIOS Setup to recover BIOS setting...
User Guide - Page 38
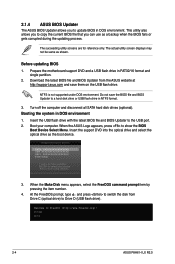
... disk drive or USB flash drive in NTFS format.
3. Turn off the computer and disconnect all SATA hard disk drives (optional). Booting the system in DOS environment 1. Insert the USB flash drive with the latest BIOS file and BIOS Updater to the USB port. 2. Boot your computer. When the ASUS Logo appears, press to show the BIOS
Boot Device Select Menu. Insert the support DVD into the optical drive...
User Guide - Page 40
... stability. Select the Load Optimized Defaults item under the Exit menu. See section 2.9 Exit Menu for details.
• If the system fails to boot after changing any BIOS setting, try to clear the CMOS and reset the motherboard to the default value. See section 1.9 Jumpers for information on how to erase the RTC RAM.
2-6
ASUS P8H61-I LX R2.0
User Guide - Page 52
... Setup, the BIOS automatically detects the presence of SATA devices. The SATA Port items show Not Present if no SATA device is installed to the corresponding SATA port.
SATA Mode Selection [IDE]
Allows you to set the SATA configuration.
[Disabled] Disables the SATA function.
[IDE] Set to [IDE Mode] when you want to use the Serial ATA hard disk drives as Parallel ATA physical storage devices...
User Guide - Page 59
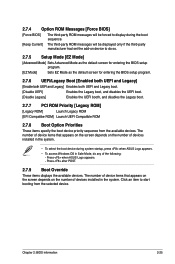
... ROM Messages [Force BIOS]
[Force BIOS]
The third-party ROM messages will be forced to display during the boot sequence.
[Keep Current] The third-party ROM messages will be displayed only if the third-party manufacturer had set the add-on device to do so.
2.7.5 Setup Mode [EZ Mode]
[Advanced Mode] Sets Advanced Mode as the default screen for entering the BIOS setup...
User Guide - Page 60
... previous BIOS settings saved in the BIOS Flash. Key in the profile number that saved your CMOS settings, press , and then select Yes.
• DO NOT shut down or reset the system while updating the BIOS to prevent the system boot failure!
• We recommend that you update the BIOS file only coming from the same memory/CPU configuration and BIOS version.
2-26
ASUS P8H61-I LX...