Asus P8Q77-M2 driver and firmware

Related Asus P8Q77-M2 Manual Pages
Download the free PDF manual for Asus P8Q77-M2 and other Asus manuals at ManualOwl.com
P8Q77-M2 User's Manual - Page 2
.... Copies of these licenses are included in this product. Where the applicable license entitles you to the source code of such software and/or other additional data, you may obtain it for a period of three years after our last shipment of the product, either (1) for free by downloading it from http://support.asus.com/download or...
P8Q77-M2 User's Manual - Page 3
... information...vi About this guide...vii P8Q77-M2 specifications summary ix Package contents...xi
Chapter 1:
Product introduction
1.1 Special features 1-1
1.1.1 Product highlights 1-1
1.1.2 Innovative ASUS features 1-2
1.2 Before you proceed 1-3
1.3 Motherboard overview 1-4
1.3.1 Placement direction 1-4
1.3.2 Screw holes 1-4
1.3.3 Motherboard layout 1-5
1.3.4 Layout contents...
P8Q77-M2 User's Manual - Page 7
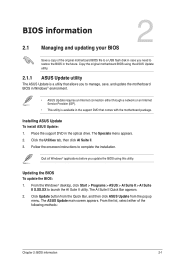
... it supports. • Chapter 2: BIOS information This chapter tells how to change system settings through the BIOS Setup menus. Detailed descriptions of the BIOS parameters are also provided.
Where to find more information
Refer to the following sources for additional information and for product and software updates. 1. ASUS websites
The ASUS website provides updated information on ASUS hardware...
P8Q77-M2 User's Manual - Page 9
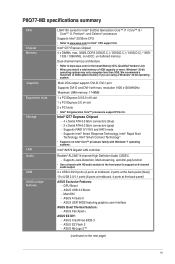
P8Q77-M2 specifications summary
CPU Chipset Memory
Graphics Expansion slots Storage
LAN Audio USB ASUS unique features
LGA1155 socket for Intel® 3rd/2nd Generation Core™ i7 / Core™ i5 / Core™ i3, Pentium®, and Celeron® processors
Supports Intel® 22/32nm CPU • Refer to www.asus.com for Intel® CPU support list. Intel® Q77 Express Chipset 4 x ...
P8Q77-M2 User's Manual - Page 10
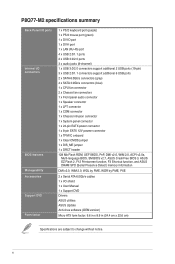
... v2.0a,
Multi-language BIOS, SM BIOS v2.7, ASUS CrashFree BIOS 3, ASUS EZ Flash 2, F12 Printscreen function, F3 Shortcut function, and ASUS DRAM SPD (Serial Presence Detect) memory information
DMI v2.0, WfM 2.0, WOL by PME, WOR by PME, PXE
2 x Serial ATA 6.0Gb/s cables 1 x I/O shield 1 x User Manual 1 x Support DVD Drivers ASUS utilities ASUS Update Anti-virus software (OEM version)
Micro ATX form...
P8Q77-M2 User's Manual - Page 14
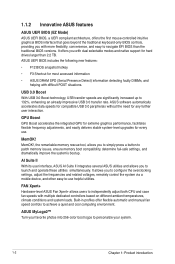
...-only BIOS controls, providing you with more flexibility, convenience, and easy to navigate EFI BIOS than the traditional BIOS versions. It offers you with dual selectable modes and native support for hard drives larger than 2.2 TB. ASUS UEFI BIOS includes the following new features:
• F12 BIOS snapshot hotkey
• F3 Shortcut for most accessed information
• ASUS DRAM SPD (Serial...
P8Q77-M2 User's Manual - Page 15
... it on a grounded antistatic pad or in the bag that came with the component.
• Before you install or remove any component, ensure that the ATX power supply is switched off or the power cord is detached from the power supply. Failure to do so may cause severe damage to the motherboard, peripherals, or components.
ASUS P8Q77-M2
1-3
P8Q77-M2 User's Manual - Page 25
... its corresponding timing or the loaded XMP Profile is not the JEDEC memory standard. The stability and compatibility of these memory modules depend on the CPU's capabilities and other installed devices.
• Due to the memory address limitation on 32-bit Windows® OS, when you install 4GB or more memory on the motherboard, the actual usable memory for the OS can be...
P8Q77-M2 User's Manual - Page 29
... the two PCI groups, making the system unstable and the card inoperable.
1.6.3 PCI slots
The PCI slot supports cards such as a LAN card, SCSI card, USB card, and other cards that comply with PCI specifications.
1.6.4 PCI Express x4 slot
This motherboard supports PCI Express 2.0 x4 network cards, SCSI cards, and other cards that comply with the PCI Express specifications.
ASUS P8Q77-M2
1-17
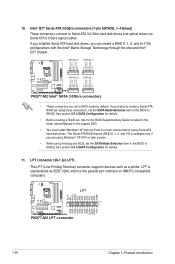
P8Q77-M2 User's Manual - Page 33
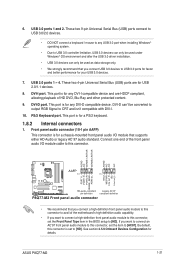
...1 and 2. These two 9-pin Universal Serial Bus (USB) ports connect to USB 3.0/2.0 devices.
• DO NOT connect a keyboard / mouse to any USB 3.0 port when installing Windows® operating system.
• Due to USB 3.0 controller limitation, USB 3.0 devices can only be used under Windows® OS environment and after the USB 3.0 driver installation.
• USB 3.0 devices can only be used as...
P8Q77-M2 User's Manual - Page 37
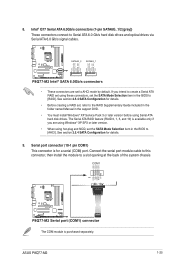
... ATA RAID set using these connectors, set the SATA Mode Selection item in the BIOS to [RAID]. See section 2.5.4 SATA Configuration for details.
• Before creating a RAID set, refer to the RAID Supplementary Guide included in the folder named Manual in the support DVD.
• You must install Windows® XP Service Pack 3 or later version before using Serial ATA hard disk drives. The Serial...
P8Q77-M2 User's Manual - Page 38
... ATA RAID set using these connectors, set the SATA Mode Selection item in the BIOS to [RAID]. See section 2.5.4 SATA Configuration for details.
• Before creating a RAID set, refer to the RAID Supplementary Guide included in the folder named Manual in the support DVD.
• You must install Windows® XP Service Pack 3 or later version before using Serial ATA hard disk drives. The Serial...
P8Q77-M2 User's Manual - Page 39
...-M2
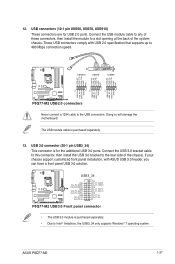
P8Q77-M2 USB2.0 connectors
Never connect a 1394 cable to the USB connectors. Doing so will damage the motherboard!
The USB module cable is purchased separately.
13. USB 3.0 connector (20-1 pin USB3_34) This connector is for the additional USB 3.0 ports. Connect the USB 3.0 bracket cable to this connector, then install the USB 3.0 bracket to the rear side of the chassis. If your chassis support...
P8Q77-M2 User's Manual - Page 40

... the power cord for about 5-10 seconds. • If your system fail to boot due to BIOS overclocking, press the MemOK! switch to boot and load BIOS default settings. A message will appear during POST reminding you that the BIOS has been restored to its default settings. • We recommend that you download and update to the latest BIOS version from the ASUS...
P8Q77-M2 User's Manual - Page 42
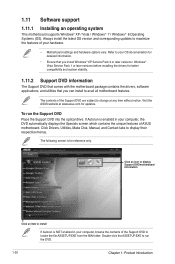
... the drivers, software applications, and utilities that you can install to avail all motherboard features.
The contents of the Support DVD are subject to change at any time without notice. Visit the ASUS website at www.asus.com for updates.
To run the Support DVD Place the Support DVD into the optical drive. If Autorun is enabled in your computer, the DVD automatically displays...
P8Q77-M2 User's Manual - Page 43
... Engine software kit must be installed (The Local Manageability Service and the Intel® Management Engine Interface must be installed and running.) • Local Administrator rights on the target machine
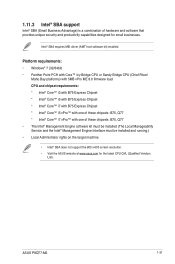
• Intel® SBA does not support the 800 x 600 screen resolution. • Visit the ASUS website at www.asus.com for the latest CPU QVL (Qualified Vendors
List).
ASUS P8Q77-M2...
P8Q77-M2 User's Manual - Page 45
... a network or an Internet Service Provider (ISP).
• This utility is available in the support DVD that comes with the motherboard package.
Installing ASUS Update To install ASUS Update: 1. Place the support DVD in the optical drive. The Specials menu appears. 2. Click the Utilities tab, then click AI Suite II. 3. Follow the onscreen instructions to complete the installation.
Quit all Windows...
P8Q77-M2 User's Manual - Page 46
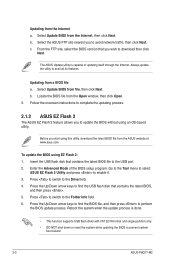
... utility, download the latest BIOS file from the ASUS website at www.asus.com.
To update the BIOS using EZ Flash 2: 1. Insert the USB flash disk that contains the latest BIOS file to the USB port. 2. Enter the Advanced Mode of the BIOS setup program. Go to the Tool menu to select
ASUS EZ Flash 2 Utility and press to enable it. 3. Press to switch to the Drive field...
P8Q77-M2 User's Manual - Page 47
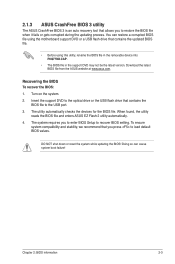
... the BIOS To recover the BIOS:
1. Turn on the system. 2. Insert the support DVD to the optical drive or the USB flash drive that contains the
BIOS file to the USB port. 3. The utility automatically checks the devices for the BIOS file. When found, the utility
reads the BIOS file and enters ASUS EZ Flash 2 utility automatically. 4. The system requires you to enter BIOS Setup to recover BIOS setting...
P8Q77-M2 User's Manual - Page 74
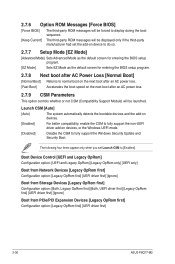
... support the Windows Security Update and Security Boot.
The following four items appear only when you set Launch CSM to [Enabled].
Boot Device Control [UEFI and Legacy OpRom] Configuration option: [UEFI and Legacy OpRom] [Legacy OpRom only] [UEFI only]
Boot from Network Devices [Legacy OpRom first] Configuration option: [Legacy OpRom first] [UEFI driver first] [Ignore]
Boot from Storage Devices...