Asus Vintage-PE2 driver and firmware


Related Asus Vintage-PE2 Manual Pages
Download the free PDF manual for Asus Vintage-PE2 and other Asus manuals at ManualOwl.com
Vintage-PE2 User''s Manual for English Edition - Page 4
...Creating a bootable floppy disk 5-2 5.1.2 ASUS EZ Flash utility 5-3 5.1.3 AFUDOS utility 5-4 5.1.4 ASUS CrashFree BIOS 2 utility 5-6 5.1.5 ASUS Update utility 5-8
5.2 BIOS setup program 5-11 5.2.1 BIOS menu screen 5-12 5.2.2 Menu bar 5-12 5.2.3 Navigation keys 5-12 5.2.4 Menu items 5-13 5.2.5 Sub-menu items 5-13 5.2.6 Configuration fields 5-13 5.2.7 Pop-up window 5-13 5.2.8 Scroll bar...
Vintage-PE2 User''s Manual for English Edition - Page 8
... of the ASUS Vintage-PE2. The chapter lists the system features including introduction on the front and rear panel, and internal components. 2. Chapter 2: Basic installation This chapter provides step-by-step instructions on how to install components in the system. 3. Chapter 3: Starting up This chapter helps you power up the system and install drivers and utilities from the support CD...
Vintage-PE2 User''s Manual for English Edition - Page 9
...T A N T : Instructions that you MUST follow to complete a task. N O T E : Tips and additional information to aid in completing a task.
Where to find more information
Refer to the following sources for additional information and for product and software updates. 1. ASUS Websites
The ASUS websites worldwide provide updated information on ASUS hardware and software products. Refer to the ASUS contact...
Vintage-PE2 User''s Manual for English Edition - Page 18
... unit (CPU) 2. DDR Dual Inline Memory Module (DIMM) 3. Expansion card(s) 4. Hard disk drive (s) 5. Optical drive(s) 6. Floppy disk drive
Tool
Phillips (cross) screw driver
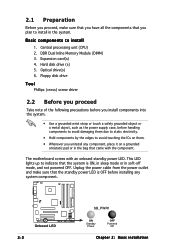
2.2 Before you proceed
Take note of the following precautions before you install components into the system.
• Use a grounded wrist strap or touch a safely grounded object or a metal object, such as the power supply case...
Vintage-PE2 User''s Manual for English Edition - Page 22
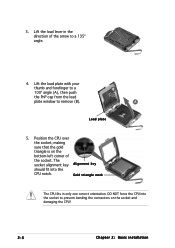
... load plate with your thumb and forefinger to a 100º angle (A), then push the PnP cap from the load plate window to remove (B).
B A
Load plate
5. Position the CPU ... the
CPU notch.
Gold triangle mark
The CPU fits in only one correct orientation. DO NOT force the CPU into the socket to prevent bending the connectors on the socket and damaging the CPU!
2-6
Chapter 2: Basic installation
Vintage-PE2 User''s Manual for English Edition - Page 23

...:
1. Install an Intel® Pentium® 4 CPU that supports Hyper-Threading Technology.
2. Power up the system and enter the BIOS Setup (see Chapter 5: BIOS setup). Under the Advanced Menu, make sure that the item Hyper-Threading Technology is set to Enabled. The item appears only if you installed a CPU that supports Hyper-Threading Technology.
3. Reboot the computer.
ASUS Vintage-PE2
2-7
Vintage-PE2 User''s Manual for English Edition - Page 35
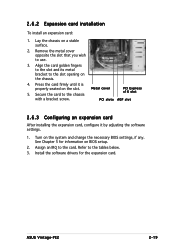
... slot
PCI slots AGP slot
2.6.3 Configuring an expansion card
After installing the expansion card, configure it by adjusting the software settings.
1. Turn on the system and change the necessary BIOS settings, if any. See Chapter 5 for information on BIOS setup.
2. Assign an IRQ to the card. Refer to the tables below. 3. Install the software drivers for the expansion card.
ASUS Vintage-PE2
2-19
Vintage-PE2 User''s Manual for English Edition - Page 36
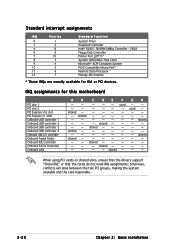
... Processor Primary IDE Channel
* These IRQs are usually available for ISA or PCI devices.
IRQ assignments for this motherboard
PCI slot 1 PCI slot 2 PCI Express x16 slot PCI Express x1 slot1 Onboard USB controller 1 Onboard USB controller 2 Onboard USB controller 3 Onboard USB controller 4 Onboard USB 2.0 controller Onboard Azalia Audio Onboard IDE Controller Onboard SATA Controller Onboard LAN...
Vintage-PE2 User''s Manual for English Edition - Page 39
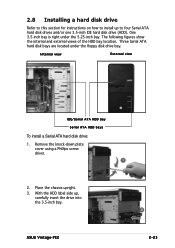
... Three Serial ATA hard disk bays are located under the floppy disk drive bay.
Internal view
External view
IDE/Serial ATA HDD bay
Serial ATA HDD bays
To install a Serial ATA hard disk drive:
1. Remove the knock-down plate cover using a Phillips screw driver.
1
2. Place the chassis upright. 3. With the HDD label side up,
carefully insert the drive into the 3.5-inch bay.
3
ASUS Vintage-PE2
2-23
Vintage-PE2 User''s Manual for English Edition - Page 47
Starting up
Chapter 3
This chapter helps you power up your system and install drivers and utilities that came with the support CD.
ASUS Vintage-PE2
Vintage-PE2 User''s Manual for English Edition - Page 48
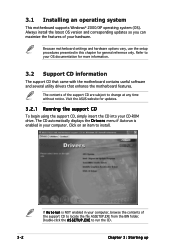
... support CD that came with the motherboard contains useful software and several utility drivers that enhance the motherboard features.
The contents of the support CD are subject to change at any time without notice. Visit the ASUS website for updates.
3.2.1 Running the support CD
To begin using the support CD, simply insert the CD into your CD-ROM drive. The CD automatically displays...
Vintage-PE2 User''s Manual for English Edition - Page 49
... for details.
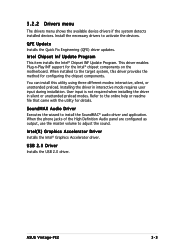
SoundMAX Audio Driver
Executes the wizard to install the SoundMAC® audio driver and application. When the phone jacks of the High Definition Audio panel are configured as output, use the master volume to adjust the sound.
Intel(R) Graphics Accelerator Driver
Installs the Intel® Graphics Accelerator driver.
USB 2.0 Driver
Installs the USB 2.0 driver.
ASUS Vintage-PE2
3-3
Vintage-PE2 User''s Manual for English Edition - Page 50
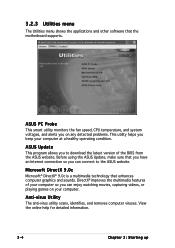
... and other software that the motherboard supports.
ASUS PC Probe
This smart utility monitors the fan speed, CPU temperature, and system voltages, and alerts you on any detected problems. This utility helps you keep your computer at a healthy operating condition.
ASUS Update
This program allows you to download the latest version of the BIOS from the ASUS website. Before using the ASUS Update, make...
Vintage-PE2 User''s Manual for English Edition - Page 54
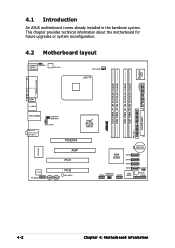
4.1 Introduction
An ASUS motherboard comes already installed in the barebone system. This chapter provides technical information about the motherboard for future upgrades or system reconfiguration.
4.2 Motherboard layout
PS/2KBMS KBPWR1
T: Mouse B: Keyboard
ATX12V1
CPU_FAN1
LGA775
Super I/O
FLOPPY1
DDR DIMM_B1 (64 bit,184-pin module) DDR DIMM_B2 (64 bit,184-pin module)
&#...
Vintage-PE2 User''s Manual for English Edition - Page 58
...
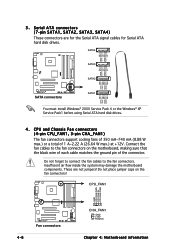
SATA1
GND RSATA_TXP1 RSATA_TXN1
GND RSATA_RXP1 RSATA_RXN1
GND
You must install Windows® 2000 Service Pack 4 or the Windows® XP Service Pack1 before using Serial ATA hard disk drives.
4. CPU and Chassis Fan connectors (4-pin CPU_FAN1, 3-pin CHA_FAN1) The fan connectors support cooling fans of 350 mA~740 mA (8.88 W max.) or a total of 1 A~2.22 A (26.64 W max.) at +12V...
Vintage-PE2 User''s Manual for English Edition - Page 64
... the motherboard support CD when the BIOS file fails or gets corrupted.) 4. A S U S U p d a t e (Updates the BIOS in Windows® environment.)
Refer to the corresponding sections for details on these utilities.
Save a copy of the original motherboard BIOS file to a bootable floppy disk in case you need to restore the BIOS in the future. Copy the original motherboard BIOS using the ASUS Update or...
Vintage-PE2 User''s Manual for English Edition - Page 67
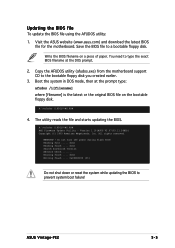
... the latest or the original BIOS file on the bootable floppy disk.
A:\>afudos /iP5GLV-MX.ROM
4. The utility reads the file and starts updating the BIOS.
A:\>afudos /iP5GLV-MX.ROM AMI Firmware Update Utility - Version 1.19(ASUS V2.07(03.11.24BB)) Copyright (C) 2003 American Megatrends, Inc. All rights reserved.
WARNING!! Do not turn off power during flash BIOS Reading file ..... done Reading...
Vintage-PE2 User''s Manual for English Edition - Page 70
... a network or an Internet Service Provider (ISP).
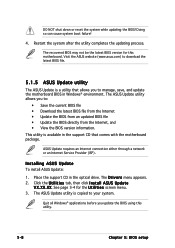
Installing ASUS Update
To install ASUS Update:
1. Place the support CD in the optical drive. The D r i v e r s menu appears. 2. Click the U t i l i t i e s tab, then click I n s t a l l A S U S U p d a t e
V X . X X . X X. See page 3-4 for the U t i l i t i e s screen menu. 3. The ASUS Update utility is copied to your system.
Quit all Windows®...
Vintage-PE2 User''s Manual for English Edition - Page 72
... the BIOS version that you wish to download. Click Next.
5. Follow the screen instructions to complete the update process.
The ASUS Update utility is capable of updating itself through the Internet. Always update the utility to avail all its features.
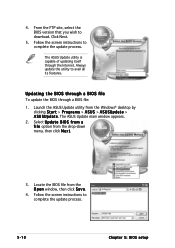
Updating the BIOS through a BIOS file
To update the BIOS through a BIOS file:
1. Launch the ASUS Update utility from the Windows® desktop by...
Vintage-PE2 User''s Manual for English Edition - Page 73
... can enable the security password feature or change the power management settings. This requires you to reconfigure your system using the BIOS Setup program so that the computer can recognize these changes and record them in the CMOS RAM of the firmware hub.
The firmware hub on the motherboard stores the Setup utility. When you start up the computer, the system provides you...