Biostar U8068 driver and firmware

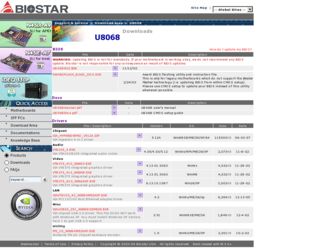
Related Biostar U8068 Manual Pages
Download the free PDF manual for Biostar U8068 and other Biostar manuals at ManualOwl.com
U8068 user's manual - Page 1
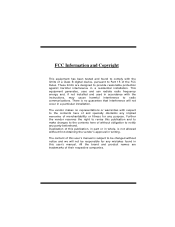
...digital device, pursuant to Part 15 of the FCC Rules. These limits are designed to provide reasonable protection against harmful interference in a residential installation.... This equipment generates, uses and can radiate radio frequency energy and, if not installed and used in accordance with the instructions...content of this user's manual is subject to be changed without notice and we ...
U8068 user's manual - Page 2
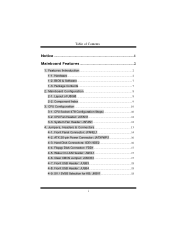
...1-2. BIOS & Software 7 1-3. Package Contents 7
2. Mainboard Configuration 8 2-1. Layout of U8068 8 2-2. Component Index 9
3. CPU Configuration 10 3-1. CPU Socket 478 Configuration Steps 10 3-2. CPU Fan Header: JCFAN1 12 3-3. System Fan Header: JSFAN1 12
4. Jumpers, Headers & Connectors 13 4-1. Front Panel Connector: JPANEL1 14 4-2. ATX 20-pin Power Connector: JATXPWR1 16 4-3. Hard Disk...
U8068 user's manual - Page 3
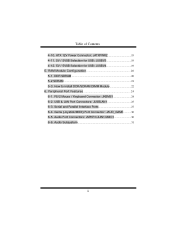
...5VSB Selection for USB: JUSBV4 19 5. RAM Module Configuration 20 5-1. DDR SDRAM 20 5-2 SDRAM...21 5-3. How to install DDR/SDRAM DIMM Module 22 6. Peripheral Port Features 24 6-1. PS/2 Mouse / Keyboard Connector: JKBMS1 24 6-2. USB & LAN Port Connectors: JUSBLAN1 25 6-3. Serial and Parallel Interface Ports 27 6-4. Game (Joystick/MIDI) Port Connector: JAUD_GAME 30 6-5. Audio Port Connectors...
U8068 user's manual - Page 4
... and hardware standards.
U8068 Features:
1.Contains on board I/O facilities that include a serial port, a VGA port, a parallel port, a PS/2 mouse port, a PS/2 keyboard port, audio ports, USB ports and a game port.
2.Contains on board IDE facilities for IDE devices such as hard disks and CD-ROM Drives.
3.Supports the Intel Pentium ® 4 processor, a leading edge processor. Complies with PC...
U8068 user's manual - Page 10
Chapter 1
Motherboard Description
1-2. BIOS & Software
1.Award legal BIOS. 2.Supports APM1.2. 3.Supports USB Function. 4.Supports ACPI.
Operating System: Offers the highest performance for MS-DOS, Windows NT, Windows 2000, Windows ME, Windows XP, Novell, LINUX, and SCO UNIX etc.
1-3. Package Contents
1.HDD Cable. 2.FDD Cable. 3.Flash Memory Writer for BIOS Update. 4.USB Cable (Optional). 5.Rear...
U8068 user's manual - Page 13
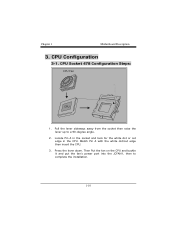
... A in the socket and look for the white dot or cut edge in the CPU. Match Pin A with the white dot/cut edge then insert the CPU.
3. Press the lever down. Then Put the fan on the CPU and buckle it and put the fan's power port into the JCFAN1, then to complete the installation.
1-10
U8068 user's manual - Page 17
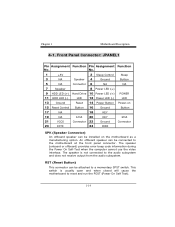
... can be installed on the motherboard as a manufacturing option. An offboard speaker can be connected to the motherboard at the front panel connector. The speaker (onboard or offboard) provides error beep code information during the Power On Self-Test when the computer cannot use the video interface. The speaker is not connected to the audio subsystem and...
U8068 user's manual - Page 18

... powered on.
HLED (Hard Drive LED Connector)
This connector can be attached to an LED on the front panel of a computer case. The LED will flicker during disk activity. This disk activity only applies to those IDE drives directly attached to the system board.
IR (Infrared Connector)
This connector is used to attach to an infrared sensing device...
U8068 user's manual - Page 25

... How to install DDR/SDRAM DIMM Module
DDR SDRAM:
Single Sided DIMM
Double Sided DIMM 1. The DDR DIMM socket has a " Plastic Safety Tab", and the DDR DIMM memory module has an Asymmetrical notch", so the DDR DIMM memory module can only... into the slot in one direction. 2. Push the tabs out. Insert the DDR DIMM memory modules into the socket at a 90-degree angle, then push down vertically so that it...
U8068 user's manual - Page 30
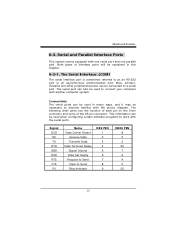
...explained in this chapter.
6-3-1. The Serial Interface: JCOM1
The serial interface port is sometimes referred to as an RS-232 port or an asynchronous communication port. Mice, printers, modems and other peripheral devices can be connected to a serial port. The serial port can also be used to connect your computer with another computer system.
Connectivity The serial ports can be used in many ways...
U8068 CMOS setup guide - Page 2
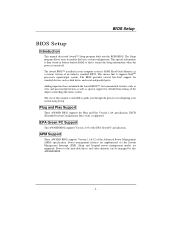
...-backed RAM so that it retains the Setup information when the power is turned off. The Award BIOS™ installed in your computer system's ROM (Read Only Memory) is a custom version of an industry standard BIOS. This means that it supports IntelTM processors input/output system. The BIOS provides critical low-level support for standard devices such as disk drives and serial and parallel ports...
U8068 CMOS setup guide - Page 4
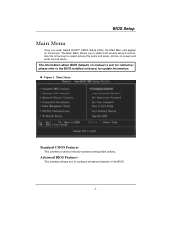
... Main Menu allows you to select from several setup functions. Use the arrow keys to select among the items and press to accept and enter the sub-menu. The information about BIOS defaults on manual is just for reference; please refer to the BIOS installed on board, for update information. ! Figure 1. Main Menu
Standard CMOS Features
This...
U8068 CMOS setup guide - Page 6
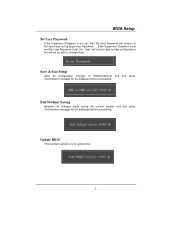
... the same way as the Supervisor Password. If the Supervisor Password is set and the User Password is set, the "User" will only be able to view configurations but will not be able to change them.
Save & Exit Setup
Save all configuration changes to CMOS(memory) and exit setup. Confirmation message will be displayed before proceeding.
Exit Without Saving...
U8068 CMOS setup guide - Page 8
... the type of floppy disk drive installed in your system.
Select the default video device.
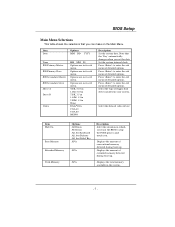
Item Halt On
Base Memory Extended Memory
Total Memory
Options All Errors No Errors All, but Keyboard All, but Diskette All, but Disk/ Key N/A
N/A
N/A
Description Select the situation in which you want the BIOS to stop the POST process and notify you.
Displays the amount of conventional...
U8068 CMOS setup guide - Page 12

... access to system memory resources, such as DRAM and external cache. It also coordinates communications with the PCI bus. The default settings that came with your system have been optimized and therefore should not be changed unless you are suspicious that the settings have been changed incorrectly. ! Figure 4. Advanced Chipset Setup
DRAM Clock/Drive Control
To control the Clock. If...
U8068 CMOS setup guide - Page 13
BIOS Setup
DRAM Timing This item determines DRAM clock/ timing follow SPD or not. The Choices: By SPD(default), Manual.
SDRAM CAS Latency When DRAM is installed, the ...Control" label and then press the enter key, it will take you a submenu with the following options:
AGP Aperture Size Select the size of the Accelerated Graphics Port (AGP) aperture. The aperture is a portion of the PCI memory address...
U8068 CMOS setup guide - Page 15
BIOS Setup
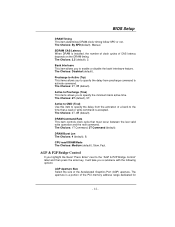
states. The Choices: Enabled (default), Disabled.
PCI Delay Transaction The chipset has an embedded 32-bit posted write buffer to support delay transactions cycles. Select Enabled to support compliance with PCI specification. The Choices: Disabled, Enabled (default).
Memory Hole
When enabled, you can reserve an area of system memory for ISA adapter ROM. When this area is reserved , it ...
U8068 CMOS setup guide - Page 17
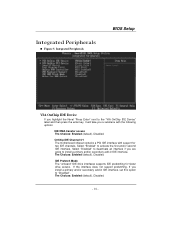
... Peripherals
BIOS Setup
VIA OnChip IDE Device
If you highlight the literal "Press Enter" next to the "VIA OnChip IDE Device" label and then press the enter key, it will take you a submenu with the following options:
IDE DMA transfer access The Choices: Enabled (default), Disabled.
OnChip IDE Channel 0/1 The motherboard chipset contains a PCI IDE interface with support...
U8068 CMOS setup guide - Page 18
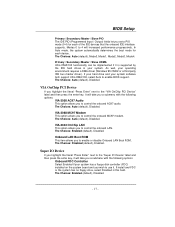
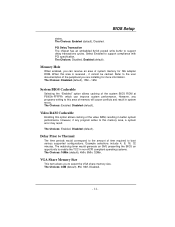
... disable Onboard LAN Boot ROM. The Choices: Disabled (default), Enabled.
Super IO Device
If you highlight the literal "Press Enter" next to the "Super IO Device" label and then press the enter key, it will take you a submenu with the following options:
Onboard FDC Controller Select Enabled if your system has a floppy disk controller (FDC) installed on the system board and...
U8068 CMOS setup guide - Page 26
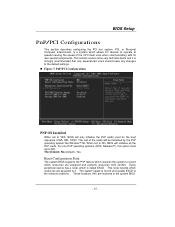
... changes to the default settings. ! Figure 7. PnP/PCI Configurations
PNP OS Installed
When set to YES, BIOS will only initialize the PnP cards used for the boot sequence (VGA, IDE, SCSI). The rest of the cards will be initialized by the PnP operating system like Window™ 95. When set to NO, BIOS will initialize all the PnP cards. For non-PnP operating...