Brother International BE-0901E PC driver and firmware
Drivers and firmware downloads for this Brother International item

Related Brother International BE-0901E PC Manual Pages
Download the free PDF manual for Brother International BE-0901E PC and other Brother International manuals at ManualOwl.com
Thread Tensions - English - Page 1
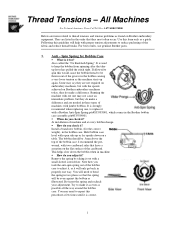
... tension problems as found on Brother embroidery equipment. They are listed in the order that they most often occur. Use this form only as a guide. Following this guideline will help...a Brother Anti-Spin Spring p/n#S35583001, which comes in the Brother bobbin case assembly p/n#S35584001. !" When do you check it? At installation of machine and at every bobbin change. !" How do you check it? Install a...
Thread Tensions - English - Page 2
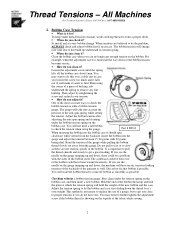
...constant, works with top thread to form a proper stitch. !" When do you check it?
At install and at every bobbin change. When tensions are believed to be the problem,
ALWAYS check and adjust ...tension
gauge. The guage will take into account the
pressure of the anti-spin spring while setting
the tension. Adjust the bobbin tension after
adjusting the anti-spin spring and cleaning
under the ...
Thread Tensions - English - Page 3
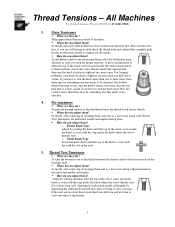
...-4BROTHER
3. Main Tensioners
!" What are they for? Main upper thread tension control of machine. !" When do you adjust them? At install, then only after bobbin has been cleaned and adjusted first. Run a tension test first, if you are still having trouble check the thread path and rethread the complete path for the troublesome...
Knife Adjustments - English - Page 3

... machine and re-check the adjustment. You may have to do this more than once to achieve the correct position.
Moving Knife Adjustment Screws
Re-install the arm cover and the needle plate and your finished. If you find that the machine will still not cut the thread cleanly, you might...
Maintenance Schedule - English - Page 3
...://www.brother-usa.com/industembroidery/tech_down.aspx
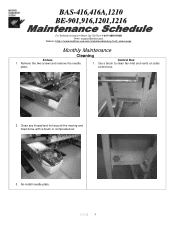
Monthly Maintenance
Cleaning
Knives 1. Remove the two screws and remove the needle
plate.
Control Box 1. Use a brush to clean fan inlet and vents on sides
control box.
2. Clean any thread and lint around the moving and fixed knive with a brush or compressed air
3. Re-install needle plate...
Maintenance Schedule - English - Page 6
...Email: tsupport@brother.com
Website: http://www.brother-usa.com/...guide bracket and retracting lever as indicated by the arrows.
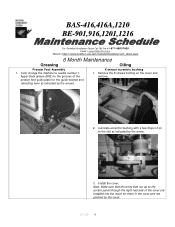
X sensor eccentric bushing 1. Remove the 8 screws holding on the cover and
remove.
2. Lubricate eccentric bushing with a few drops of oil to the slot as indicated by the arrow.
3. Install the cover. Note: Make sure that the wires that run up to the control...
Motor Locks - English - Page 1
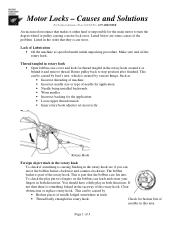
... for the main motor to turn the degree wheel or pulley causing a motor lock error. Listed below are some causes of the problem. Listed in the order that they occur... application • Needle being installed backwards • Worn needles • Incorrect backing for the application. • Loose upper thread tension • Inner rotary hook adjuster set incorrectly
Rotary Hook
Foreign object...
Tubular To Cap - English - Page 1
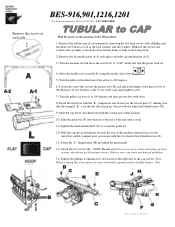
... and move the switch (L) to "CAP" mode and turn the power back on.
4) Move the needle case to needle #1 using the...Install the metal bar with the "L" stamped on and attach over the locator pins (C) making sure that the stamped "L" is on the left side facing up. Secure with the long black thumbscrews (D).
9) Slide the cap driver attachment through the sewing arm of the machine.
10) Slide the guide...
Head Board Replacement - English - Page 3

... install the new one. A. Installing board - Please follow reverse instructions on removal. B. Make sure that the rotary switch on the board is set to 1.
8. After board is installed and all plugged in you will need to perform a version up-grade in accordance to model of machine. (For version up-grading machine please follow version upgrade procedure.)
9. After board is installed, machine is version...
Instruction Manual - English - Page 11
...display is BE-0901E-AC-PC.
Check the model before
Configuration of this manual
This manual consists of the following chapters:
Chapter 1
An Introduction of Embroidery Machine
Provides information on the specifications of the embroidery machine, software installation environment, and basic software...
Explains how to use the Machine Controller.
Chapter 7
Operation of Machine
Provides...
Instruction Manual - English - Page 12
... Mounting of Guard Bar ...2-4 2-5 Mounting of Cotton Stand ...2-5 2-6 Lubrication to Needle Bar Case...2-6 2-7 Connection of Personal Computer to Machines (for connecting 4 sets 2-7 2-8 Connection of Power Supply ...2-9 2-9 Installation of Software ...2-11 3. Preparation for Embroidering...2-12 3-1 Upper Threading...2-12 3-2 Replacement of Bobbin ...2-14 3-3 Replacing and Selecting Needle...2-15...
Instruction Manual - English - Page 14
... before Turning On the Machine...6-6 Displaying the Tool Bar ...6-6 Displaying the Status Bar...6-7 Upgrading the Version of Interface Board...6-7 Reset Interface Board...6-7 Communication Port ...6-7 Language...6-8
Settings after Turning Power On ...6-9 Tool Bar ...6-9 Status Bar ...6-9 Zoom In ...6-9 Zoom Out...6-9 Zoom In Specified Range ...6-10 Fit to Window...6-10 Whole Pattern...6-10 Grid...
Instruction Manual - English - Page 22
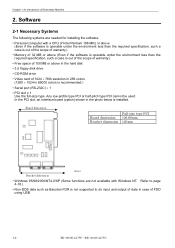
... hard disk • 3.5 floppy disk drive • CD-ROM drive • Video card of 1024 × 768 resolution in 256 colors (1280 × 1024 in 65000 colors is recommended.) • Serial port (RS-232C) × 1 • PCI slot x 1 Use the full-size type. Any low-profile type PCI or half-pitch type PCI cannot be used. In the PCI slot, an interface board (option...
Instruction Manual - English - Page 24
... "Screen saver" on the "Control panel" screen and set "Not used". • Set the computer not to use the system agent included in the Windows 95 PLUS.
2-4 Help
The software is equipped with an on-line help function as an accessory. Click , then the icon of the desired item. A message is displayed to explain the meaning and...
Instruction Manual - English - Page 39
... Embroidery Machine
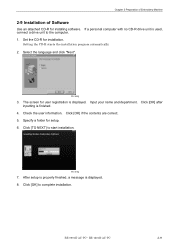
2-9 Installation of Software
Use an attached CD-R for installing software. If a personal computer with no CD-R drive unit is used, connect a drive unit to the computer. 1. Set the CD-R for installation.
Setting the CD-R starts the installation program automatically.
2. Select the language and click "Next".
W1366Q
3. The screen for user registration is displayed. Input your name...
Instruction Manual - English - Page 58
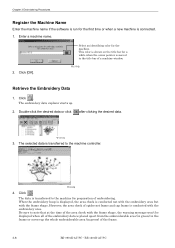
... name if the software is run for the... arrow pointer is moved to the title bar of a machine window.
2. Click [OK].
W1370Q
Retrieve the Embroidery Data
1. Click...controller.
W1363Q
4. Click .
The data is transferred to the machine for preparation of embroidering. When the embroidery hoop is displayed...frame shape, the warning message won't be displayed when all of the embroidery data is placed ...
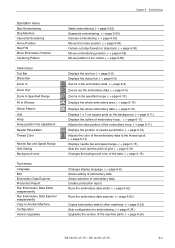
Instruction Manual - English - Page 122
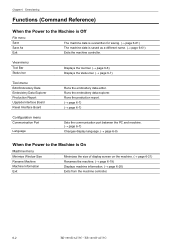
... Explorer Production Report Upgrade Interface Board Reset Interface Board
Runs the embroidery data editor. Runs the embroidery data explorer. Runs the production report. (→ page 6-7) (→ page 6-7)
Configuration menu
Communication Port
Language
Sets the communication port between the PC and machine. (→ page 6-7)
Changes display language. (→ page 6-8)
When the Power to the...
Instruction Manual - English - Page 123
...8594; page 6-59) Moves pattern to the center. (→ page 6-60)
Displays the tool bar. (→ page 6-9) Displays the status bar. (→ page 6-9) Zooms in the embroidery data. (→...62)
Copies embroidery data to other machines. (→ page 6-23) Sets configuration for embroidering. (→ page 6-24) Upgrades the version of the machine parts. (→ page 6-24)
BE-0901E-AC-PC•...
Instruction Manual - English - Page 142
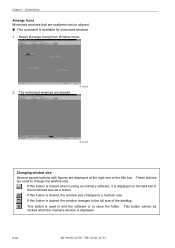
... button is clicked, the window size changes to a medium size.
If this button is clicked, the window changes to the full size of the desktop.
This button is used to end the software or to close the folder. This button cannot be clicked when the machine window is displayed.
6-22
BE-0901E-AC-PC• BE-1201B-AC...
Procedure for sewing a DST file using PC - English - Page 1
...-1260, BES-1262
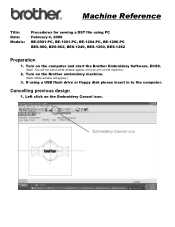
Preparation
1. Turn on the computer and start the Brother Embroidery Software, ECSC.
(Note: You will not see a white window appear until you turn on the machine.)
2. Turn on the Brother embroidery machine.
(Note: White window will appear.)
3. If using a USB flash drive or floppy disk please insert in to the computer.
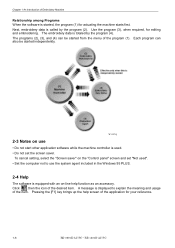
Cancelling previous design
1. Left click on the...