Brother International BE-1206B driver and firmware
Drivers and firmware downloads for this Brother International item

Related Brother International BE-1206B Manual Pages
Download the free PDF manual for Brother International BE-1206B and other Brother International manuals at ManualOwl.com
Thread Tensions - English - Page 1
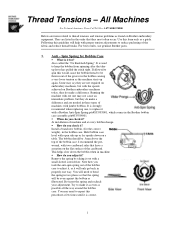
... tension problems as found on Brother embroidery equipment. They are listed in the order that they most often occur. Use this form only as a guide. Following this guideline will help...a Brother Anti-Spin Spring p/n#S35583001, which comes in the Brother bobbin case assembly p/n#S35584001. !" When do you check it? At installation of machine and at every bobbin change. !" How do you check it? Install a...
Thread Tensions - English - Page 2
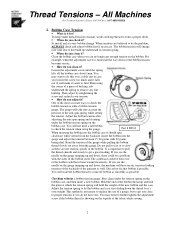
...constant, works with top thread to form a proper stitch. !" When do you check it?
At install and at every bobbin change. When tensions are believed to be the problem,
ALWAYS check and adjust ...tension
gauge. The guage will take into account the
pressure of the anti-spin spring while setting
the tension. Adjust the bobbin tension after
adjusting the anti-spin spring and cleaning
under the ...
Thread Tensions - English - Page 3
...-4BROTHER
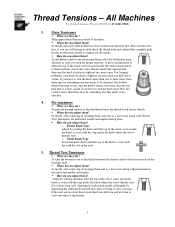
3. Main Tensioners
!" What are they for? Main upper thread tension control of machine. !" When do you adjust them? At install, then only after bobbin has been cleaned and adjusted first. Run a tension test first, if you are still having trouble check the thread path and rethread the complete path for the troublesome...
Upper Thread Breaks - English - Page 1
... thread is not threaded correctly o Correctly thread the machine
• Upper thread tension is to tight o Reduce upper thread tension
• Needle is not installed correctly o Install needle correctly
• Needle is bent or worn o Replace the needle
• Presser foot height is incorrect o Adjust presser foot height to thickness of material...
Maintenance Schedule - English - Page 1
BE-1204, 1206
For Technical Assistance Please Call Toll Fre e 1-877-4BROTHER Email: tsupport@brother.com
Website: http://www.brother-usa.com/industembroidery/tech_down.aspx
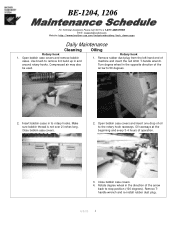
Daily Maintenance
Cleaning
Rotary hook 1. Open bobbin case covers and remove ...degree wheel in the direction of the arrow
back to stop position (100 degrees). Remove Thandle wrench and re-install rubber dust plug.
4/8/05 1
Maintenance Schedule - English - Page 3

...://www.brother-usa.com/industembroidery/tech_down.aspx
Monthly Maintenance
Cleaning
Knives
Control Box
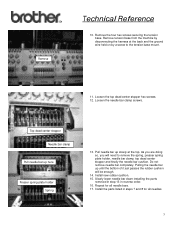
1. Remove the two rear screws and remove the
1. Use a brush to clean filters on fans and vents in
needle plates.
front and back of control box.
2. Clean any thread and lint around the moving and fixed knives.
3. Re-install needle plates...
Maintenance Schedule - English - Page 7
...
For Technical Assistance Please Call Toll Fre e 1-877-4BROTHER Email: tsupport@brother.com
Website: http://www.brother-usa.com/industembroidery/tech_down.aspx
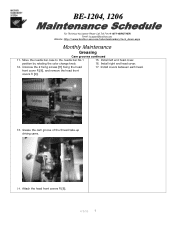
Monthly Maintenance
Greasing
Cam grooves continued
11. Move the needle bar case to the needle bar No.1
15. Install left end head cover.
position by rotating the color change knob.
16...
Tubular to Cap - English - Page 1
...Technical Assistance Please Call Toll Fre e 1-877-4BROTHER Email: tsupport@brother.com
Website: http://www.brother-usa.com/industembroidery/tech_down.aspx
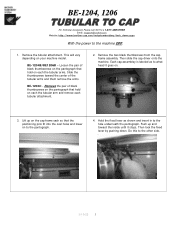
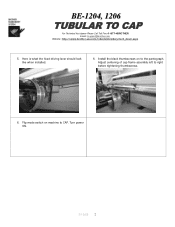
With the power to the machine OFF.
1. Remove the tubular attachment. This ....
2. Remove the two black thumbscrews from the cap frame assembly. Then slide the cap driver onto the machine. Each cap assembley is labeled as to what head it goes on....
Tubular to Cap - English - Page 2
BE-1204, 1206
For Technical Assistance Please Call Toll Fre e 1-877-4BROTHER Email: tsupport@brother.com
Website: http://www.brother-usa.com/industembroidery/tech_down.aspx
5. Here is what the fixed driving lever should look like when installed.
6. Install the black thumbscrews on to the pantograph. Adjust centering of cap frame assembly left to right before tightening...
Changing Needle Bar Cushions - English - Page 3
.... Do not
remove needle bar completely. Pulling the needle bar
up until the bottom of it just passes the rubber cushion
will be enough. 14. Install new rubber cushion. 15. Slowly lower needle bar down installing the parts
removed in step 13 in reverse order. 16. Repeat for all needle bars. 17...
Rotary Hook Support Bar - English - Page 1
...
Title: Date: Models:
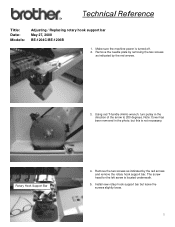
Adjusting / Replacing rotary hook support bar May 27, 2008 BE-1204C/BE-1206B
1. Make sure the machine power is turned off. 2. Remove the needle plate by removing...Support Bar Remove
4. Remove the two screws as indicated by the red arrows and remove the rotary hook support bar. The screw head for the left screw is located underneath.
5. Install new rotary hook support ...
Cap to Tubular - English - Page 1
... Assistance Please Call Toll Free 1-877-4BROTHER Email: tsupport@brother.com
Website: http://www.brother-usa.com/industembroidery/tech_down.aspx
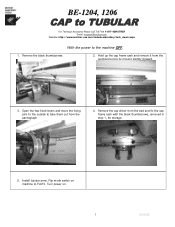
With the power to the machine OFF.
1. Remove the black thumbscrews.
....
4. Remove the cap driver from the bed and fix the cap frame sash with the black thumbscrews, removed in step 1, for storage.
Outside Open
5. Install tubular arms. Flip mode switch...
Cap to Tubular - English - Page 2
...the number 1 slot of the right tubular arm underneath the pantograph thumbscrew on the right. Install the left tubular arm so that the number 1 slot is underneath the pantograph thumbscrew on ...This will align the left tubular arm with the correct positioning pins on the connecting plate. Install small thumbscrew to secure left tubular arm to the connecting plate. Tighten both thumbscrews on ...
Procedure for sewing a DST file using PC - English - Page 1
...-1260, BES-1262
Preparation
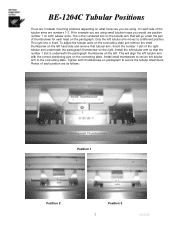
1. Turn on the computer and start the Brother Embroidery Software, ECSC.
(Note: You will not see a white window appear until you turn on the machine.)
2. Turn on the Brother embroidery machine.
(Note: White window will appear.)
3. If using a USB flash drive or floppy disk please insert in to the computer.
Cancelling previous design
1. Left click on the...
Procedure for sewing a DST file using PC - English - Page 4
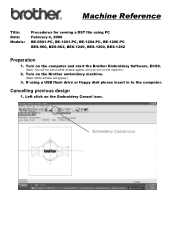
2. On the right hand side of the window, double left click on the design that you want to load.
3. A "Create Icon" window will be displayed. Left click on OK if this is the design. If not, click on cancel.
Procedure for sewing a DST file using PC - English - Page 5
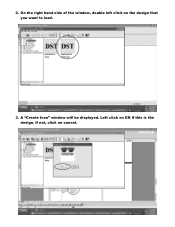
4. A window appears asking "How many times is feed required to be performed before thread trimming?" The number 3 will automatically be selected. Left click on OK.
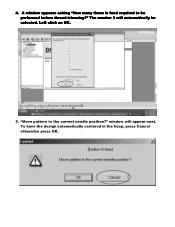
5. "Move pattern to the current needle position?" window will appear next. To have the design automatically centered in the hoop, press Cancel otherwise press OK.
Procedure for sewing a DST file using PC - English - Page 9
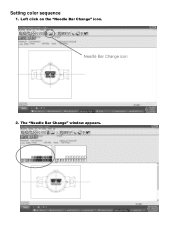
Setting color sequence
1. Left click on the "Needle Bar Change" icon.
Needle Bar Change icon
2. The "Needle Bar Change" window appears.
Procedure for sewing a DST file using PC - English - Page 10
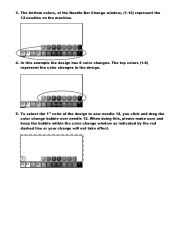
3. The bottom colors, of the Needle Bar Change window, (1-12) represent the 12 needles on the machine.
4. In this example the design has 8 color changes. The top colors (1-8) represent the color...and drag the color change bubble over needle 12. When doing this, please make sure and keep the bubble within the color change window as indicated by the red dashed line or your change will not take effect.
Procedure for sewing a DST file using PC - English - Page 11
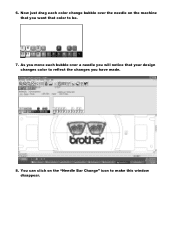
6. Now just drag each color change bubble over the needle on the machine that you want that color to be.
7. As you move each bubble over a needle you will notice that your design changes color to reflect the changes you have made.
8. You can click on the "Needle Bar Change" icon to make this window disappear.
Procedure for sewing a DST file using PC - English - Page 12
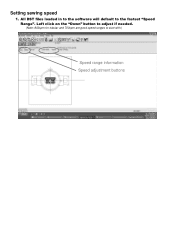
Setting sewing speed
1. All DST files loaded in to the software will default to the fastest "Speed Range". Left click on the "Down" button to adjust if needed.
(Note: 800spm for tubular and 700spm are good speed ranges to start with.)
Speed range information Speed adjustment buttons