Brother International BES-116 driver and firmware
Drivers and firmware downloads for this Brother International item

Related Brother International BES-116 Manual Pages
Download the free PDF manual for Brother International BES-116 and other Brother International manuals at ManualOwl.com
Thread Tensions - English - Page 1
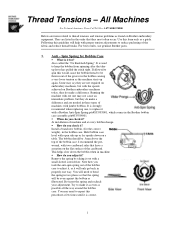
... tension problems as found on Brother embroidery equipment. They are listed in the order that they most often occur. Use this form only as a guide. Following this guideline will help...a Brother Anti-Spin Spring p/n#S35583001, which comes in the Brother bobbin case assembly p/n#S35584001. !" When do you check it? At installation of machine and at every bobbin change. !" How do you check it? Install a...
Thread Tensions - English - Page 2
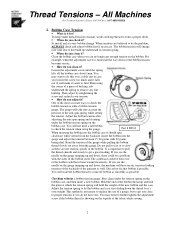
...constant, works with top thread to form a proper stitch. !" When do you check it?
At install and at every bobbin change. When tensions are believed to be the problem,
ALWAYS check and adjust ...tension
gauge. The guage will take into account the
pressure of the anti-spin spring while setting
the tension. Adjust the bobbin tension after
adjusting the anti-spin spring and cleaning
under the ...
Thread Tensions - English - Page 3
...-4BROTHER
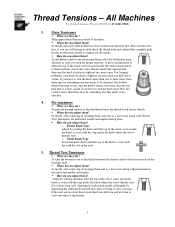
3. Main Tensioners
!" What are they for? Main upper thread tension control of machine. !" When do you adjust them? At install, then only after bobbin has been cleaned and adjusted first. Run a tension test first, if you are still having trouble check the thread path and rethread the complete path for the troublesome...
Knife Adjustments - English - Page 3

... machine and re-check the adjustment. You may have to do this more than once to achieve the correct position.
Moving Knife Adjustment Screws
Re-install the arm cover and the needle plate and your finished. If you find that the machine will still not cut the thread cleanly, you might...
Motor Locks - English - Page 1
... for the main motor to turn the degree wheel or pulley causing a motor lock error. Listed below are some causes of the problem. Listed in the order that they occur... application • Needle being installed backwards • Worn needles • Incorrect backing for the application. • Loose upper thread tension • Inner rotary hook adjuster set incorrectly
Rotary Hook
Foreign object...
Upper Thread Breaks - English - Page 1

... thread is not threaded correctly o Correctly thread the machine
• Upper thread tension is to tight o Reduce upper thread tension
• Needle is not installed correctly o Install needle correctly
• Needle is bent or worn o Replace the needle
• Presser foot height is incorrect o Adjust presser foot height to thickness of material...
Instruction Manual - English - Page 4

...power switch and disconnecting the power cord from the wall outlet before opening the face plate of the control...occur in any devices. Excessively dry...power and disconnect the power cord from the wall outlet. Lightning may cause problems with correct operation.
Installation
Machine installation should only be carried out by a qualified technician.
Contact your Brother...children.
Avoid setting up the ...
Instruction Manual - English - Page 5
... hook and knife.
If the power switch needs to be left on when carrying out some adjustment, be extremely careful to observe all safety precautions.
Use only the proper replacement parts as specified by Brother.
If any safety devices have been removed, be absolutely sure to re-install them to their original positions and...
Instruction Manual - English - Page 9

... how to edit the embroidery data.
Chapter 5 Setting This Chapter describes procedures of setting the machine and working environment.
Chapter 6 Operation ...Error Messages Provides information on error codes and action to be taken.
Chapter 10 Troubleshooting Provides troubleshooting for the machine.
Connection and Installation of Optional Equipment Describes connections between the machine/computer...
Instruction Manual - English - Page 12
...INSTRUCTIONS 1 Before Starting Operation 5 Procedure of Reading This Manual 7 Screen Composition 8
Chapter 1 Preparation of Embroidery Machine
1. Specifications 16 2. Names of Machine Components 17 3. Installation 18
3-1 Transportation of Machine 18 3-2 Installation of Machine 18 3-3 Installation of Operation Panel 19 3-4 Attaching the tead guide bar and the thread guide...Machine Power 41...
Instruction Manual - English - Page 15
... Needle and Rotary Hook 130 3. Adjustment of Presser Foot Height 131 4. Adjustment of Thread Trimmer 132 5. Adjusting the Belt Tension 133
Chapter 9 Error code list
Chapter 10 Troubleshooting
Mechanical Section 140 Electrical Section 142
Connection and Installation of Optional Equipment
Attaching Bobbin Winder (Using the 9-spool cotton stand 148
BES-116AC
13
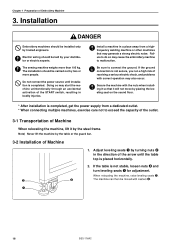
Instruction Manual - English - Page 20
... be laid by your distributor or electric experts.
The sewing machine weighs more than 195 kg. The installation should be carried out by two or more people.
Do not connect the power source until installation is completed. Doing so may start the machine unintentionally through an accidental activation of the START switch, resulting...
Instruction Manual - English - Page 21
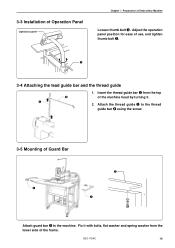
3-3 Installation of Operation Panel
Operation panel
Chapter 1 Preparation of Embroidery Machine
Loosen thumb bolt q. Adjust the operation panel position for ease of use, and tighten thumb bolt q.
q
3-4 Attaching the tead guide bar and the thread guide
1. Insert the thread guide bar q from the top
w
of the machine head by turning it.
q
2. Attach the thread guide q to...
Instruction Manual - English - Page 23
... y through spool shaft t.
i o
u
o
!0
u i
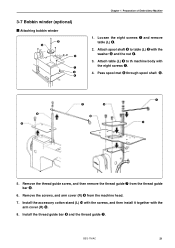
5. Remove the thread guide screw, and then remove the thread guide u from the thread guide bar i.
6. Remove the screws, and arm cover (R) o from the machine head.
7. Install the accessory cotton stand (L) !0 with the screws, and then install it together with the arm cover (R) o.
8. Install the thread guide bar i and the thread guide u.
BES-116AC
21
Instruction Manual - English - Page 36
... 1 Preparation of Embroidery Machine
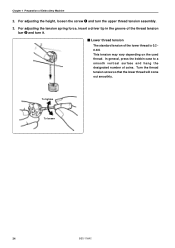
2. For adjusting the height, loosen the screw q and turn the upper thread tension assembly. 3. For adjusting the tension spring force, insert a driver tip in the groove of the thread tension
bar w and turn it. Lower thread tension The standard tension of the lower thread is 0.2~ 0.3N. This...
Instruction Manual - English - Page 37

Chapter 2
Embroidering Procedures
After installation of machine start embroidering. This chapter explains about the operation panel on the machine as well as precautions for the actual embroidering process.
Instruction Manual - English - Page 40
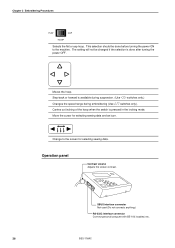
...flat or cap hoop. This selection should be done before turning the power ON to the machine. The setting will not be changed if the selection is done after turning the power OFF.
Moves the hoop. Step-back or forward is available during ...SBUS interface connector Not used (Do not connects anything.)
RS-232C interface connector Connect personal computer with BE-100 installed, etc.
38
BES-116AC
Instruction Manual - English - Page 51
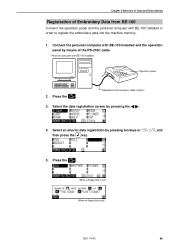
... the RS-232C cable.
Personal computer with BE-100 installed
Operation panel
2. Press the
.
Dedicated communication cable (Option)
3. Select the data registration screen by pressing the
.
4. Select an area for data registration by pressing ten keys or then press the key.
, and
5. Press the
.
When a floppy disk is set
When no floppy disk is set
BES-116AC
49
Instruction Manual - English - Page 94
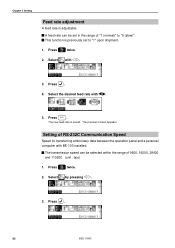
... feed rate with .
5. Press . END
The new feed rate is saved. The previous screen appears.
Setting of RS-232C Communication Speed
Speed for transferring embroidery data between the operation panel and a personal computer with BE-100 installed.
The transmission speed can be selected within the range of 9600, 19200, 38400 and 115200. (unit...
Instruction Manual - English - Page 124
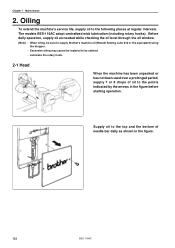
... extend the machine's service life, supply oil to the following places at regular intervals. The models BES-116AC adopt centralized wick lubrication (including rotary hooks). Before daily operation, supply oil as needed while checking the oil level through the oil window.
(Note) • When oiling, be sure to supply Brother's machine oil (Nisseki...