Brother International BES-1210AC driver and firmware
Drivers and firmware downloads for this Brother International item

Related Brother International BES-1210AC Manual Pages
Download the free PDF manual for Brother International BES-1210AC and other Brother International manuals at ManualOwl.com
Thread Tensions - English - Page 1
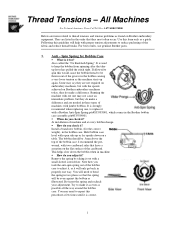
... tension problems as found on Brother embroidery equipment. They are listed in the order that they most often occur. Use this form only as a guide. Following this guideline will help...a Brother Anti-Spin Spring p/n#S35583001, which comes in the Brother bobbin case assembly p/n#S35584001. !" When do you check it? At installation of machine and at every bobbin change. !" How do you check it? Install a...
Thread Tensions - English - Page 2
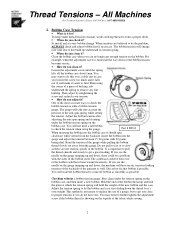
...constant, works with top thread to form a proper stitch. !" When do you check it?
At install and at every bobbin change. When tensions are believed to be the problem,
ALWAYS check and adjust ...tension
gauge. The guage will take into account the
pressure of the anti-spin spring while setting
the tension. Adjust the bobbin tension after
adjusting the anti-spin spring and cleaning
under the ...
Thread Tensions - English - Page 3
...-4BROTHER
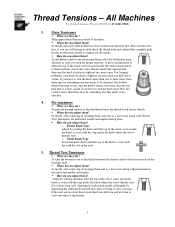
3. Main Tensioners
!" What are they for? Main upper thread tension control of machine. !" When do you adjust them? At install, then only after bobbin has been cleaned and adjusted first. Run a tension test first, if you are still having trouble check the thread path and rethread the complete path for the troublesome...
Knife Adjustments - English - Page 3

... machine and re-check the adjustment. You may have to do this more than once to achieve the correct position.
Moving Knife Adjustment Screws
Re-install the arm cover and the needle plate and your finished. If you find that the machine will still not cut the thread cleanly, you might...
Maintenance Schedule - English - Page 3
...://www.brother-usa.com/industembroidery/tech_down.aspx
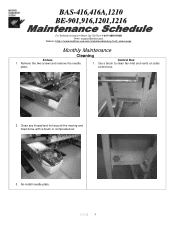
Monthly Maintenance
Cleaning
Knives 1. Remove the two screws and remove the needle
plate.
Control Box 1. Use a brush to clean fan inlet and vents on sides
control box.
2. Clean any thread and lint around the moving and fixed knive with a brush or compressed air
3. Re-install needle plate...
Maintenance Schedule - English - Page 6
...Email: tsupport@brother.com
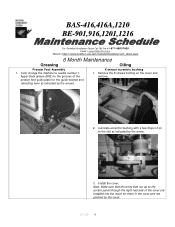
Website: http://www.brother-usa.com/...guide bracket and retracting lever as indicated by the arrows.
X sensor eccentric bushing 1. Remove the 8 screws holding on the cover and
remove.
2. Lubricate eccentric bushing with a few drops of oil to the slot as indicated by the arrow.
3. Install the cover. Note: Make sure that the wires that run up to the control...
Motor Locks - English - Page 1
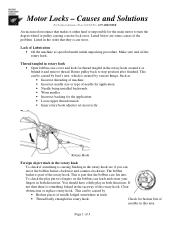
... for the main motor to turn the degree wheel or pulley causing a motor lock error. Listed below are some causes of the problem. Listed in the order that they occur... application • Needle being installed backwards • Worn needles • Incorrect backing for the application. • Loose upper thread tension • Inner rotary hook adjuster set incorrectly
Rotary Hook
Foreign object...
Cap to Tubular - English - Page 1
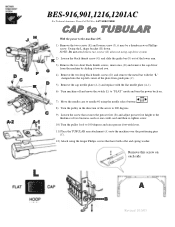
... cap drive system
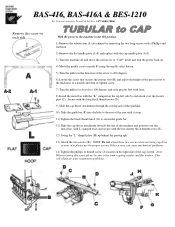
2) Loosen the black thumb screw (G) and slide the guide bar (F) out of the lower arm.
3) Remove the two short black thumb screws, inner ones, (E) and remove the cap driver from the...the plate from guide pins (C).
5) Remove the cap needle plate (A-2) and replace with the flat needle plate (A-1).
6) Turn machine off and move the switch (L) to "FLAT" mode and turn the power back on....
Upper Thread Breaks - English - Page 1

... thread is not threaded correctly o Correctly thread the machine
• Upper thread tension is to tight o Reduce upper thread tension
• Needle is not installed correctly o Install needle correctly
• Needle is bent or worn o Replace the needle
• Presser foot height is incorrect o Adjust presser foot height to thickness of material...
Color Change Potentiometer Replacement - English - Page 1
... Technical Assistance Please Call Toll Free 1-877-4BROTHER
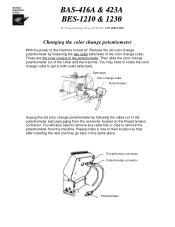
Changing the color change potentiometer
With the power to the machine turned off. Remove the old color change potentiometer by loosening the two outer... You will also need to remove any cable ties or clips to remove the potentiometer from the machine. Please make a note of their location so that after installing the new one they go back in...
Color Change Potentiometer Replacement - English - Page 2
... Bracket
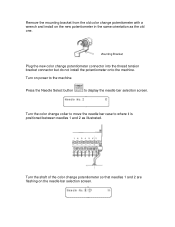
Plug the new color change potentiometer connector into the thread tension bracket connector but do not install the potentiometer onto the machine.
Turn on power to the machine.
Press the Needle Select button
to display the needle bar selection screen.
Turn the color change collar to move the needle bar case to...
Color Change Potentiometer Replacement - English - Page 3

Now turn the shaft counterclockwise very slowly until just 2 is flashing.
Install the new color change potentiometer onto the machine by inserting the shaft in to the ... machine is directly on needle number 2.
Check to make sure that the needle the machine is on matches the needle displayed by color changing with the arrow keys and checking all the needles. Press the End key when done. Make sure to...
Tubular to Cap - English - Page 1
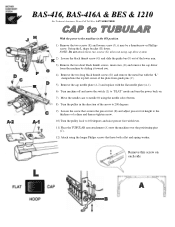
... turn the power back on....lever.
8) Install the metal...guide bar.
12) Slide the cap driver... attachment towards the rear of the machine and position over the metal bar, with L stamped on it, and secure with the two shorter black thumbscrews (E).
12) Swing the "L" shaped plate (H) up behind the pantograph.
13) Attach the two screws (K). NOTE: Do not attach these two screws when not using cap drive...
Cap to Tubular - English - Page 1
... cap drive system 2) Loosen the black thumb screw (G) and slide the guide bar (F) out of the lower arm. 3) Remove the two short black thumb screws, inner ones, (E) and remove the cap driver from the...the plate from guide pins (C). 5) Remove the cap needle plate (A-2) and replace with the flat needle plate (A-1). 6) Turn machine off and move the switch (L) to "FLAT" mode and turn the power back on....
Instruction Manual - English - Page 4
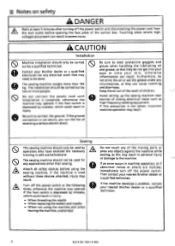
...power switch and disconnecting the power cord from
the wall outlet before opening the face plate of the control box. Touching areas where high voltages are present can result in severe injury.
A CAUTION
Installation
® Machine installation should only be carried ® out by a qualified technician.
0
Contact your Brother...the reach of children.
Avoid setting up the sewing machine near ...
Instruction Manual - English - Page 5
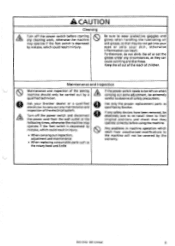
...power... inspection
A Maintenance and inspection of the sewing
If the power switch needs to be left on when
machine should only ...Brother dealer or a qualified
electrician to carry out any maintenance and
inspection of the electrical system.
0
Turn off the power switch and disconnect
the power...specified by Brother.
If any safety devices have been removed, be absolutely sure to re-install them ...
Instruction Manual - English - Page 8
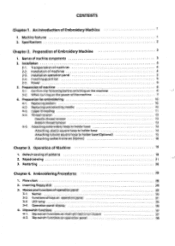
... 4. Embroidering Procedures
28
1. Flow chart
28
2. Inserting floppy disk
29
3. Names and functions of operation panel
30
3-1. Names
30
3-2. Functions of keys on operation panel
31
3-3. LED lamp
35
3-4. Operation panel display
36
4. Dip switch functions
37
4-1. Dip switch functions on main printed circuit board
37
4-2. Dip switch functions on operation panel
38
Instruction Manual - English - Page 9
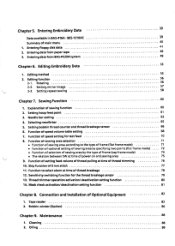
...
74
• The relation between SW at time of power on and sewing area
75
9. Function of setting feed volume of thread pulling at time of thread trimming
... trimmer operation activation/ deactivation setting function
80
14. Mask check activation/ deactivation setting function
81
Chapter 8. Connection and Installation of Optional Equipment
82
1. Tape reader
82
2. Bobbin winder (Option...
Instruction Manual - English - Page 14
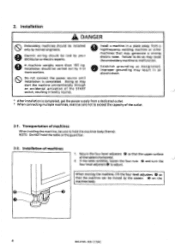
... the embroidery machine to malfunction.
Establ ish grounding as designated. Improper grounding may result in an electric shock.
* After installation is completed, get the power supply from a dedicated outlet. * When connecting multiple machines, exercise care not to exceed the capacity of the outlet.... the machine can be moved by the casters @ on the machine body.
4
BAS-416A • BES-1210AC
Instruction Manual - English - Page 15
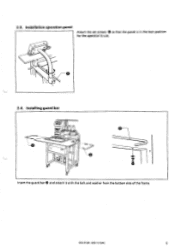
2-3. Installation operation panel
Attach the set screws 0 so that the panel is in the best position
for the operator to use.
t
2-4. Installing guard bar
.........
CIVIZEIr
CI
-,...„...
ac•iio
•
Insert the guard bar 0 and attach it with the bolt and washer from the bottom side of the frame.
BAS-416A • BES-1210AC
5