Brother International BES-961BC driver and firmware
Drivers and firmware downloads for this Brother International item

Related Brother International BES-961BC Manual Pages
Download the free PDF manual for Brother International BES-961BC and other Brother International manuals at ManualOwl.com
Thread Tensions - English - Page 1
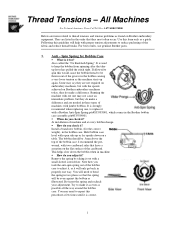
... tension problems as found on Brother embroidery equipment. They are listed in the order that they most often occur. Use this form only as a guide. Following this guideline will help...a Brother Anti-Spin Spring p/n#S35583001, which comes in the Brother bobbin case assembly p/n#S35584001. !" When do you check it? At installation of machine and at every bobbin change. !" How do you check it? Install a...
Thread Tensions - English - Page 2
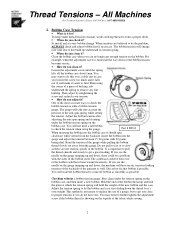
...constant, works with top thread to form a proper stitch. !" When do you check it?
At install and at every bobbin change. When tensions are believed to be the problem,
ALWAYS check and adjust ...tension
gauge. The guage will take into account the
pressure of the anti-spin spring while setting
the tension. Adjust the bobbin tension after
adjusting the anti-spin spring and cleaning
under the ...
Thread Tensions - English - Page 3
...-4BROTHER
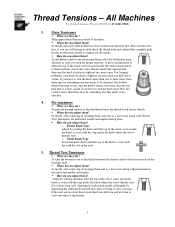
3. Main Tensioners
!" What are they for? Main upper thread tension control of machine. !" When do you adjust them? At install, then only after bobbin has been cleaned and adjusted first. Run a tension test first, if you are still having trouble check the thread path and rethread the complete path for the troublesome...
Knife Adjustments - English - Page 3

... machine and re-check the adjustment. You may have to do this more than once to achieve the correct position.
Moving Knife Adjustment Screws
Re-install the arm cover and the needle plate and your finished. If you find that the machine will still not cut the thread cleanly, you might...
Motor Locks - English - Page 1
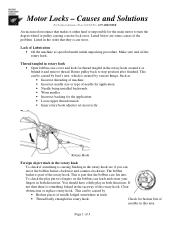
... for the main motor to turn the degree wheel or pulley causing a motor lock error. Listed below are some causes of the problem. Listed in the order that they occur... application • Needle being installed backwards • Worn needles • Incorrect backing for the application. • Loose upper thread tension • Inner rotary hook adjuster set incorrectly
Rotary Hook
Foreign object...
Upper Thread Breaks - English - Page 1
... thread is not threaded correctly o Correctly thread the machine
• Upper thread tension is to tight o Reduce upper thread tension
• Needle is not installed correctly o Install needle correctly
• Needle is bent or worn o Replace the needle
• Presser foot height is incorrect o Adjust presser foot height to thickness of material...
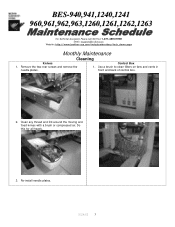
Maintenance Schedule - English - Page 3
...Call Toll Fre e 1-877-4BROTHER Email: tsupport@brother.com
Website: http://www.brother-usa.com/industembroidery/tech_down.aspx
Monthly Maintenance
Cleaning
Knives
Control Box
1. Remove the two rear screws and remove... and back of control box.
2. Clean any thread and lint around the moving and fixed knives with a brush or compressed air. Do this for all heads.
3. Re-install needle plates. 5/24...
Tubular to Cap - English - Page 1
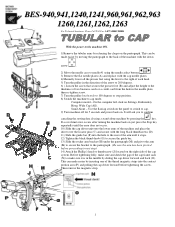
... or stop position.
8) Switch the machine to cap mode.
Computer model - On the computer left click on Settings, Embroidery
Hoop, Wide Cap (All).
Stand Alone - Use the flat/cap switch on the panel to switch to cap.
9) Turn machine off for 5 seconds and power back on. It will ask you to confirm
canceling the...
Cap to Tubular - English - Page 1

...the driver for safekeeping.
5) Move the needle case to needle #1 using the needle select buttons
.
6) Remove the cap needle plates (A) and replace with the flat needle plates.
7) Manually ...Computer model - On the computer left click on Settings, Embroidery Hoop, Tubular (All).
Stand Alone - Use the flat/cap switch on the panel to switch to flat.
12) Turn machine off for 5 seconds and power...
Instruction Manual - English - Page 4
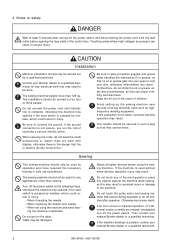
...power switch and disconnecting the power cord from the wall outlet before opening the face plate of the control box. Touching areas where high voltages are present can result in severe injury.
CAUTION
Installation
Machine installation should only be carried out by a qualified technician.
Contact your Brother...out of the reach of children.
Avoid setting up the sewing machine near sources of strong...
Instruction Manual - English - Page 5
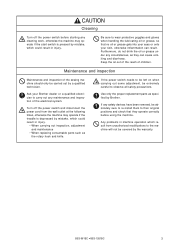
... hook and knife.
If the power switch needs to be left on when carrying out some adjustment, be extremely careful to observe all safety precautions.
Use only the proper replacement parts as specified by Brother.
If any safety devices have been removed, be absolutely sure to re-install them to their original positions and...
Instruction Manual - English - Page 10
... The display is BES-961BC.
Configuration of this manual
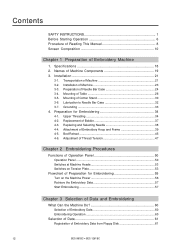
This manual consists of the following chapters:
Chapter 1 Preparation of Embroidery Machine This Chapter describes the specifications, installation and ...Embroidering Data Explains how to edit the embroidery data.
Chapter 5 Setting This Chapter describes procedures of setting the machine and working environment.
Chapter 6 Operation of Machine ...
Instruction Manual - English - Page 11
Chapter 9 List of Error Messages Provides information on error codes and action to be taken.
Chapter 10 Troubleshooting Provides troubleshooting for the machine.
Connection and Installation of Optional Equipment Describes connections between the machine/computer and optional equipment available.
BES-961BC • BES-1261BC
9
Instruction Manual - English - Page 14
...INSTRUCTIONS 1 Before Starting Operation 6 Procedure of Reading This Manual 8 Screen Composition 10
Chapter 1 Preparation of Embroidery Machine
1. Specifications 18 2. Names of Machine Components 19 3. Installation 21
3-1. Transportation of Machine 21 3-2. Installation... of Preparation for Embroidering 55 Turn on the Machine Power 56 Retrieve the Embroidery Data 57 Start Embroidering 57
...
Instruction Manual - English - Page 17
...2. Oiling 131
2-1. Head ...131 3. Greasing 133
3-1. Head ...133 3-2. Feed Guide Section 137
Chapter 8 Standard Adjustment
1. Adjusting Needle Bar Height 140 2. Replacing (... 150
Chapter 9 List of Error Message
Chapter 10 Troubleshooting
Mechanical Section 156 Electrical Section 158
Connection and Installation of Optional Equipment
Attaching Bobbin Winder 160
BES-961BC • BES-1261BC
15
Instruction Manual - English - Page 23
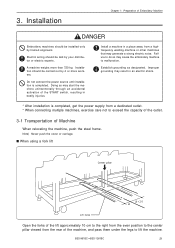
... the embroidery machine to malfunction.
Establish grounding as designated. Improper grounding may result in an electric shock.
* After installation is completed, get the power supply from a dedicated outlet. * When connecting multiple machines, exercise care not to exceed the capacity of the outlet...of the machine, and pass them under the legs to lift the machine.
BES-961BC • BES-1261BC
21
Instruction Manual - English - Page 25
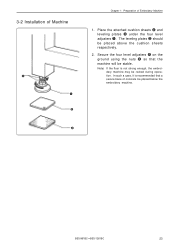
3-2 Installation of Machine
r q e w
Chapter 1 Preparation of Embroidery Machine
1. Place the attached cushion sheets w and leveling plates e under the four level adjusters q. The leveling plates e should be ... embroidery machine may be rocked during operation. In such a case, it is recommended that a secure base of concrete be placed below the embroidery machine.
BES-961BC • BES-1261BC
23
Instruction Manual - English - Page 50
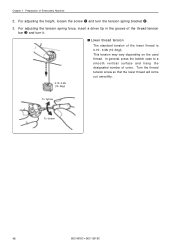
...Machine
2. For adjusting the height, loosen the screw q and turn the tension spring bracket w. 3. For adjusting the tension spring force, insert a driver tip in the groove of the thread tension
bar e and turn it. s Lower thread tension The standard tension of the lower thread is 0.15... the lower thread will come out smoothly.
0.15~0.3N (15~30gf)
To tighten
To loosen
48
BES-961BC • BES-1261BC
Instruction Manual - English - Page 51
Chapter 2
Embroidering Procedures
After installation of machine start embroidering. This chapter explains about the operation panel on the machine as well as precautions for the actual embroidering process.
Instruction Manual - English - Page 54
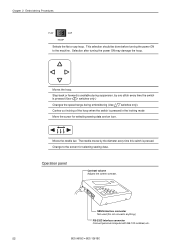
...CAP
HOOP
Selects the flat or cap hoop. This selection should be done before turning the power ON to the machine. Selection after turning the power ON may damage the hoop.
Moves the hoop.
Step-back or forward is available during ... connector Not used (Do not connects anything.)
RS-232C interface connector Connect personal computer with BE-100 installed, etc.
52
BES-961BC • BES-1261BC