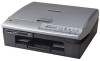
Brother International DCP 110c - Color Flatbed Multi-Function Center driver and firmware
Drivers and firmware downloads for this Brother International item
Related Brother International DCP 110c Manual Pages
Download the free PDF manual for Brother International DCP 110c and other Brother International manuals at ManualOwl.com
Software Users Manual - English - Page 3
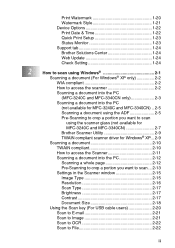
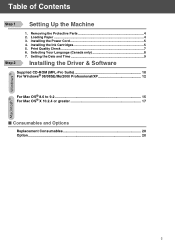
Print Watermark 1-20 Watermark Style 1-21 Device Options 1-22 Print Date & Time 1-22 Quick Print Setup 1-23 Status Monitor 1-23 Support tab 1-24 Brother Solutions Center 1-24 Web Update 1-24 Check Setting 1-24
2
How to scan using Windows 2-1
Scanning a document (For Windows® XP only 2-2
WIA compliant 2-2
How to access the scanner 2-2
Scanning a document into the PC
(MFC-...
Software Users Manual - English - Page 5
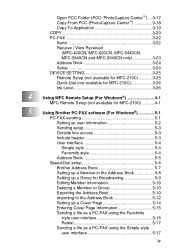
... and MFC-3340CN only 3-23 Address Book 3-24 Setup 3-24 DEVICE SETTING 3-25 Remote Setup (not available for MFC-210C 3-25 Quick-Dial (not available for MFC-210C 3-26 Ink Level 3-26
4
Using MFC Remote Setup (For Windows 4-1
MFC Remote Setup (not available for MFC-210C 4-1
5
Using Brother PC-FAX software (For Windows 5-1
PC-FAX sending 5-1
Setting up user information 5-2
Sending...
Software Users Manual - English - Page 9
... the Brother printer driver
A Printer Driver is software that translates data from the format used by a computer into the format required by a particular printer, using a printer command language or page description language. The printer drivers are on the CD-ROM we have supplied. Install the drivers first by following the Quick Setup Guide. Also, the latest printer driver can be downloaded from...
Software Users Manual - English - Page 40

..., Contrast, Resolution and Picture Type from the Advanced Properties. Click the OK button after you choose your settings.
C
7 To start scanning your document, click the Scan button in the
Scan dialog box. This time only the selected area of the document will appear in the PaperPort® 9.0SE window (or your software application window).
2 - 8 HOW TO SCAN USING WINDOWS®
Software Users Manual - English - Page 46

....
If your model is flatbed type, and you have loaded the document on the scanner glass in step 1, please skip this step.
6 Click Start.
This time only the selected area of the document will appear in the PaperPort® 9.0SE window (or your software application window).
7 In the PaperPort® 9.0SE window, use the options available...
Software Users Manual - English - Page 91
... quickly find members to send your fax to.
■ PC-FAX is available in Black & White only. ■ If you are using Windows® XP or Windows® 2000
Professional, you need to log on with administrator rights. ■ Please check Brother Solutions Center for the latest updates
available for Brother PC-FAX. Visit http://solutions.brother.com/
USING BROTHER PC-FAX SOFTWARE 5 - 1
Software Users Manual - English - Page 111
... into the media drive of the machine. You could lose your data or damage the card.
For USB cable users
For Windows® 2000 users, to access the PhotoCapture Center™ features from your PC you must first install a Windows® 2000 update. Please see the Quick Setup Guide for installation instructions.
1 Insert a SmartMedia®, CompactFlash®, Memory Stick®,
SecureDigital...
Users Manual - English - Page 3
...
Frequently asked questions (FAQs)
The Brother Solutions Center is our one-stop resource for all your Fax Machine/Multi-Function Center needs. You can download the latest software and utilities, read FAQs and troubleshooting tips to learn how to get the most from your Brother product.
http://solutions.brother.com
You can check here for Brother driver updates.
For Customer Service
In USA...
Users Manual - English - Page 75
...ROM. This program will repair and reinstall the software.
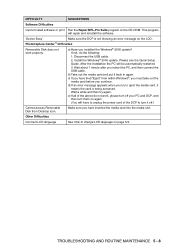
'Device Busy'
Make sure the DCP is not showing an error message on the LCD.
PhotoCapture Center™ Difficulties
Removable Disk does not work properly.
a) Have you installed the Windows® 2000 update? If not, do the following:
1. Disconnect the USB cable. 2. Install the Windows® 2000 update. Please see the Quick Setup Guide...
Quick Setup Guide - English - Page 1

... Guide DCP-110C
Before you can use the machine, you must set up the hardware and install the driver. Please read this "Quick Setup Guide" for proper set up and installation instructions.
Step 1
Setting Up the Machine
Step 2
Installing the Driver & Software
Setup is Complete!
For the latest drivers and to find the best solution for your problem or question, access the Brother Solutions Center...
Quick Setup Guide - English - Page 5
... the Protective Parts 4 2. Loading Paper ...4 3. Installing the Power Cord 5 4. Installing the Ink Cartridges 5 5. Print Quality Check 7 6. Selecting Your Language (Canada only 8 7. Setting the Date and Time 9
Installing the Driver & Software
Supplied CD-ROM (MFL-Pro Suite 10 For Windows® 98/98SE/Me/2000 Professional/XP 12
For Mac OS® 8.6 to 9.2 15 For Mac OS® X 10...
Quick Setup Guide - English - Page 11
... ▼.
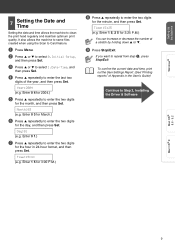
9 Press Stop/Exit.
If you want to repeat from step 1, press
Stop/Exit.
To confirm the current date and time, print out the User Settings Report. (See "Printing reports" of Appendix in the User's Guide)
Continue to Step 2, Installing the Driver & Software
Mac OS® 8.6 - 9.2
Mac OS® X
9
Quick Setup Guide - English - Page 12

... a Brother Authorized Service Center.
Repair MFL-Pro Suite If you experience errors while installing the MFL-Pro Suite you can use this function to automatically repair and re-install the software.
*1 The User's Guide on the CD-ROM includes the Software for features available when connected to a computer (e.g. Printing and Scanning).
Start Here You can install the printer driver, scanner driver...
Quick Setup Guide - English - Page 13
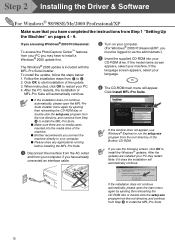
Setting Up the Machine
Windows®
Mac OS® 8.6 - 9.2
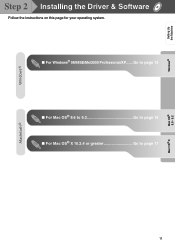
Step 2 Installing the Driver & Software
Follow the instructions on this page for your operating system. ■ For Windows® 98/98SE/Me/2000 Professional/XP...... Go to page 12 ■ For Mac OS® 8.6 to 9.2 Go to page 15 ■ For Mac OS® X 10.2.4 or greater Go to page 17
11
Mac OS® X
Quick Setup Guide - English - Page 14
... AC outlet
and from your computer, if you have already connected an interface cable.
If this window does not appear, use Windows® Explorer to run the setup.exe program from the root directory of the Brother CD-ROM.
If you see the following screen, click OK to install the Windows® updates. After the updates are installed your PC may restart...
Quick Setup Guide - English - Page 15
... then connect it to the machine.
Windows®
Installing the Driver & Software
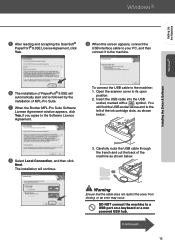
6 The installation of PaperPort® 9.0SE will
automatically start and is followed by the installation of MFL-Pro Suite.
7 When the Brother MFL-Pro Suite Software
License Agreement window appears, click Yes, if you agree to the Software Licence Agreement.
To connect the USB cable to the machine: 1. Open the...
Quick Setup Guide - English - Page 16
...computer, the
Installation Diagnostics will run automatically and the installation results window will be shown.
If the installation is unsuccessful try installing again using the Repair MFL-Pro Suite option from the main menu. Select Repair MFL-Pro Suite and follow the instructions on the screen.
The MFL-Pro Suite, Brother Printer driver and Scanner driver have been installed and the installation...
Quick Setup Guide - English - Page 17
...
Windows®
Installing the Driver & Software Mac OS® 8.6 - 9.2
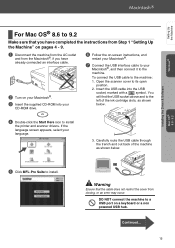
For Mac OS® 8.6 to 9.2
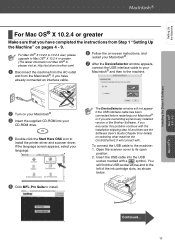
Make sure that you have completed the instructions from Step 1 "Setting Up the Machine" on pages 4 - 9.
1 Disconnect the machine from the AC outlet
and from the Macintosh®, if you have already connected an interface cable.
2 Turn on your Macintosh®. 3 Insert the supplied CD-ROM...
Quick Setup Guide - English - Page 19
...
CD-ROM drive.
4 Double-click the Start Here OSX icon to
install the printer driver and scanner driver. If the language screen appears, select your language.
5 Click MFL-Pro Suite to install.
The DeviceSelector window will not appear if the USB interface cable has been connected before restarting your Macintosh® or if you are overwriting a previously installed version of the Brother Software...
Quick Setup Guide - English - Page 20
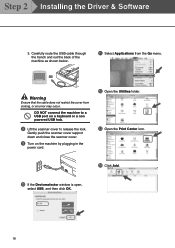
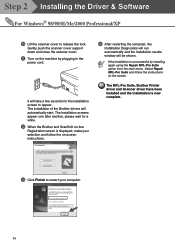
Step 2 Installing the Driver & Software
3. Carefully route the USB cable through the trench and out the back of the machine as shown below.
A Select Applications from the Go menu.
Warning
Ensure that the cable does not restrict the cover from closing, or an error may occur.
DO NOT connect the machine to a USB port on a keyboard or a non powered USB hub.
8 Lift...