Brother International DreamWeaver„ XE VM6200D driver and firmware
Drivers and firmware downloads for this Brother International item

Related Brother International DreamWeaver„ XE VM6200D Manual Pages
Download the free PDF manual for Brother International DreamWeaver„ XE VM6200D and other Brother International manuals at ManualOwl.com
Users Manual - English - Page 2
TRADEMARKS
IMPORTANT:
READ BEFORE DOWNLOADING, COPYING, INSTALLING OR USING. By downloading, copying, installing or using the software you agree to this license. If you do not agree to this license, do not download, install, copy or use the software.
Intel License Agreement For Open Source Computer Vision Library
Copyright © 2000, Intel Corporation, all rights reserved. Third party copyrights...
Users Manual - English - Page 4
... by the manufacturer as contained in this manual. Use only the interface cable (USB cable) included with this machine. Use only the sensor pen included with this machine. The contents of this manual and specifications of this product are subject to change without notice. For additional product information and updates, visit our website at www.brother.com
B-2
Users Manual - English - Page 6
IMPORTANT SAFETY INSTRUCTIONS
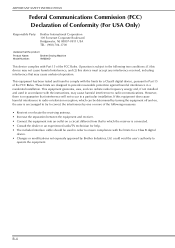
Federal Communications Commission (FCC) Declaration of Conformity (For USA Only)
Responsible Party:
Brother International Corporation 100 Somerset Corporate Boulevard Bridgewater, NJ 08807-0911 USA TEL : (908) 704-1700
declares that the product
Product Name: Model Number:
Brother Sewing Machine VM6200D
This device complies with Part 15 of the FCC Rules. ...
Users Manual - English - Page 7

...INSTRUCTIONS
Laser Notices (For U.S.A. only)
Laser Safety
This sewing machine is certified as a Class 1 laser product under the U.S. Department of Health and Human Services (DHHS) Radiation Performance Standard according to the Radiation Control...
Brother ...controls, adjustments or the performance of procedures other than those specified in this manual may result in hazardous radiation exposure.
B-5
Users Manual - English - Page 8
...INSTRUCTIONS
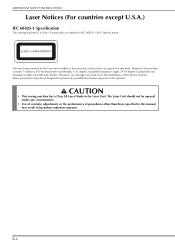
Laser Notices (For countries except U.S.A.)
IEC 60825-1 Specification
This sewing machine is a Class 1 laser product as defined in IEC 60825-1:2007 specifications.
The laser beam emitted by the laser unit installed....
• Use of controls, adjustments or the performance of procedures other than those specified in this manual may result in hazardous radiation exposure.
B-6
Users Manual - English - Page 13
... ......... 84
Uninterrupted Embroidering (Monochrome - Using a Single Color 84 Basting Embroidery 84
USING THE MEMORY FUNCTION 85
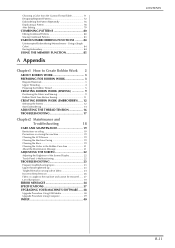
A Appendix
Chapter1 How to Create Bobbin Work 2
ABOUT BOBBIN WORK 3 PREPARING FOR...30
ERROR MESSAGES 34 SPECIFICATIONS 37 UPGRADING YOUR MACHINE'S SOFTWARE ..... 38
Upgrade Procedure Using USB Media 38 Upgrade Procedure Using Computer 39
INDEX 40
CONTENTS
B-11
Users Manual - English - Page 23
...
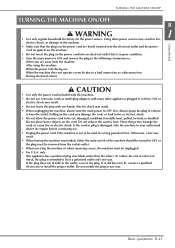
CAUTION
• Use only the power cord included with this machine.
• Do not use extension cords or multi-plug adapters with many other appliances plugged in ...OFF or the plug must be removed from the socket-outlet.
• When servicing the machine or when removing covers, the machine must be unplugged.
•... to install the proper outlet. Do not modify the plug in any way.
Basic operations...
Users Manual - English - Page 30
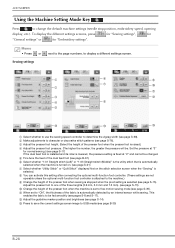
... embroidery speed, opening
display, etc.). To display the different settings screens, press
for "Sewing settings",
for
"General settings" or
for "Embroidery settings".
Memo • Press or next to the page numbers, to display a different settings screen.
Sewing settings
a
f
i
g
j
b
k
c
l
d
h
e
m
m
m
a Select whether to use the sewing speed controller to determine the zigzag...
Users Manual - English - Page 32
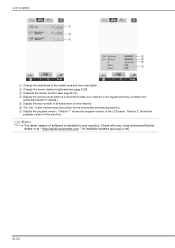
... is the internal machine number for the embroidery and sewing machine. g Display the program version. "Version 1" shows the program version of the LCD panel, "Version 2" shows the
program version of the machine.
Memo • The latest version of software is installed in your machine. Check with your local authorized Brother
dealer or at " http://solutions.brother.com " for available updates (see...
Users Manual - English - Page 44
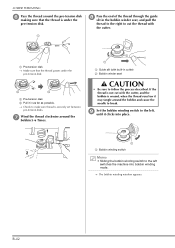
...; Make sure that the thread passes under the pre-tension disk.
b Pre-tension disk c Pull it in as far as possible. → Check to make sure thread is securely set between
pre-tension disks.
g
Wind the thread clockwise bobbin 5-6 Times.
around
the
a Guide slit (with built-in cutter) b Bobbin winder seat
CAUTION
• Be sure...
Users Manual - English - Page 45
... could result in damage to the machine.
CAUTION
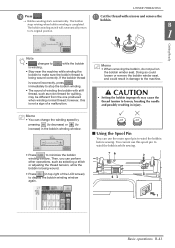
• Setting the bobbin improperly may cause the thread tension to loosen, breaking... (to decrease) or (to increase) in the bobbin winding window.
■ Using the Spool Pin
You can use the main...the bobbin while sewing.
• Press
to minimize the bobbin
winding window. Then, you can perform
other operations, such as selecting a stitch...
Users Manual - English - Page 48
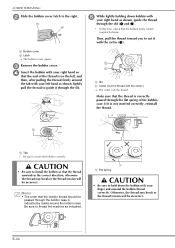
... pulling the thread firmly around
the tab with your left hand as shown, lightly
pull the thread to guide it through the slit.
a Slit b Cutter (Cut the thread with the cutter.) → The ...the thread.
a Tab * Be sure to insert the bobbin correctly.
CAUTION
• Be sure to install the bobbin so that the thread unwinds in the correct direction, otherwise the thread may break or the thread...
Users Manual - English - Page 54
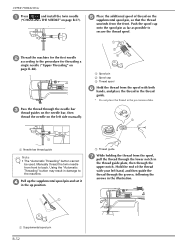
UPPER THREADING
a
Press
and install the twin needle
("CHANGING THE NEEDLE" on page B-57).
e
Place the additional spool of thread...the thread in the thread
guide.
* Do not place the thread in the pre-tension disks.
c
Pass the thread through the needle bar thread guides on the needle bar, then
thread the needle on the left side manually.
a Needle bar thread guide
Note
• The "...
Users Manual - English - Page 56
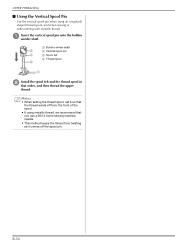
... pin
onto
the
bobbin
a Bobbin winder shaft
d
b Vertical spool pin
c
c Spool felt
d Thread spool b
a
b
Install the spool felt and the thread spool that order, and then thread the upper
in
thread.
Memo • When setting the thread spool, set it so that
the thread winds off from the front of the spool.
•...
Users Manual - English - Page 57
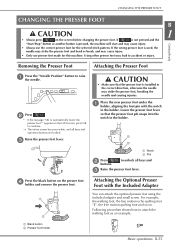
...c Raise the presser foot lever.
CAUTION
• Make sure that the presser foot is installed in the correct direction, otherwise the needle may strike the presser foot, breaking the needle and... foot lever.
Attaching the Optional Presser Foot with the Included Adapter
You can attach the optional presser feet using the included adapter and small screw. For example, the walking foot, the free...
Users Manual - English - Page 238
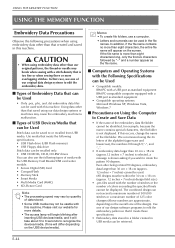
... that meets the following specifications. • USB Flash drive (USB Flash memory) • USB Floppy disk drive Stitch data can be recalled only. • USB CD-ROM, CD-R, CD-RW drives You can also use the following types of media with the USB Memory Card Reader/USB card writer module. • Secure Digital (SD) Card • CompactFlash • Memory Stick • Smart Media • Multi...
Users Manual - English - Page 298

... the Maintenance Message 21
ADJUSTING THE SCREEN 22
Adjusting the Brightness of the Screen Display 22 Touch Panel is Malfunctioning 22
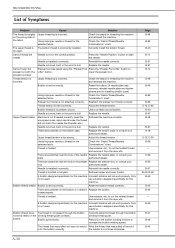
TROUBLESHOOTING 23
Frequent troubleshooting topics 23 Upper thread ...List of Symptoms 30
ERROR MESSAGES 34
SPECIFICATIONS 37
UPGRADING YOUR MACHINE'S SOFTWARE........ 38
Upgrade Procedure Using USB Media 38 Upgrade Procedure Using Computer 39
INDEX 40
Users Manual - English - Page 310
... rethread the machine.
Bobbin is set incorrectly.
Reset the bobbin. (If needle plate was removed, reinstall needle plate and tighten screws prior to installing bobbin case.)
Using improper needle or...on the winding thread guide correctly.
bobbin.
Bobbin spins slowly.
Correctly pass the thread through the bobbin winding thread guide.
Press [+] in the bobbin winding window to increase the bobbin...
Users Manual - English - Page 318
... MACHINE'S SOFTWARE
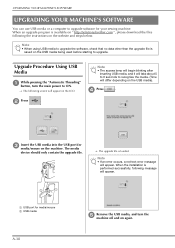
UPGRADING YOUR MACHINE'S SOFTWARE
You can use USB media or a computer to upgrade software for your sewing machine. When an upgrade program is available on " http://solutions.brother.com ", please download the files following the instructions on the website and steps below.
Note • When using USB media to upgrade the software, check that no data other than the upgrade file...
Users Manual - English - Page 319
...Troubleshooting
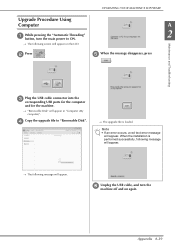
c
Plug the USB cable connector into the corresponding USB ports for the computer
and for the machine.
→ "Removable Disk" will appear in "Computer (My computer)".
d Copy the upgrade file to "Removable Disk".
→ The upgrade file is loaded.
Note • If an error occurs, a red text error message
will appear. When the installation is performed successfully, following...