Brother International Duetta 2 4750D driver and firmware
Drivers and firmware downloads for this Brother International item

Related Brother International Duetta 2 4750D Manual Pages
Download the free PDF manual for Brother International Duetta 2 4750D and other Brother International manuals at ManualOwl.com
Users Manual - English - Page 5
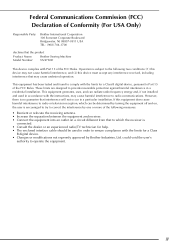
... receiver is
connected. • Consult the dealer or an experienced radio/TV technician for help. • The enclosed interface cable should be used in order to ensure compliance with the limits for a Class
B digital device. • Changes or modifications not expressly approved by Brother Industries, Ltd. could void the user's
authority to operate the equipment...
Users Manual - English - Page 6
... correct installation. 5. Use only the interface cable (USB cable) included with this machine.
For repair or adjustment In the event a malfunction occurs or adjustment is required, first follow the troubleshooting table in the back of the operation manual to inspect and adjust the machine yourself. If the problem persists, please consult your local authorized Brother dealer...
Users Manual - English - Page 11
... Mirror Image 183 Changing the Density (Alphabet Character and Frame
SOFTWARE 250
Upgrade Procedure Using USB Media 250
Upgrade Procedure Using Computer 251
STITCH SETTING CHART 253
6
Index 260
Patterns Only 183
Changing the Colors of Alphabet Character Patterns............184
USING THE MEMORY FUNCTION 185
Embroidery Data Precautions 185 Saving Embroidery Patterns in the...
Users Manual - English - Page 13
....
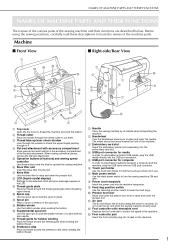
c Embroidery card slot
Insert the embroidery cards (sold separately) into the embroidery card slot.
d USB port connector for media
In order to send patterns from/to USB media, plug the USB media directly into the USB port connector.
e USB port connector for computer
In order to import/export patterns between a computer and the machine, plug the USB cable into the USB port connector.
f Touch...
Users Manual - English - Page 22
...During electrical storms
CAUTION
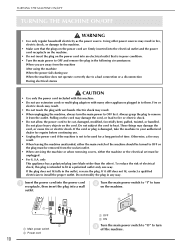
• Use only the power cord included with this machine.
• Do not use extension cords or multi-plug adapters with many other appliances plugged in to them. ... must be removed from the socket-outlet.
• When servicing the machine or when removing covers, either the machine or the electrical set must be unplugged.
• For U.S.A. only
This appliance...
Users Manual - English - Page 28
... (needle stop position, embroidery speed, opening
display, etc.) Press
,
or
to display the different settings screens.
Memo • This function will be available in future technology upgrades.
• Press
or
to display a different settings screen.
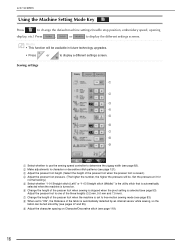
Sewing settings
a
b
c d e f g h i
a Select whether to use the sewing speed controller to determine the zigzag width (see page 82). b Make...
Users Manual - English - Page 29
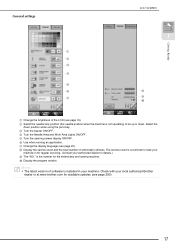
General settings
a b c d e f g
LCD SCREEN
1
h i j
Getting Ready
a Change the ...servicing. (Contact your authorized dealer for details.) i The "NO." is the number for the embroidery and sewing machine. j Display the program version.
Memo • The latest version of software is installed in your machine. Check with your local authorized Brother
dealer or at www.brother.com for available updates...
Users Manual - English - Page 45
...
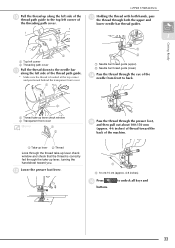
a Needle bar thread guide (upper) b Needle bar thread guide (lower)
n
Pass the thread through the needle from front to back.
eye
of
the
(bC)
a Thread take-up lever check window b Transparent front cover... the machine.
a Take-up lever b Thread
Look through the thread take-up lever check window and check that the thread is correctly fed through the take-up lever, turning the handwheel toward...
Users Manual - English - Page 46
... left side.
a
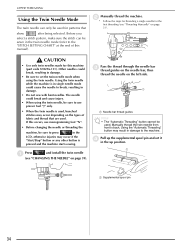
a Needle bar thread guides
Note • The "Automatic Threading" button cannot be
used. Manually thread the twin needle from front to back. Using the "Automatic Threading" button may result in damage to the machine.
d
Pull up the supplemental in the up position.
spool
pin
and
set
it
a
a Supplemental spool pin
34
Users Manual - English - Page 48
...: )
* Refer to the "STITCH SETTING CHART" at the end of this manual for proper stitch to use with presser foot "J".
→ The Selected stitch is displayed.
Note
If the
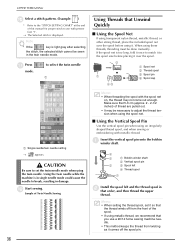
key is light gray... Spool felt
d Thread spool
a
b
Install the spool felt and the thread spool that order, and then thread the upper
in
thread.
Memo • When setting the thread spool, set it so that
the thread winds off...
Users Manual - English - Page 49
... screen becomes white, and all keys and operation buttons are locked.
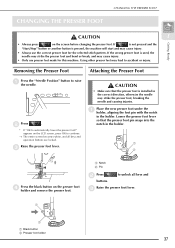
c Raise the presser foot lever.
CAUTION
• Make sure that the presser foot is installed in the correct direction, otherwise the needle may strike the presser foot, breaking the needle and causing injuries.
a
Place the new presser foot under the...
Users Manual - English - Page 52
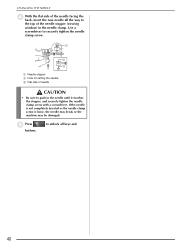
... the back, insert the new needle all the way to
the top of the needle stopper (viewing
window) in the needle clamp. Use a
screwdriver to securely tighten the needle
clamp screw.
a
b
c
a Needle stopper b Hole for setting the needle c Flat side of needle
CAUTION
• Be sure to push in the needle until...
Users Manual - English - Page 146
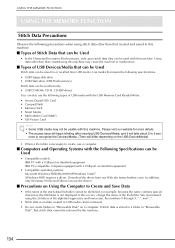
...USB Devices/Media that can be Used
Stitch data can be saved to or recalled from USB media. Use media that meets the following specifications. • USB Floppy disk drive • USB Flash drive (USB Flash memory) Stitch data can be recalled only. • USB CD-ROM, CD-R, CD-RW drives You can also use the following types of USB media with the USB Memory Card Reader/Writer. • Secure Digital...
Users Manual - English - Page 147
...AG. • xD-Picture Card is a registered trademark or a trademark of Fuji Photo Film Co. Ltd. • IBM is a registered trademark or a trademark of International Business Machines Corporation. • Microsoft and Windows are registered trademarks or trademarks of Microsoft Corporation. Each company whose software title is mentioned in this manual has a Software License Agreement specific to...
Users Manual - English - Page 198
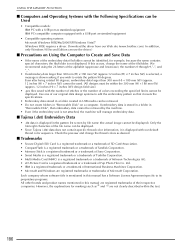
... models: IBM PC with a USB port as standard equipment IBM PC-compatible computer equipped with a USB port as standard equipment
• Compatible operating systems: Microsoft Windows 98SE/Me/2000/XP/Windows Vista/7 (Windows 98SE requires a driver. Download the driver from our Web site (www.brother.com). In addition, only Windows 98 Second Edition can use the driver.)
■ Precautions on Using...
Users Manual - English - Page 247
... Adjusting the Alternate Bobbin Case (with no marking 237
ADJUSTING THE SCREEN 238
Screen Visibility is Low 238 Touch Panel is Malfunctioning 238
TROUBLESHOOTING 240 ERROR MESSAGES 243
■ Alarm Sounds ...248
SPECIFICATIONS 249 UPGRADING YOUR MACHINE'S SOFTWARE 250
Upgrade Procedure Using USB Media 250 Upgrade Procedure Using Computer 251
Users Manual - English - Page 262
... YOUR MACHINE'S SOFTWARE
UPGRADING YOUR MACHINE'S SOFTWARE
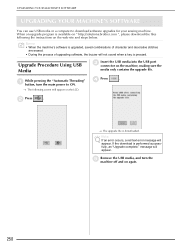
You can use USB media or a computer to download software upgrades for your sewing machine. When an upgrade program is available on " http://solutions.brother.com ", please download the files following the instructions on the web site and steps below.
Memo • When the machine's software is upgraded, saved combinations of character...
Users Manual - English - Page 263
..." button, turn the main power to ON.
→ The following screen will appear on the LCD.
b Press
.
c
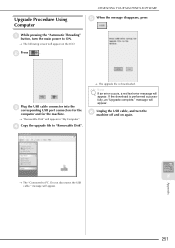
Plug the USB cable connector into the corresponding USB port connectors for
the
computer and for the machine.
→ "Removable Disk" will appear in "My Computer".
d Copy the upgrade file to "Removable Disk".
→ The upgrade file is downloaded.
Note If an error occurs, a red text...
Users Manual - English - Page 264

UPGRADING YOUR MACHINE'S SOFTWARE
252
Users Manual - English - Page 274
...decorative stitches 136
, computer 139 190
embroidery patterns 187
, machine's memory 136 187
MY CUSTOM STITCH designs 233 stitch settings 60
, USB media 138 189
utility stitches 60 Scallop stitches 92 Set key 229 Settings
automatic reinforcement stitching 51
, automatic thread cutting 52 175
display language 20 embroidery settings 18 general settings 17
machine setting mode key 16...