Brother International HE-120 driver and firmware
Drivers and firmware downloads for this Brother International item
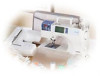
Related Brother International HE-120 Manual Pages
Download the free PDF manual for Brother International HE-120 and other Brother International manuals at ManualOwl.com
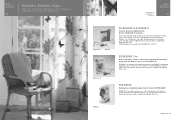
Accessory Catalog - Page 5
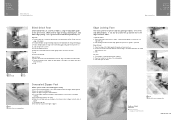
...guide screw, adjust the fabric guide to the edge of the fabric, and lower
the presser foot. 3. Sew.
SA133 ABCDEFJKMN
SA134 GHILOP
SA128 All Brother home-use sewing machines
Concealed Zipper Foot
Allows you to install.... 2. Place the fold at the left side of the center guide. 3. Sew and open the fabric.
SA184 All Brother home-use sewing machines
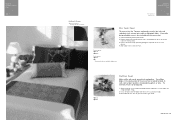
Ring Bearer Pillow & Hankerchief
Innov-is Project...
Accessory Catalog - Page 7
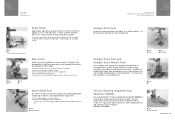
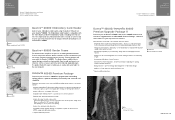
... be used with all Brother presser feet. Can be used for stitching heavy fabrics together.
1. Attach the seam guide on the needle plate with the thumbscrew of the seam guide. 2. Adjust the distance...stitching especially on thin fabrics or small pieces of patchworks. Installing the Straight Stitch Needle Plate automatically sets the needle position to the center straight stitching position on selected...
Accessory Catalog - Page 13
....)
Brother Embellishment
Feet
Pin Tuck Foot
24
Ruffler Foot
Pin Tuck Foot
This presser foot has 7 grooves and produces perfect pin tucks and corded pin tucks using a twin needle on lightweight fabric. A specially designed bobbin cover is also included with this presser foot.
1. Install and manually thread a twin needle. 2. Draw a reference line to guide...
Accessory Catalog - Page 16
... own unique embroidery patterns in the easy steps. Comes with USB card writer, 4M blank memory card and software compatible with Windows 2000 or later. SAVR8.0 Upgrade kit is compatible with PE-DESIGN 5.0, 6.0 & 7.0.
PE-DESIGN® Lite
New to embroidery software? Master basic digitizing and embroidery design work with Brother's easy to use PE-DESIGN® Lite.
PE-DESIGN®...
Accessory Catalog - Page 17
... QuattroTM 6000D
SAVR4000D Innov-is 4000D
QuattroTM 6000D Embroider y Card Reader
Connect your embroidery card reader using the built-in USB port on your QuattroTM 6000D. This Embroidery Card Reader is compatible with the entire library of Brother Embroidery Cards, including licensed content. The simple and easy USB attachment takes seconds to connect and ensures your treasured collection...
Users Manual - English - Page 3
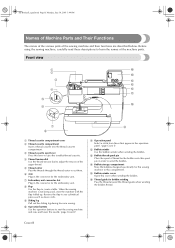
... Insert a thread cassette into the thread cassette compartment.
c Thread cassette eject lever Press this lever to eject the installed thread cassette.
d Thread tension dial Use the thread tension dial to adjust the tension of the upper thread.
e...this spool pin in order to wind the bobbin.
n Bobbin storage compartment Store the bobbins designed specifically for this sewing machine in this ...
Users Manual - English - Page 4
... Presser foot holder The presser foot is installed onto the presser foot holder.
4
...card slot Insert the embroidery card.
d Main power switch Use the main power switch to turn the sewing machine on and off.
e Power supply jack Insert the plug on the power supply cord into the power supply jack.
f Foot controller jack Insert the plug on the end of the foot controller cable into the foot controller...
Users Manual - English - Page 10
... the machine ...13
LCD (liquid crystal display) operation 14
Viewing the LCD...14 Changing the Machine Settings ...15 Checking machine operating procedures ...17
Winding/Installing the Bobbin 18
Bobbin precautions ...18 Winding the bobbin ...18 Installing the bobbin ...21
Upper Threading ...23
About the spool of thread ...23 Loading the spool into the thread cassette...
Users Manual - English - Page 16
... assure correct installation. For repair or adjustment In the event a malfunction occurs or adjustment is required, first follow the troubleshooting table in the back of the operation manual to inspect and adjust the machine yourself. If the problem persists, please consult your local authorized Brother dealer. For additional product information and updates, visit our...
Users Manual - English - Page 17
SE-BrotherE_sgml.book Page 11 Monday, June 30, 2003 3:44 PM
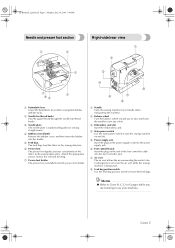
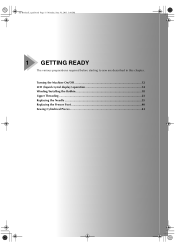
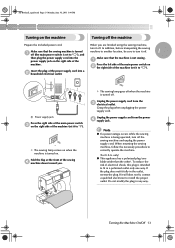
1 GETTING READY
The various preparations required before starting to sew are described in this chapter. Turning the Machine On/Off 12 LCD (liquid crystal display) operation 14 Winding/Installing the Bobbin 18 Upper Threading ...23 Replacing the Needle 35 Replacing the Presser Foot 40 Sewing Cylindrical Pieces 43
Users Manual - English - Page 19
...machine to another location, be sure to turn it off.
1
a off (the main power switch is set to " "), and
then plug the power supply cord into the power supply jack on the right side of the
Make sure that the machine is not sewing... the plug. If it still does not fit, contact a qualified electrician to install the proper outlet. Do not modify the plug in any way.
Turning the Machine On/Off 13
Users Manual - English - Page 23
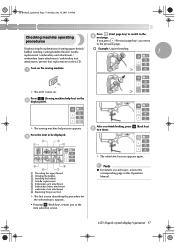
... previous page.
Displays simple explanations of setting upper thread / bobbin winding / setting bobbin thread /...display panel.
X The sewing machine help screen appears.
Press the item to be displayed. c
2
3
1
4
After you finish looking, press e two times.
(Back key)
5 6
8 7
a Threading the upper thread b Winding the bobbin c Installing...Manual.
LCD (liquid crystal display) operation 17
Users Manual - English - Page 24
SE-BrotherE_sgml.book Page 18 Monday, June 30, 2003 3:44 PM
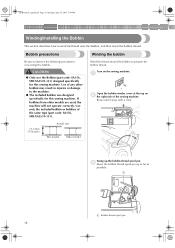
GETTING READY
Winding/Installing the Bobbin
This section describes how to wind the thread onto the bobbin, and then insert the bobbin thread.
Bobbin precautions
Winding the bobbin
Be ...
Users Manual - English - Page 25
... for the spool being used, the thread may catch on the slit in the spool or the needle may break.
●
• Use the special Brother embroidery bobbin thread when embroidering.
Note
z If a spool of thread 12 mm (1/2 inch) in diameter and 75 mm (3 inch) high is inserted onto the bobbin...
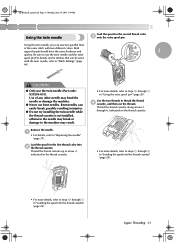
Users Manual - English - Page 27
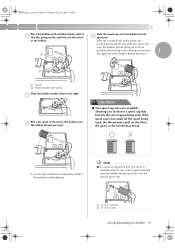
...Install the bobbin wound with thread.
spinning or spins freely.
CAUTION
1
When the bobbin either stops spinning or spins m freely, press (Start/stop button).
X The sewing machine stops, and the "Winding bobbin thread..." display... spool pin, close r the bobbin winder cover, and then slide the
sewing speed controller back to its original position.
Memo
z When the sewing machine is started or the...
Users Manual - English - Page 29
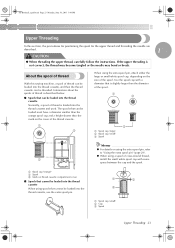
...CAUTION
● When threading the upper thread, carefully follow the instructions. If the upper threading is not correct, the thread may...
With this sewing machine, a spool of thread can be loaded into the thread cassette, and then the thread cassette can be... pin" (page 29).
z When using a spool of cross-wound thread, install the small white spool cap with some space between the cap and the spool....
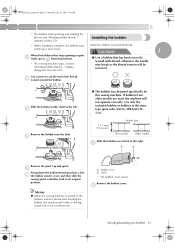
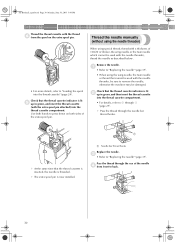
Users Manual - English - Page 33
...the thread cassette.
In this section, the procedures for installing the thread
cassette and threading the needle are described. ...
z If the needle threader cannot be used, refer
to "Thread the needle manually (without
2
using the needle threader)" (page 30).
Check that the thread....
1
a Disc b Cutter X The spool of thread is now loaded in the
thread cassette.
Note
z Be sure the thread is cut ...
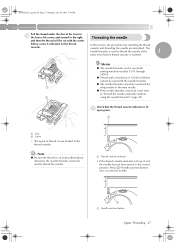
Users Manual - English - Page 34
...not be threaded or the thread was not passed through the needle bar thread hook, refer to "Loading the spool into the thread cassette" (page 24) and perform the procedure again starting from step .... However, when the side cutter is attached, be sure to lower the presser foot lever before installing the thread cassette. For more details, refer to "Sewing overcasting stitches using the side cutter" (...
Users Manual - English - Page 36
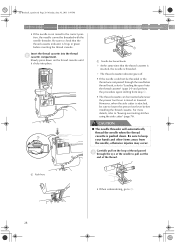
...the spool on the extra spool pin.
Thread the needle manually (without using the needle threader)
• For more details, refer to "Loading the spool into the thread cassette" (page 24).
Check... time that the thread cassette is inserted, the needle is threaded.
X The extra spool pin is now installed.
a Needle bar thread hooks Replace the needle. c • Refer to "Replacing the needle" (page...
Users Manual - English - Page 37
...spool pin.For details on the stitches that can be sewn
with the twin needle, refer to "Stitch Settings" (page
66).
CAUTION
● Only use the twin needle (Part code : X59296-051). Use ... thread cassette is not installed, otherwise the needle may break or damage to the machine may result.
Remove the needle. a
• For details, refer to "Replacing the needle" (page 37).
Load the spool for the ...