Brother International Innov-ís 40 driver and firmware
Drivers and firmware downloads for this Brother International item

Related Brother International Innov-ís 40 Manual Pages
Download the free PDF manual for Brother International Innov-ís 40 and other Brother International manuals at ManualOwl.com
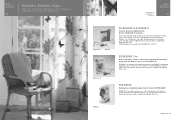
Accessory Catalog - Page 5
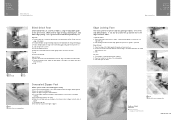
...guide screw, adjust the fabric guide to the edge of the fabric, and lower
the presser foot. 3. Sew.
SA133 ABCDEFJKMN
SA134 GHILOP
SA128 All Brother home-use sewing machines
Concealed Zipper Foot
Allows you to install...at the left side of the center guide. 3. Sew and open the fabric.
SA184 All Brother home-use sewing machines
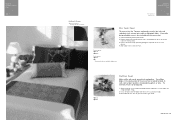
Ring Bearer Pillow & Hankerchief
Innov-is Project Book (See pages 37 ...
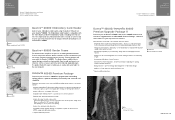
Accessory Catalog - Page 7
...Brother presser feet. Can be used for stitching heavy fabrics together.
1. Attach the seam guide on the needle plate with the thumbscrew of the seam guide. 2. Adjust the distance and place the right edge of the fabric against the seam guide. 3. Sew.
SA538 AB C:Innov... or small pieces of patchworks. Installing the Straight Stitch Needle Plate automatically sets the needle position to the center...
Accessory Catalog - Page 13
....)
Brother Embellishment
Feet
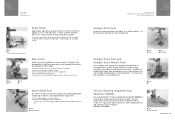
Pin Tuck Foot
24
Ruffler Foot
Pin Tuck Foot
This presser foot has 7 grooves and produces perfect pin tucks and corded pin tucks using a twin needle on lightweight fabric. A specially designed bobbin cover is also included with this presser foot.
1. Install and manually thread a twin needle. 2. Draw a reference line to guide...
Accessory Catalog - Page 16
... own unique embroidery patterns in the easy steps. Comes with USB card writer, 4M blank memory card and software compatible with Windows 2000 or later. SAVR8.0 Upgrade kit is compatible with PE-DESIGN 5.0, 6.0 & 7.0.
PE-DESIGN® Lite
New to embroidery software? Master basic digitizing and embroidery design work with Brother's easy to use PE-DESIGN® Lite.
PE-DESIGN®...
Accessory Catalog - Page 17
... with QuattroTM 6000D
SABF6000D QuattroTM 6000D
SAVR4000D Innov-is 4000D
QuattroTM 6000D Embroider y Card Reader
Connect your embroidery card reader using the built-in USB port on your QuattroTM 6000D. This Embroidery Card Reader is compatible with the entire library of Brother Embroidery Cards, including licensed content. The simple and easy USB attachment takes seconds to connect and ensures...
Users Manual - English - Page 3
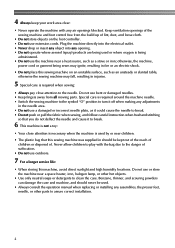
...objects on the foot controller. • Do not...stove or iron; otherwise, the machine,
power cord or garment being sewn may ignite, ... fabric when sewing, and follow careful instruction when freehand stitching
so that you do...Do not use outdoors.
7 For a longer service life:
• When storing this machine, ...manual when replacing or installing any assemblies, the presser feet, needle, or other parts to...
Users Manual - English - Page 7
...On/Off 13
Power supply precautions ...13 Turning on the machine ...14 Turning off the machine ...14
Preparing for Upper and Lower Threading 15
Winding the bobbin ...15 Installing the bobbin ......BASICS 39
Starting to Sew ...39
Sewing procedure ...39 Selecting a stitch ...40 Adjusting the stitch length and width ...40 Positioning the fabric ...41 Starting to sew ...42 Securing the stitching ...44...
Users Manual - English - Page 15
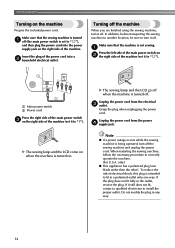
...Press the left side of the main power switch on b the right side of the machine (set it to " ").
a Main power switch b Power cord
Press the right side of the main power switch c on the right side of the machine (set it to "|").
X The sewing lamp ...outlet, reverse the plug. If it still does not fit, contact a qualified electrician to install the proper outlet. Do not modify the plug in any way.
14
Users Manual - English - Page 19

...Installing the bobbin
Install the bobbin wound with thread.
CAUTION
● Use a bobbin that has been correctly wound, otherwise the needle may break or the thread tension will be incorrect.
Turn off the sewing machine (set...model b Other model c 11.5 mm (7/16 inch) (actual size) ● Before installing the bobbin or replacing the needle, be sure to turn off the sewing machine, otherwise ...
Users Manual - English - Page 21
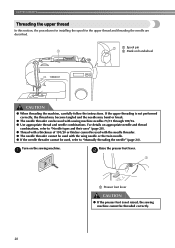
...for installing the spool for the upper thread and threading the needle are described.
b a Spool pin
a
b Mark on handwheel
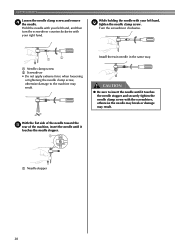
CAUTION
● When threading the machine, carefully follow the instructions. If...wing needle or the twin needle. ● If the needle threader cannot be used, refer to "Manually threading the needle" (page 24).
Turn on the sewing machine.
a
Raise the presser foot lever.
...
Users Manual - English - Page 26
...
"Threading the upper thread" (page 20).
Manually thread the left needle with the c upper thread.
Pass the thread through the eye of the needle from the front to the back.
Install the thread spool and thread the upper e thread.
Memo
● When setting the thread spool, set it so that the thread winds off...
Users Manual - English - Page 29
... occur.
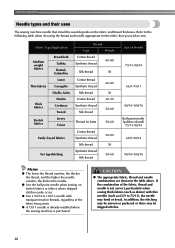
● Use a 90/14 to 100/16 needle with transparent nylon threads, regardless of the fabric being sewn.
● A 75/11 needle is already installed when the sewing machine is purchased.
CAUTION
● The appropriate fabric, thread and needle combinations are shown in the table above. If the combination of...
Users Manual - English - Page 31
....
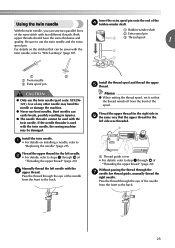
a
b
a Needle clamp screw b Screwdriver • Do not apply extreme force when loosening
or tightening the needle clamp screw, otherwise damage to the machine may result.
Install the twin needle in the same way.
CAUTION
● Be sure to insert the needle until it touches the needle stopper and securely tighten the...
Users Manual - English - Page 32
..., otherwise injuries may occur if the start/stop button is accidentally pressed and the machine starts sewing.
● Make sure that the presser foot is installed in the correct direction, otherwise the needle may strike the presser foot, causing it to break and cause injuries.
a Black button b Presser foot holder
31
Users Manual - English - Page 33

...in the LCD. For details on selecting a stitch, refer to "Selecting a stitch" (page 40).
Slowly lower the presser foot lever so that the f presser foot pin snaps into the notch ...Pin
a
b
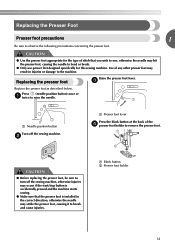
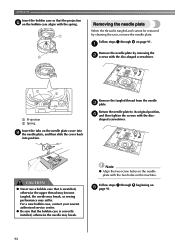
Removing the presser foot holder
Remove the presser foot holder when cleaning the sewing machine or when installing the optional walking foot.
Remove the presser foot. a • For details, refer to "Replacing the ...
Users Manual - English - Page 34
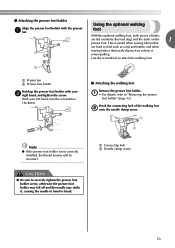
..." (page 32).
Hook the connecting fork of the walking foot b onto the needle clamp screw.
a
b
Note
● If the presser foot holder is not correctly installed, the thread tension will be incorrect.
CAUTION
● Be sure to securely tighten the presser foot holder screw, otherwise the presser foot holder may fall...
Users Manual - English - Page 38

... the four legs until they snap into place.
Pull the flat bed attachment off to the left.
b
When you are finished with free-arm sewing, c install the flat bed attachment back in its
original position.
37
Users Manual - English - Page 39
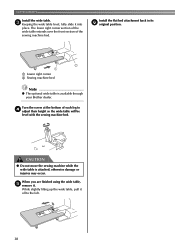
... lower right corner section of the wide table extends over the front section of the sewing machine bed.
Install the flat bed attachment back in its f original position.
2 1 a Lower right corner b Sewing... machine bed
Note
● The optional wide table is available through your Brother dealer.
Turn the screw at the bottom of each leg to d adjust their height so the wide...
Users Manual - English - Page 84
... Width [mm (inch)]
Auto
Manual
Stitch Length [mm (inch)]
Auto
Manual
Reverse/ Reinforcement
Stitching
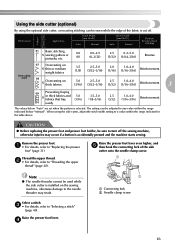
Pattern Presser Foot...set when the pattern is selected. The setting can be adjusted to any value within the range indicated below "Manual". When using the side cutter, adjust the stitch width setting...cannot be used while the side cutter is installed on the sewing machine, otherwise damage to ...
Users Manual - English - Page 93
... may become tangled, the needle may break, or sewing performance may suffer. For a new bobbin case, contact your nearest authorized service center.
● Be sure that the bobbin case is correctly installed, otherwise the needle may break.
Note
● Align the two screw holes on the needle plate with the two holes...