Brother International NX-400Q driver and firmware
Drivers and firmware downloads for this Brother International item
Related Brother International NX-400Q Manual Pages
Download the free PDF manual for Brother International NX-400Q and other Brother International manuals at ManualOwl.com
Users Manual - English - Page 4
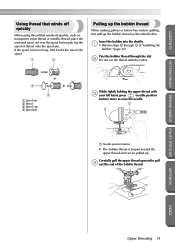
... needle plate is marked with guides for sewing straight seams.
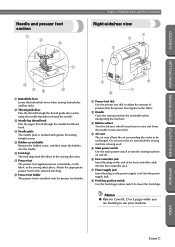
5...foot holder The presser foot is installed onto the presser foot holder.
...power switch Use the main power switch to turn the sewing machine on and off.
6 Foot controller jack Insert the plug on the end of the foot controller cable into the foot controller jack.
7 Power supply jack Insert the plug on the power supply cord into the power...
Users Manual - English - Page 6
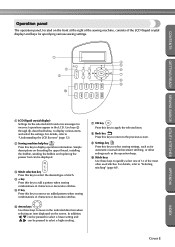
... stitch and error messages for incorrect operations appear in the LCD. Use keys 2 through 9, described below, to display various items and select the settings. For details, refer to "Understanding the LCD Screens" (page 12).
2 Sewing machine help key Press this key to display operation information. Simple descriptions on threading the upper thread, installing the bobbin...
Users Manual - English - Page 8
... the "Important Safety Instructions" (page 6), and then study this manual for the correct operation of the various functions. In addition, after you have finished reading this manual, store it where ...it can quickly be accessed for future reference.
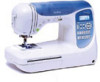
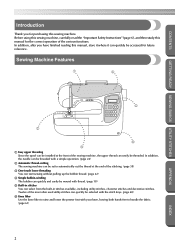
Sewing Machine Features
1
4
5
2
6 3 1 Easy upper threading Since the spool can be installed at the front...
Users Manual - English - Page 9
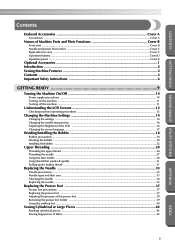
... ...2 Sewing Machine Features ...2 Contents ...3 Important Safety Instructions 6
GETTING READY 9
Turning the Machine On/Off 10
Power supply precautions ...10 Turning on the machine ...11 Turning off the machine ...11
Understanding the LCD Screens 12
Checking machine operating procedures ...13
Changing the Machine Settings 14
Changing the settings ...14 Changing the needle stop position ...16...
Users Manual - English - Page 14
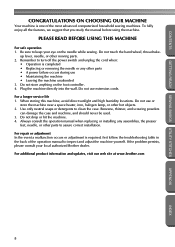
... assure correct installation. For repair or adjustment In the event a malfunction occurs or adjustment is required, first follow the troubleshooting table in the back of the operation manual to inspect and adjust the machine yourself. If the problem persists, please consult your local authorized Brother dealer. For additional product information and updates, visit our...
Users Manual - English - Page 15
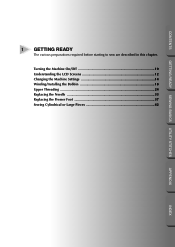
... preparations required before starting to sew are described in this chapter.
Turning the Machine On/Off 10 Understanding the LCD Screens 12 Changing the Machine Settings 14 Winding/Installing the Bobbin 18 Upper Threading ...24 Replacing the Needle 33 Replacing the Presser Foot 37 Sewing Cylindrical or Large Pieces 42
APPENDIX
INDEX
Users Manual - English - Page 17
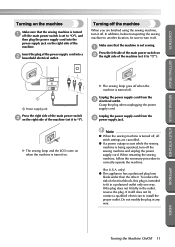
... is turned 1 off (the main power switch is set to "O"), and
then plug the power supply cord into the power supply jack on the right side of the machine.
Insert the plug of the power supply cord into a 2 household electrical...plug. If it still does not fit, contact a qualified electrician to install the proper outlet. Do not modify the plug in any way.
APPENDIX
INDEX
Turning the Machine On/Off 11
Users Manual - English - Page 19
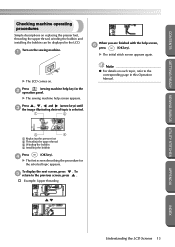
... replacing the presser foot, threading the upper thread, winding the bobbin and installing the bobbin can be displayed in the LCD.
Turn on the sewing machine.
1
When you are ... each topic, refer to the corresponding page in this Operation Manual.
3
4
1 Replacing the presser foot 2 Threading the upper thread 3 Winding the bobbin 4 Installing the bobbin
Press
(OK key).
4
X The first screen...
Users Manual - English - Page 24
GETTING READY SEWING BASICS UTILITY STITCHES
GETTING READY
CONTENTS
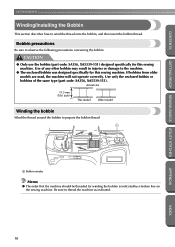
Winding/Installing the Bobbin
This section describes how to wind the thread onto the bobbin, and then insert the bobbin thread.
Bobbin precautions
Be sure to observe ...
Users Manual - English - Page 25
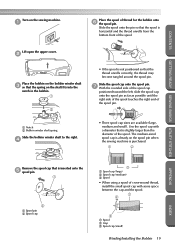
... is inserted onto the 5 spool pin.
1
2
1 Spool pin 2 Spool cap
3 1 Spool cap (large) 2 Spool cap (medium) 3 Spool • When using a spool of cross-wound thread,
install the small spool cap with some space between the cap and the spool.
1 2
3
1 Spool 2 Gap 3 Spool cap (small)
Winding...
Users Manual - English - Page 27

... bobbin stops spinning when it is full.
Press
e
(start/stop button) once.
X The sewing machine stops.
Slide the sewing speed controller back to its i original position.
CAUTION
● Use a bobbin thread that has been correctly wound, otherwise the needle may break or... bobbin, the machine will make a clicking sound; this is not a malfunction.
APPENDIX
INDEX
Winding/Installing the Bobbin 21
Users Manual - English - Page 28
GETTING READY SEWING BASICS UTILITY STITCHES
GETTING READY
CONTENTS
Installing the bobbin
Install the bobbin wound with thread.
CAUTION
● Use a bobbin thread that has...8226; Be sure to insert the bobbin correctly. Lightly hold down the bobbin with your right 5 hand, and then guide the thread as shown with your left hand.
Memo
● The order that the bobbin thread should be passed ...
Users Manual - English - Page 29
... up the bobbin thread before starting to sew, pull up the thread according to the procedure in "Pulling up the bobbin thread" (page 31).
Winding/Installing the Bobbin 23
APPENDIX
INDEX
Users Manual - English - Page 31
... is inserted onto the 5 spool pin.
1
2
1 Spool pin 2 Spool cap
3 1 Spool cap (large) 2 Spool cap (medium) 3 Spool • When using a spool of cross-wound thread,
install the small spool cap with some space between the cap and the spool.
1 2
3
1 Spool 2 Gap 3 Spool cap (small)
Upper Threading 25
APPENDIX
INDEX
Users Manual - English - Page 34
... cap. For details on the stitches that can be sewn with the twin needle, refer to "Stitch Settings" (page 128).
Note
● If the needle is not raised, the needle threader cannot thread the...needle position button to raise the needle before using the needle threader.
● If the twin needle is installed, the needle threader cannot be used. For details, refer to "Using the twin needle" (at the ...
Users Manual - English - Page 37
... before free-motion quilting, first pull up the bobbin thread as described below.
Insert the bobbin into the shuttle. 1 • Refer to steps 1 through 5 of "Installing the
bobbin" (page 22).
Pass the bobbin thread through the slot. 2 Do not cut the thread with the cutter.
3
4
1 Spool net 2 Spool 3 Spool cap 4 Spool...
Users Manual - English - Page 40
... occur.
● Use a 90/14 to 100/16 needle with transparent nylon threads, regardless of the fabric being sewn.
● A 75/11 needle is already installed when the sewing machine is purchased.
CAUTION
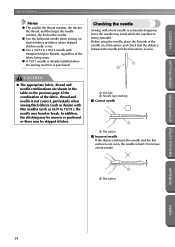
● The appropriate fabric, thread and needle combinations are shown in the table on the previous page. If...
Users Manual - English - Page 41
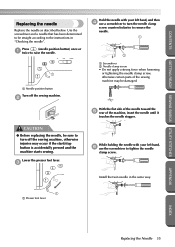
...the needle as described below. Use the screwdriver and a needle that has been determined to be straight according to the instructions in "Checking the needle".
Press
(needle position button) once or
1 twice to raise the needle.
1
1 ...6 use the screwdriver to tighten the needle
clamp screw.
Install the twin needle in the same way.
1
1 Presser foot lever
APPENDIX
INDEX
Replacing the Needle 35
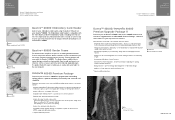
Accessory Catalog - Page 16
... own unique embroidery patterns in the easy steps. Comes with USB card writer, 4M blank memory card and software compatible with Windows 2000 or later. SAVR8.0 Upgrade kit is compatible with PE-DESIGN 5.0, 6.0 & 7.0.
PE-DESIGN® Lite
New to embroidery software? Master basic digitizing and embroidery design work with Brother's easy to use PE-DESIGN® Lite.
PE-DESIGN®...
Accessory Catalog - Page 17
... QuattroTM 6000D
SAVR4000D Innov-is 4000D
QuattroTM 6000D Embroider y Card Reader
Connect your embroidery card reader using the built-in USB port on your QuattroTM 6000D. This Embroidery Card Reader is compatible with the entire library of Brother Embroidery Cards, including licensed content. The simple and easy USB attachment takes seconds to connect and ensures your treasured collection...