Brother International PC-8500D driver and firmware
Drivers and firmware downloads for this Brother International item

Related Brother International PC-8500D Manual Pages
Download the free PDF manual for Brother International PC-8500D and other Brother International manuals at ManualOwl.com
Accessory Catalog - Page 5
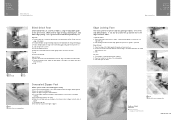
...guide screw, adjust the fabric guide to the edge of the fabric, and lower
the presser foot. 3. Sew.
SA133 ABCDEFJKMN
SA134 GHILOP
SA128 All Brother home-use sewing machines
Concealed Zipper Foot
Allows you to install.... 2. Place the fold at the left side of the center guide. 3. Sew and open the fabric.
SA184 All Brother home-use sewing machines
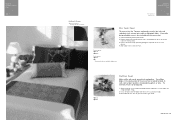
Ring Bearer Pillow & Hankerchief
Innov-is Project...
Accessory Catalog - Page 7
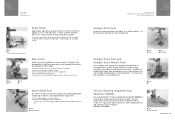
... be used with all Brother presser feet. Can be used for stitching heavy fabrics together.
1. Attach the seam guide on the needle plate with the thumbscrew of the seam guide. 2. Adjust the distance...stitching especially on thin fabrics or small pieces of patchworks. Installing the Straight Stitch Needle Plate automatically sets the needle position to the center straight stitching position on selected...
Accessory Catalog - Page 13
....)
Brother Embellishment
Feet
Pin Tuck Foot
24
Ruffler Foot
Pin Tuck Foot
This presser foot has 7 grooves and produces perfect pin tucks and corded pin tucks using a twin needle on lightweight fabric. A specially designed bobbin cover is also included with this presser foot.
1. Install and manually thread a twin needle. 2. Draw a reference line to guide...
Accessory Catalog - Page 16
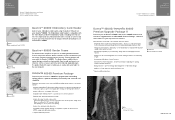
... own unique embroidery patterns in the easy steps. Comes with USB card writer, 4M blank memory card and software compatible with Windows 2000 or later. SAVR8.0 Upgrade kit is compatible with PE-DESIGN 5.0, 6.0 & 7.0.
PE-DESIGN® Lite
New to embroidery software? Master basic digitizing and embroidery design work with Brother's easy to use PE-DESIGN® Lite.
PE-DESIGN®...
Accessory Catalog - Page 17
... QuattroTM 6000D
SAVR4000D Innov-is 4000D
QuattroTM 6000D Embroider y Card Reader
Connect your embroidery card reader using the built-in USB port on your QuattroTM 6000D. This Embroidery Card Reader is compatible with the entire library of Brother Embroidery Cards, including licensed content. The simple and easy USB attachment takes seconds to connect and ensures your treasured collection...
Users Manual - English - Page 4

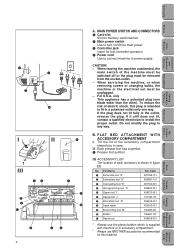
... presser feet,
needle, or other parts to assure correct installation.
For repair or adjustment
In the event a malfunction occurs or adjustment is required, first follow the troubleshooting table in the back of the operation manual to inspect and adjust the machine yourself. If the problem persists, please consult your nearest authorized Brother service center.
1
Users Manual - English - Page 5

...SETTING 16 Winding the bobbin and setting the bobbin thread 16 Setting the bobbin 18 UPPER THREADING 19 Thread according to number and arrow marks on machine 19 Auto-threading device 20 Using the extra spool pin and the net ______21 START/STOP 22 "START/STOP" button 22 Foot controller...Patterns (Memory
Card)
Patterns (Programmed in Machine)
Sewing Chart
Trouble shooting
Error Maintenance...
Users Manual - English - Page 9
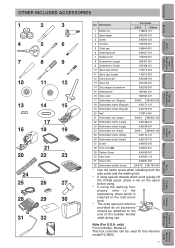
... Button fitting foot "M"
130489-001
0 Bobbin
136492-101
A Needle set
X58358-001
* Always use the plastic bobbin which is supplied with machine or in accessory compartment.
* Always use BROTHER accessories recommended for this machine.
Patterns (Memory
Card)
Patterns (Programmed in Machine)
Sewing Chart
Trouble shooting
Error Maintenance Messages
My Custom Stitch TM
Retrieving
Editing...
Users Manual - English - Page 10
...set (Regular)
SA422 ...instruction book.
* The extra spool pin which is provided as an accessory should be attached to the end of the bobbin winder shaft during use.
Note (For U.S.A. only) Foot controller: Model J2 This foot controller can be used for this machine model PC-8500.
7
Error Maintenance Messages
Trouble shooting
Sewing Chart
Patterns (Programmed in Machine)
Patterns (Memory
Card...
Users Manual - English - Page 24
... Custom Stitch TM
Error Maintenance Messages
Trouble shooting
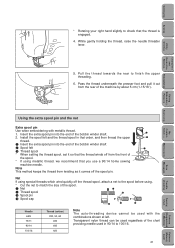
Using the ...Install the spool felt and the thread spool in that order, and then thread the upper
2
thread.
1 Insert the extra spool pin into the end of the bobbin winder shaft
2 Spool felt
1
3 Thread spool
* When setting the thread spool, set...30 #30 #20
Note The auto-threading device cannot be used with the combinations shown at...
Users Manual - English - Page 34
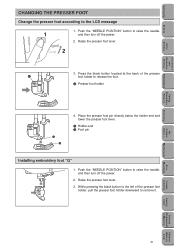
... the needle,
and then turn off the power.
2. Raise the presser foot lever.
3. While pressing the black button to the left of the presser foot holder, pull the presser foot holder downward to remove it.
Retrieving
My Custom Stitch TM
Error Maintenance Messages
Trouble shooting
Sewing Chart
Patterns (Programmed in Machine)
Patterns (Memory
Card)
31
Users Manual - English - Page 35
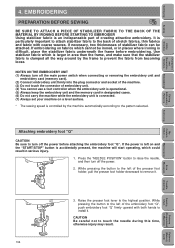
... the highest position. While
pressing the black button to the left of embroidery foot "Q",
pull embroidery foot "Q" downward to remove it.
My Custom Stitch TM
Error Maintenance Messages
Trouble shooting
Sewing Chart
Patterns (Programmed in Machine)
Patterns (Memory
Card)
32
Users Manual - English - Page 36
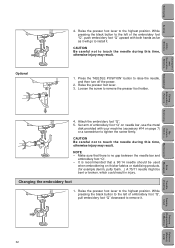
...disk provided with your machine (accessory #14 on page 7) or a screwdriver to tighten the screw firmly.
CAUTION Be careful not to touch the needle during this time, otherwise injury may result.
NOTE - If the presser foot is not installed... drop automatically.
My Custom Stitch TM
Error Maintenance Messages
Trouble shooting
Sewing Chart
Patterns (Programmed in Machine)
Patterns (Memory
Card)
33
Users Manual - English - Page 50
...Stitch TM
Error Maintenance Messages
Trouble shooting
*
1
**
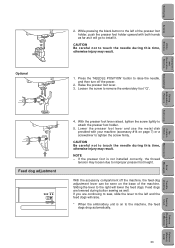
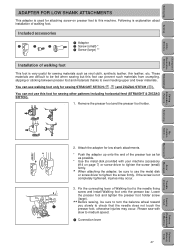
2. Attach the adapter for low shank attachments.
* Push the adapter up onto the end of the presser bar as far as possible.
* Use the metal disk provided with your machine (accessory #14 on page 7) or screw driver to tighten... to medium speed.
1 Connection lever
47
Sewing Chart
Patterns (Programmed in Machine)
Patterns (Memory
Card)
Users Manual - English - Page 109
... the embroidery unit is operational. (5) Always keep the embroidery unit and the memory card in designated cases. (6) Do not carry the machine while the embroidery unit is connected. (7) Always set your machine on a level surface.
* The sewing speed is controlled by the machine automatically according to the pattern selected.
Attaching embroidery foot "Q"
CAUTION Be...