Brother International PE-170D driver and firmware
Drivers and firmware downloads for this Brother International item
Related Brother International PE-170D Manual Pages
Download the free PDF manual for Brother International PE-170D and other Brother International manuals at ManualOwl.com
Users Manual - English - Page 4

...OUR COMPUTER EMBROIDERY... main power switch when inserting and removing the embroidery card. Do
not touch the embroidery card inserted in the card slot while your machine turns on.
For a longer service life
... Always consult the operation manual or use the "BASIC OPERATION" key when replacing or installing
any assemblies; needle, or other parts to assure correct installation.
For repair or adjustment
...
Users Manual - English - Page 5

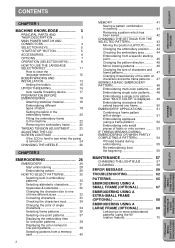
... frame patterns 35 Selecting one-point patterns 37 Displaying the embroidery time for one-point patterns 39 Displaying the color names for one-point patterns 39 Selecting patterns from a memory card 40
2
MEMORY 41 Saving a pattern combination in memory 41 Retrieving a pattern which has been saved 42
CHANGING THE SETTINGS FOR THE SELECTED PATTERN 43
Moving the...
Users Manual - English - Page 7
...ERROR MESSAGE
TROUBLESHOOTING
PATTERNS
EMBROIDERING USING A SMALL
FRAME (OPTIONAL)
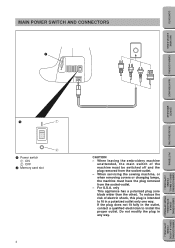
1
1 Power switch 1 ON 2 OFF
2 Memory card slot
4
CAUTION - When leaving the embroidery machine
unattended, the main switch of the machine must be switched off and the plug removed from the socket-outlet. - When servicing... contact a qualified electrician to install the proper outlet. Do not modify the plug in...
Users Manual - English - Page 16
...
MACHINE KNOWLEDGE
EMBROIDERING MAINTENANCE
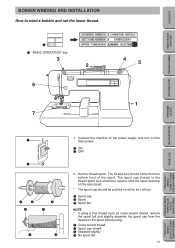
BOBBIN WINDING AND INSTALLATION
How to wind a bobbin and set the lower thread.
1 1 "BASIC OPERATION" key
3 2
6
7
4
5
1
ERROR MESSAGE
TROUBLESHOOTING
PATTERNS
EMBROIDERING USING A SMALL
FRAME (OPTIONAL)
1 2
1
2
3
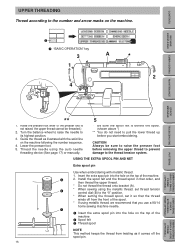
1. Connect the machine to the power supply and turn on the main power.
1 ON 2 OFF
2. Set the thread spool. The thread end should...
Users Manual - English - Page 19

... the top of the machine. 2. Install the spool felt and the thread spool in that order, and
then thread the upper thread. * Do not thread the thread onto bracket (A). * When sewing using the metallic thread, set thread tension
control dial (B) to the "0" position. * When setting the thread spool, set it so that the thread
winds...
Users Manual - English - Page 51
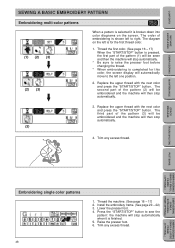
...embroidering is completed for this color, the screen display will automatically move to the left one position.
... will then stop automatically.
(3)
4. Trim any excess thread.
ERROR MESSAGE
TROUBLESHOOTING
PATTERNS
EMBROIDERING USING A SMALL
FRAME (OPTIONAL)
EMBROIDERING USING...patterns
1. Thread the machine. (See page 16 - 17) 2. Install the embroidery frame. (See page 20 - 22) 3. Lower the ...
Users Manual - English - Page 66
CONTENTS
MACHINE KNOWLEDGE
EMBROIDERING MAINTENANCE
ERROR MESSAGE
TROUBLESHOOTING
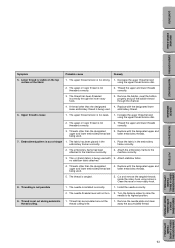
Symptom
Probable cause
Remedy
5. Lower thread is visible on ... hook using scissors. Clean the race or inner rotary hook.
8. Threading is not possible
1. The needle is installed incorrectly.
1. Install the needle correctly.
2. The needle threader lever will not turn. 2. Turn the balance wheel to raise the ...
Users Manual - English - Page 70

CONTENTS
MACHINE KNOWLEDGE
EMBROIDERING MAINTENANCE
ERROR MESSAGE
TROUBLESHOOTING
EMBROIDERING USING A SMALL FRAME (OPTIONAL)
Embroidering ...sure that the initial setting operation for the carriage (embroidery arm) after the power is turned on - in other words, the movement of the carriage (embroidery arm) in order to set the position - is completed before installing the small embroidery frame...
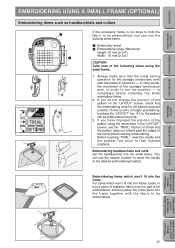
Users Manual - English - Page 71

CONTENTS
MACHINE KNOWLEDGE
EMBROIDERING MAINTENANCE
ERROR MESSAGE
TROUBLESHOOTING
EMBROIDERING USING A EXTRA-SMALL FRAME (OPTIONAL)
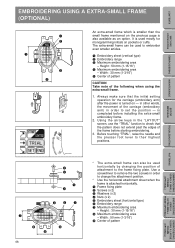
An ... sure that the initial setting operation for the carriage (embroidery arm) after the power is turned on - in other words, the movement of the carriage (embroidery arm) in order to set the position - is completed before installing the extra-small embroidery ...
Owner's Manual (Español) - Spanish - Page 4

...OUR COMPUTER EMBROIDERY... main power switch when inserting and removing the embroidery card. Do
not touch the embroidery card inserted in the card slot while your machine turns on.
For a longer service life
... Always consult the operation manual or use the "BASIC OPERATION" key when replacing or installing
any assemblies; needle, or other parts to assure correct installation.
For repair or adjustment
...
Owner's Manual (Español) - Spanish - Page 5
... frame patterns 35 Selecting one-point patterns 37 Displaying the embroidery time for one-point patterns 39 Displaying the color names for one-point patterns 39 Selecting patterns from a memory card 40
2
MEMORY 41 Saving a pattern combination in memory 41 Retrieving a pattern which has been saved 42
CHANGING THE SETTINGS FOR THE SELECTED PATTERN 43
Moving the...
Owner's Manual (Español) - Spanish - Page 7

...ERROR MESSAGE
TROUBLESHOOTING
PATTERNS
EMBROIDERING USING A SMALL
FRAME (OPTIONAL)
1
1 Power switch 1 ON 2 OFF
2 Memory card slot
4
CAUTION - When leaving the embroidery machine
unattended, the main switch of the machine must be switched off and the plug removed from the socket-outlet. - When servicing... contact a qualified electrician to install the proper outlet. Do not modify the plug in...
Owner's Manual (Español) - Spanish - Page 16

...
MACHINE KNOWLEDGE
EMBROIDERING MAINTENANCE
BOBBIN WINDING AND INSTALLATION
How to wind a bobbin and set the lower thread.
1 1 "BASIC OPERATION" key
3 2
6
7
4
5
1
ERROR MESSAGE
TROUBLESHOOTING
PATTERNS
EMBROIDERING USING A SMALL
FRAME (OPTIONAL)
1 2
1
2
3
1. Connect the machine to the power supply and turn on the main power.
1 ON 2 OFF
2. Set the thread spool. The thread end should...
Owner's Manual (Español) - Spanish - Page 19
... the top of the machine. 2. Install the spool felt and the thread spool in that order, and
then thread the upper thread. * Do not thread the thread onto bracket (A). * When sewing using the metallic thread, set thread tension
control dial (B) to the "0" position. * When setting the thread spool, set it so that the thread
winds...
Owner's Manual (Español) - Spanish - Page 51

...embroidering is completed for this color, the screen display will automatically move to the left one position.
... will then stop automatically.
(3)
4. Trim any excess thread.
ERROR MESSAGE
TROUBLESHOOTING
PATTERNS
EMBROIDERING USING A SMALL
FRAME (OPTIONAL)
EMBROIDERING USING...patterns
1. Thread the machine. (See page 16 - 17) 2. Install the embroidery frame. (See page 20 - 22) 3. Lower the ...
Owner's Manual (Español) - Spanish - Page 66

CONTENTS
MACHINE KNOWLEDGE
EMBROIDERING MAINTENANCE
ERROR MESSAGE
TROUBLESHOOTING
Symptom
Probable cause
Remedy
5. Lower thread is visible on ... hook using scissors. Clean the race or inner rotary hook.
8. Threading is not possible
1. The needle is installed incorrectly.
1. Install the needle correctly.
2. The needle threader lever will not turn. 2. Turn the balance wheel to raise the ...
Owner's Manual (Español) - Spanish - Page 70
CONTENTS
MACHINE KNOWLEDGE
EMBROIDERING MAINTENANCE
ERROR MESSAGE
TROUBLESHOOTING
EMBROIDERING USING A SMALL FRAME (OPTIONAL)
Embroidering ...sure that the initial setting operation for the carriage (embroidery arm) after the power is turned on - in other words, the movement of the carriage (embroidery arm) in order to set the position - is completed before installing the small embroidery frame...
Owner's Manual (Español) - Spanish - Page 71
CONTENTS
MACHINE KNOWLEDGE
EMBROIDERING MAINTENANCE
ERROR MESSAGE
TROUBLESHOOTING
EMBROIDERING USING A EXTRA-SMALL FRAME (OPTIONAL)
An ... sure that the initial setting operation for the carriage (embroidery arm) after the power is turned on - in other words, the movement of the carriage (embroidery arm) in order to set the position - is completed before installing the extra-small embroidery ...