Brother International PE-700II driver and firmware
Drivers and firmware downloads for this Brother International item

Related Brother International PE-700II Manual Pages
Download the free PDF manual for Brother International PE-700II and other Brother International manuals at ManualOwl.com
Accessory Catalog - Page 5
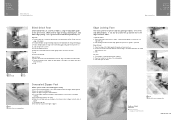

...guide screw, adjust the fabric guide to the edge of the fabric, and lower
the presser foot. 3. Sew.
SA133 ABCDEFJKMN
SA134 GHILOP
SA128 All Brother home-use sewing machines
Concealed Zipper Foot
Allows you to install.... 2. Place the fold at the left side of the center guide. 3. Sew and open the fabric.
SA184 All Brother home-use sewing machines
Ring Bearer Pillow & Hankerchief
Innov-is Project...
Accessory Catalog - Page 7
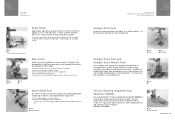

... be used with all Brother presser feet. Can be used for stitching heavy fabrics together.
1. Attach the seam guide on the needle plate with the thumbscrew of the seam guide. 2. Adjust the distance...stitching especially on thin fabrics or small pieces of patchworks. Installing the Straight Stitch Needle Plate automatically sets the needle position to the center straight stitching position on selected...
Accessory Catalog - Page 13

....)
Brother Embellishment
Feet
Pin Tuck Foot
24
Ruffler Foot
Pin Tuck Foot
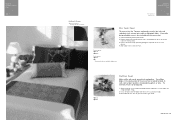
This presser foot has 7 grooves and produces perfect pin tucks and corded pin tucks using a twin needle on lightweight fabric. A specially designed bobbin cover is also included with this presser foot.
1. Install and manually thread a twin needle. 2. Draw a reference line to guide...
Accessory Catalog - Page 16


... embroidery patterns in the easy steps. Comes with USB card writer, 4M blank memory card and software compatible with Windows 2000 or later. SAVR8.0 Upgrade kit is compatible with PE-DESIGN 5.0, 6.0 & 7.0.
PE-DESIGN® Lite
New to embroidery software? Master basic digitizing and embroidery design work with Brother's easy to use PE-DESIGN® Lite.
PE-DESIGN® Lite is designed for the...
Accessory Catalog - Page 17
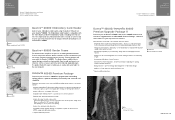

... QuattroTM 6000D
SAVR4000D Innov-is 4000D
QuattroTM 6000D Embroider y Card Reader
Connect your embroidery card reader using the built-in USB port on your QuattroTM 6000D. This Embroidery Card Reader is compatible with the entire library of Brother Embroidery Cards, including licensed content. The simple and easy USB attachment takes seconds to connect and ensures your treasured collection...
Users Manual - English - Page 3

... outdoors.
7 For a longer service life:
• When storing ...manual when replacing or installing any assemblies, the presser feet, needle, or other parts to assure correct installation...manual.
Save these instructions.
The contents of this manual and specifications of this product are subject to change without notice.
For additional product information and updates, visit our web site at www.brother...
Users Manual - English - Page 4
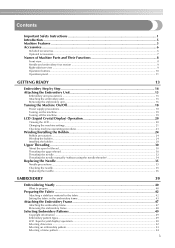

... embroidery unit ...16
Turning the Machine On/Off 18
Power supply precautions ...18
Turning on the machine ...19 Turning off the machine ...19
LCD (Liquid Crystal Display) Operation 20
Viewing the LCD...20
Changing the machine settings...21
Checking machine operating procedures ...23
Winding/Installing the Bobbin 24
Bobbin precautions ...24 Winding the bobbin...
Users Manual - English - Page 9
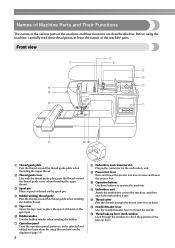

...guide plate Pass the thread around the thread guide plate when threading the upper thread.
b Thread guide cover Like with the thread guide plate, pass the thread around the thread guide...be selected and edited, and operations for using the machine can be displayed (page 11).
8
h Embroidery unit connector slot Plug in the ...window Look through the window to check the position of the take-up lever.
Users Manual - English - Page 14
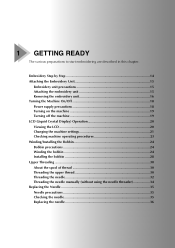

... embroidery unit 16 Turning the Machine On/Off 18 Power supply precautions 18 Turning on the machine 19 Turning off the machine 19 LCD (Liquid Crystal Display) Operation 20 Viewing the LCD 20 Changing the machine settings 21 Checking machine operating procedures 23 Winding/Installing the Bobbin 24 Bobbin precautions 24 Winding the bobbin...
Users Manual - English - Page 15
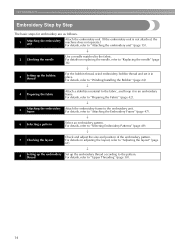

.... For details on replacing the needle, refer to "Replacing the needle" (page 36).
↓
3
Setting up the bobbin thread
For the bobbin thread, wind embroidery bobbin thread and set it in place. For details, refer to "Winding/Installing the Bobbin" (page 24).
↓
4 Preparing the fabric
Attach a stabilizer material to the fabric, and...
Users Manual - English - Page 20
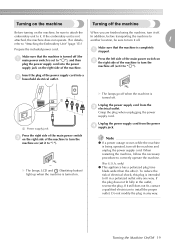

...machine is turned off (the a main power switch is set to " "), and then
plug the power supply cord into the power supply jack on the right side of the machine.
Press the left side of the main power switch on b the right side of... reverse the plug. If it still does not fit, contact a qualified electrician to install the proper outlet. Do not modify the plug in any way.
Turning the Machine On/Off 19
Users Manual - English - Page 24
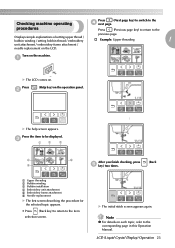

... operating
Press
(Next page key) to switch to the
d next page.
procedures
Press
(Previous page key) to return to the
previous page.
Displays simple explanations of setting upper thread / bobbin winding / setting bobbin thread / embroidery
† Example: Upper threading
1
unit attachment / embroidery frame attachment /
needle replacement on the LCD.
Turn on the machine...
Users Manual - English - Page 25

GETTING READY
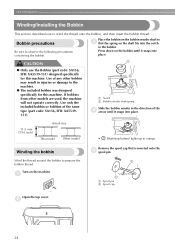
Winding/Installing the Bobbin
This section describes how to wind the thread onto the bobbin, and then insert the bobbin thread.
Bobbin precautions
Be sure to observe ...
Users Manual - English - Page 26
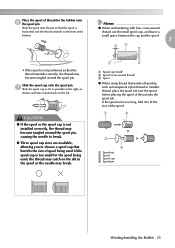

...to the right, as shown, with the rounded side on the left.
CAUTION
● If the spool or the spool cap is not installed correctly, the thread may become tangled around the spool pin, causing the needle to break.
● Three spool cap sizes are available, ... is too long, fold it to fit the size of the spool.
1
2
3
4
a Spool net b Spool c Spool cap d Spool pin
Winding/Installing the Bobbin 25
Users Manual - English - Page 28
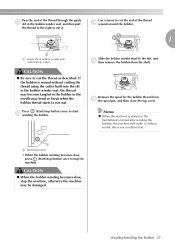

...the thread to the right to cut it.
Use scissors to cut the end of the thread n wound around the bobbin.
1
1
a Guide slit in bobbin winder seat (with built-in cutter)
CAUTION
● Be sure to cut the thread as described. If the bobbin is wound... machine.
CAUTION
● When the bobbin winding becomes slow, stop the machine, otherwise the machine may be damaged.
Winding/Installing the Bobbin 27
Users Manual - English - Page 29
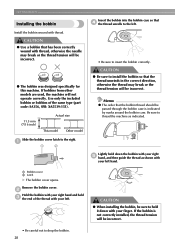

...model
Other model
• Be sure to insert the bobbin correctly.
CAUTION
● Be sure to install the bobbin so that the thread unwinds in the correct direction, otherwise the thread may break or the... latch to the right.
a
1
2
Lightly hold down the bobbin with your right e hand, and then guide the thread as shown with
your left hand.
a Bobbin cover b Latch
X The bobbin cover opens.
Remove...
Users Manual - English - Page 30
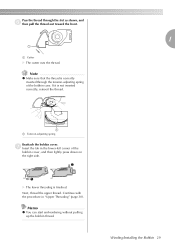

..., thread the upper thread. Continue with the procedure in "Upper Threading" (page 30).
Memo
z You can start embroidering without pulling up the bobbin thread.
Winding/Installing the Bobbin 29
Users Manual - English - Page 33
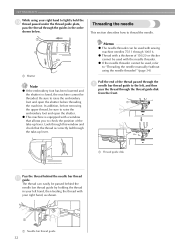

...z This machine is equipped with a window that allows you to check the position of the take-up lever. Look through this window and check that the thread is correctly ...manually (without using the needle threader)" (page 34).
Pull the end of the thread passed through the a needle bar thread guide to the left, and then
pass the thread through the thread guide disk from the front.
1
a Thread guide disk...
Quick Setup Guide USB - English - Page 4
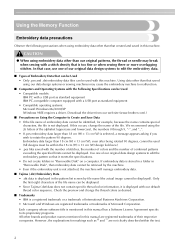

... be Used • Compatible models: IBM PC with a USB port as standard equipment IBM PC-compatible computer equipped with a USB port as standard equipment • Compatible operating systems: Microsoft Windows Me/2000/XP (Windows 98SE requires a driver. Download the driver from our web site (www.brother.com).)
■ Precautions on Using the Computer to Create and Save Data • If the file...
Quick Setup Guide USB - English - Page 7

....
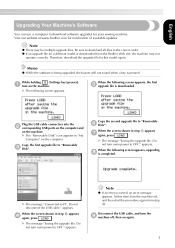
When the following screen appears, the first e upgrade file is downloaded.
Plug the USB cable connectors into the b corresponding USB ports on the computer and
on the machine. X The "Removable Disk" icon appears in "My
Computer" on the computer.
Copy the first upgrade file to "Removable c Disk".
Copy the second upgrade file to "Removable f Disk".
When the screen shown in step e appears...
