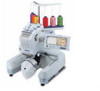
Brother International PR-600 driver and firmware
Drivers and firmware downloads for this Brother International item
Related Brother International PR-600 Manual Pages
Download the free PDF manual for Brother International PR-600 and other Brother International manuals at ManualOwl.com
Users Manual - English - Page 4

... to assure correct installation. For repair or adjustment In the event a malfunction occurs or adjustment is required, first follow the troubleshooting table at the back of this Operation Manual to inspect and adjust the machine yourself. If the problem persists, consult your local authorized Brother dealer. For additional product information and updates, visit our...
Users Manual - English - Page 129

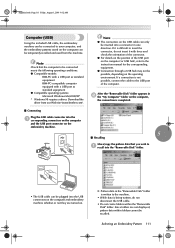
...conditions. ● Compatible models:
IBM-PC with a USB port as standard equipment IBM-PC-compatible computer equipped with a USB port as standard equipment ● Compatible operating systems: Microsoft Windows Me/2000/XP * Windows 98 requires a driver. Download the driver from our Web site (www.brother.com).
Note
● The connectors on the USB cable can only be inserted into a connector in...
Users Manual - English - Page 134

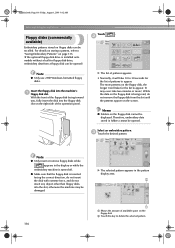
... the optional floppy disk drive is installed onto models without a built-in floppy disk drive, embroidery data from a floppy disk can be opened.)
Note
● Only use 2HD Windows-formatted floppy disks.
Insert the floppy disk into the machine's 1 floppy disk slot.
With the front of the floppy disk facing toward you, fully insert the disk into the floppy disk slot on the...
Users Manual - English - Page 153

...
1 displayed, touch
in the embroidering
settings screen.
X The screen shown below appears.
Touch the button for the media where you 3 wish to save the pattern.
To save the pattern in the machine's memory,
press
.
To save the pattern on a CompactFlash card,
touch
.
To save the pattern on a floppy disk, touch . (If the optional floppy disk drive is
installed...
Users Manual - English - Page 158
... and for receiving maintenance for the machine. 6 VERSION
Shows the version of the software installed on this embroidery machine
Note
● Version 1.0 is the version of the software installed on this machine. Check with your local authorized Brother dealer or at www.brother.com for details on available updates.
7 CHANGING THE THREAD COLOR DISPLAY The color information in the thread color...
Users Manual - English - Page 188
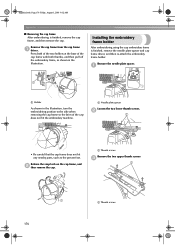
... view a video of the operation on the LCD (see page 151).
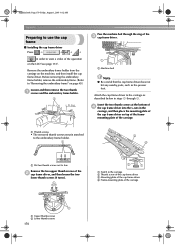
Remove the embroidery frame holder from the carriage on the machine, and then install the cap frame driver. Before removing the embroidery frame holder, remove the embroidery frame. (Refer to "Removing the embroidery frame" on page 45.)
Loosen and then remove...
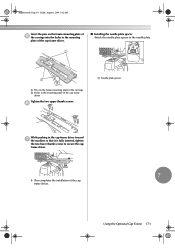
Users Manual - English - Page 189

... 1, 2003 9:12 AM
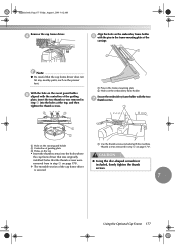
Insert the pins on the frame-mounting plate of 5 the carriage into the holes in the mounting
plate of the cap frame driver.
■ Installing the needle plate spacer Attach the needle plate spacer to the needle plate.
1 1
2
1 Pins on the frame-mounting plate of the carriage 2 Holes in...
Users Manual - English - Page 193

... then snap the frame into place.
2
1
1 Holder
7
3
1 Guiding Plate on cap frame driver 2 Notch on cap frame 3 Holder X The cap frame is secured with the two
holders one on the right and one on the left. This completes the installation of the cap frame, and the cap is ready to be embroidered.
Using...
Users Manual - English - Page 194
...cap frame, and then remove the cap.
Remove the cap frame from the cap frame 1 driver.
Press both of the two holders at the base of the cap frame with both thumbs, ... frame, as shown in the illustration.
Installing the embroidery frame holder
After embroidering using the cap embroidery frame is finished, remove the needle plate spacer and cap frame driver, and then re-attach the embroidery frame...
Users Manual - English - Page 195
... frame holder with the two 7 thumb screws.
1
2
1 Hole on the sweat guard holder 2 Centerline of guiding plate 3 Holes on the top • Insert the thumb screws into the holes where
the cap frame driver that was originally installed (holes that the thumb screws were removed from in step 2 on page 170). X The movable...
Users Manual - English - Page 208
... the machine does not operate correctly, check for the following points/issues before requesting service. If the suggested remedy does not correct the problem, contact your authorized dealer.
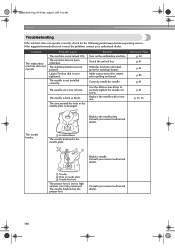
.... Make sure tension disc rotates when pulling on thread.
Correctly install the needle.
Use the Allen screw driver to securely tighten the needle set screw. Replace the needle with a new one.
Reference Page ...
Users Manual - English - Page 210
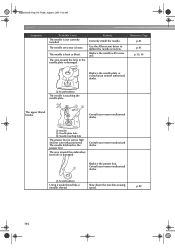
...around the hole in the needle plate is damaged.
1
Remedy
Correctly install the needle.
Use the Allen screw driver to tighten the needle set screw. Replace the needle with a new one.
Reference Page p.61...authorized dealer.
3
1 Needle 2 Needle plate hole 3 Needle touching hole
The presser foot is set too high and not correctly positioned. The needle hits/touches the presser foot.
The area around ...
Users Manual - English - Page 218
... Appendix
Patterns cannot be deleted from the CompactFlash card.
The CompactFlash card may be damaged.
During data transfer, the USB cable was disconnected. Do not disconnect the USB cable while data is being transferred. (Refer to page 111.)
Patterns stored in the machine's memory cannot be
recalled. The machine's memory may be
damaged. Consult your nearest authorized dealer...
Users Manual - English - Page 4
... to assure correct installation. For repair or adjustment In the event a malfunction occurs or adjustment is required, first follow the troubleshooting table at the back of this Operation Manual to inspect and adjust the machine yourself. If the problem persists, consult your local authorized Brother dealer. For additional product information and updates, visit our...
Users Manual - English - Page 129
...conditions. ● Compatible models:
IBM-PC with a USB port as standard equipment IBM-PC-compatible computer equipped with a USB port as standard equipment ● Compatible operating systems: Microsoft Windows Me/2000/XP * Windows 98 requires a driver. Download the driver from our Web site (www.brother.com).
Note
● The connectors on the USB cable can only be inserted into a connector in...
Users Manual - English - Page 134
... the optional floppy disk drive is installed onto models without a built-in floppy disk drive, embroidery data from a floppy disk can be opened.)
Note
● Only use 2HD Windows-formatted floppy disks.
Insert the floppy disk into the machine's 1 floppy disk slot.
With the front of the floppy disk facing toward you, fully insert the disk into the floppy disk slot on the...
Users Manual - English - Page 153

...
1 displayed, touch
in the embroidering
settings screen.
X The screen shown below appears.
Touch the button for the media where you 3 wish to save the pattern.
To save the pattern in the machine's memory,
press
.
To save the pattern on a CompactFlash card,
touch
.
To save the pattern on a floppy disk, touch . (If the optional floppy disk drive is
installed...
Users Manual - English - Page 158

... and for receiving maintenance for the machine. 6 VERSION
Shows the version of the software installed on this embroidery machine
Note
● Version 1.0 is the version of the software installed on this machine. Check with your local authorized Brother dealer or at www.brother.com for details on available updates.
7 CHANGING THE THREAD COLOR DISPLAY The color information in the thread color...
Users Manual - English - Page 188

... view a video of the operation on the LCD (see page 151).
Remove the embroidery frame holder from the carriage on the machine, and then install the cap frame driver. Before removing the embroidery frame holder, remove the embroidery frame. (Refer to "Removing the embroidery frame" on page 45.)
Loosen and then remove...
Users Manual - English - Page 189
... 1, 2003 9:12 AM
Insert the pins on the frame-mounting plate of 5 the carriage into the holes in the mounting
plate of the cap frame driver.
■ Installing the needle plate spacer Attach the needle plate spacer to the needle plate.
1 1
2
1 Pins on the frame-mounting plate of the carriage 2 Holes in...