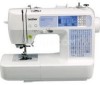
Brother International SE 350 - Compact Sewing & Embroidery Combo Machine driver and firmware
Drivers and firmware downloads for this Brother International item
Related Brother International SE 350 Manual Pages
Download the free PDF manual for Brother International SE 350 and other Brother International manuals at ManualOwl.com
Users Manual - English - Page 4
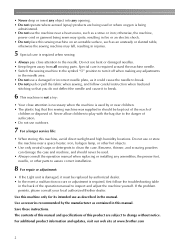
... your local authorized Brother dealer.
Use this machine only for its intended use as described in the manual.
Use accessories recommended by the manufacturer as contained in this manual.
Save these instructions.
The contents of this manual and specifications of this product are subject to change without notice.
For additional product information and updates, visit our web...
Users Manual - English - Page 6
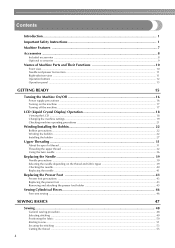
... ...12 Operation panel ...13
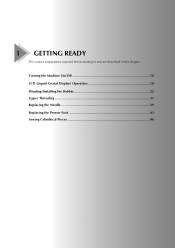
GETTING READY
15
Turning the Machine On/Off 16
Power supply precautions ...16 Turning on the machine ...17 Turning off the machine ...17
LCD (Liquid Crystal Display) Operation 18
Viewing the LCD ...18 Changing the machine settings ...19 Checking machine operating procedures ...21
Winding/Installing the Bobbin 22
Bobbin precautions ...22 Winding the bobbin ...22...
Users Manual - English - Page 13
... needle to sew one stitch.
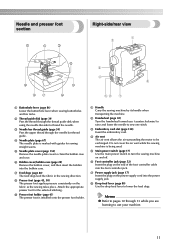
c Embroidery card slot (page 138) Insert the embroidery card.
d Air vent The air vent allows the air surrounding the motor to be exchanged. Do not cover the air vent while the sewing machine is being used.
e Main power switch (page 17) Use the main power switch to turn the sewing machine on and off.
f Foot controller jack...
Users Manual - English - Page 17
1 GETTING READY
The various preparations required before starting to sew are described in this chapter.
Turning the Machine On/Off 16 LCD (Liquid Crystal Display) Operation 18 Winding/Installing the Bobbin 22 Upper Threading ...31 Replacing the Needle 39 Replacing the Presser Foot 43 Sewing Cylindrical Pieces 46
Users Manual - English - Page 19
... machine
Turning off the machine
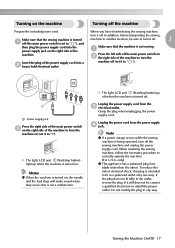
Prepare the included power cord.
When you have finished using the sewing machine,
turn it off. In addition, before transporting the sewing
Make sure that the sewing machine is turned
machine to another location, be sure to turn it off.
1
a off (the main power switch is set to " "), and
then plug the power supply cord into the power...
Users Manual - English - Page 22
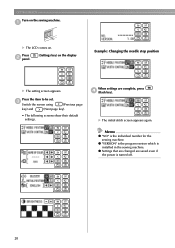
...) and
(Next page key).
• The following screens show their default settings.
When settings are complete, press d (Back key).
X The initial stitch screen appears again.
Memo
z "NO" is the individual number for the
sewing machine. z "VERSION" is the program version which is
installed in the sewing machine. z Settings that are changed are saved even if
the power is turned off.
20
Users Manual - English - Page 23
...1
selection screen.
bobbin winding / setting bobbin thread / needle replacement / embroidery unit attachment /
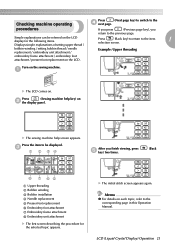
Example: Upper threading
embroidery frame attachment / embroidery foot attachment / presser foot replacement on the LCD.
Turn on the sewing machine.
a
X The LCD comes on.
Press
(Sewing machine help key) on
b the display panel.
X The sewing machine help screen appears.
Press the...
Users Manual - English - Page 24
GETTING READY
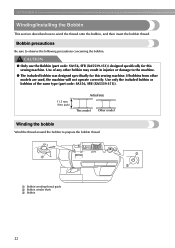
Winding/Installing the Bobbin
This section describes how to wind the thread onto the bobbin, and then insert the bobbin thread.
Bobbin precautions
Be sure to observe the following precautions concerning the bobbin.
CAUTION
● Only use the Bobbin (part code: SA156, SFB (XA5539-151)) designed specifically for this sewing machine. Use...
Users Manual - English - Page 25

Turn on the sewing machine.
a
Place the spool of thread for the bobbin...bobbin winder in the direction of the c arrow until it snaps into place.
Memo
z For embroidering, use the embroidery bobbin thread.
Note
z If the spool is not positioned so that the thread unwinds correctly, the thread may ...on the slit in the spool or the machine may be damaged.
●
Winding/Installing the Bobbin 23
Users Manual - English - Page 27
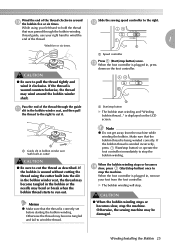
... stops or becomes n slow, press (Start/stop button) once to
stop the machine. When the foot controller is plugged in, remove your foot from the foot controller.
X The bobbin winding will stop.
CAUTION
● When the bobbin winding stops or becomes slow, stop the machine. Otherwise, the sewing machine may be damaged.
Winding/Installing the Bobbin 25
Users Manual - English - Page 29
...right hand as shown below.
● The included bobbin was designed specifically for this sewing machine. If bobbins from other models are used, the machine will not operate correctly. Use only the included bobbin or bobbins of the same ....
e
Note
z Make sure that the thread passes under the pretension disk of the bobbin-winding thread guide correctly (page 24).
Winding/Installing the Bobbin 27
Users Manual - English - Page 31
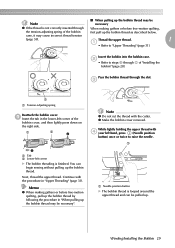
...page 31).
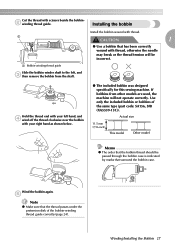
Insert the bobbin into the bobbin case.
b
• Refer to steps c through f of "Installing the bobbin" (page 28).
Pass the bobbin thread through the slot.
c
a a Tension-adjusting spring
Reattach ...b
2
1
a Tab b Lower-left corner
X The bobbin threading is finished. You can begin sewing without pulling up the bobbin thread.
Next, thread the upper thread. Continue with the procedure in ...
Users Manual - English - Page 38
... of thread toward the rear of the machine.
Install the twin needle. a • For details on installing a needle, refer to
"Replacing the needle" (page 41).
Thread the upper thread for the left needle b eye.
For details, refer to steps a through k of "Threading the upper thread" (page 32).
Manually thread the left needle with the...
Users Manual - English - Page 39
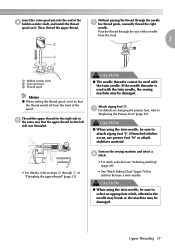
...install the thread
spool on it. Then, thread the upper thread.
Without passing the thread through the needle f bar thread guide, manually thread the right
needle. Pass the thread through the eye of the needle from the front.
1
a Bobbin winder shaft b Extra spool pin c Thread spool
Memo
z When setting the thread spool, set... with the twin needle, the sewing machine may be damaged.
Attach zigzag ...
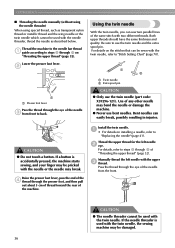
Users Manual - English - Page 42
...higher the needle number, the thicker the needle.
z A 75/11 needle is already installed when the sewing machine is purchased.
■ Ball point needle (gold colored) To avoid skipped stitches use ... or thread.
■ Embroidery needles Use a 75/11 home sewing machine needle. When embroidering on thick fabrics such as denim, use a 90/14 or 100/16 home sewing machine needle.
CAUTION
z The ...
Users Manual - English - Page 44
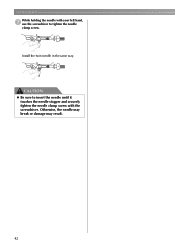
GETTING READY While holding the needle with your left hand,
g use the screwdriver to tighten the needle clamp screw.
Install the twin needle in the same way.
CAUTION
z Be sure to insert the needle until it touches the needle stopper and securely tighten the needle clamp screw with the screwdriver. Otherwise, the needle may break or damage may result.
42
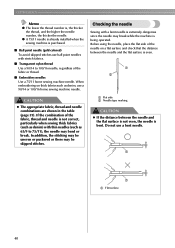
Users Manual - English - Page 45
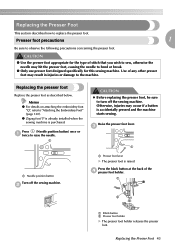
... the presser foot
Replace the presser foot as described below.
Memo
z For details on attaching the embroidery foot "Q", refer to "Attaching the Embroidery Foot" (page 120).
z Zigzag foot "J" is already installed when the sewing machine is purchased.
Press (Needle position button) once or a twice to raise the needle.
a
CAUTION
z Before replacing the presser foot, be...
Users Manual - English - Page 46
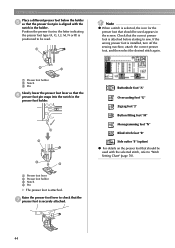
...should be used appears in the screen. Check that the correct presser foot is attached before starting to sew. If the wrong presser foot is installed, turn off the sewing machine, attach the correct presser foot, and then select the desired stitch again.
b
c
a Presser ...) z For details on the presser foot that should be used with the selected stitch, refer to "Stitch Setting Chart" (page 70).
44
Users Manual - English - Page 47
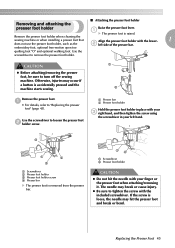
... is raised.
Remove the presser foot holder when cleaning the sewing machine or when installing a presser foot that
Align the presser foot holder with the...embroidery foot, optional free-motion open toe
quilting foot "O" and optional walking foot. Use the
screwdriver to remove the presser foot holder.
CAUTION
z Before attaching/removing the presser foot, be sure to turn off the sewing machine...
Users Manual - English - Page 48
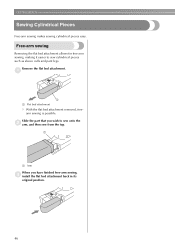
... legs.
Remove the flat bed attachment.
a
a a Flat bed attachment
X With the flat bed attachment removed, freearm sewing is possible.
Slide the part that you wish to sew onto the b arm, and then sew from the top.
a
a Arm
When you have finished free-arm sewing, c install the flat bed attachment back in its
original position.
46